User Interface
1. Starting the program
Open an xterm window and type hydractio to start the program (or hydrasim to start the simulator). This start up shell script will search your home directory for file .fiborg to set the environment before running. For example to start the program you would type.
% hydractio
No & sign is required.
2. Command Line Interface Tool
Hydra CTIO presents a terminal window to type commands and send them to the instrument. This command line interface to the Hydra-CTIO instrument gives complete control over the instrument and its functionality. Following is the list with the available commands and a short description of what they do and their arguments.
coldstart - Initialize the motors, find the home positions for the X, Y, and Z axes and resets the encoder to correspond to the center of the focal plate.
home axis - This procedure homes the specified axis and reset the zero point. Available axes are xy, x, w, y, z and gripper. Be aware that homing x, y or w individually *doesn't ensures orthogonality*. Also remember that if x and w are not electrically geared then the gantry can run out of the orthogonal limits.
minit axis - This procedure initialize the specified axis. Available axis are xy, x, y, w, z, gripper. Although you can call x, y or w individually there's only one embedded galil function for initializing the x/y gantry system. This means that no matter you specified x, y or w you will also initialize the other two axes too.
brakes option - Turn the stage brakes on or off. Multiple ways for giving the same order are allowed. To lock the brakes use lock/on/1 as argument. To unlock the brakes use unlock/off/0.
gox x ?vel? ?accel? ?sys? - Move the gripper to the specified position in x leaving the y position the same. Used defaults for the one's that are not supplied in the command line.
goy y ?vel? ?accel? ?sys? - Move the gripper to the specified position in y leaving the x position the same. Used defaults for the one's that are not supplied in the command line.
goxy x y ?vel? ?accel? ?sys? - Move the gripper to the specified position. Used defaults for the one's that aren't supplied in the command line.
gotag tagid - This procedure move the x/y gantry system to the location recorded in the specified tag.
goz z - Move the Z axis to the specified position. Use defaults for missing arguments. The units for position are encoder steps.
gripin - Power up and bring in the gripper.
gripout - This procedure moves the gripper to its stow position. If running under real mode then check for button presence and warn if a button is in the gripper.
tag id ?x? ?y? - This procedure tag the specified location for future reference. It receives as arguments a tag id and an optional coordinate. If only the id is specified by the user, then the current gripper location is taged. The coordinates are x,y sky coordinates.
view name/number ?type? - This procedure let the user view the specified button/object/slit by moving the x/y gantry system to that position. If no type is specified then it will be assumed that the number correspond to a fiber number. Valid names are characters identifying FOPS. Valid type specifiers are "o" for object, "f" for fiber, "s" for slit and "P" for FOPS.
gopen - Open the gripper to its normal open position.
relax - Open the gripper to its relaxed position.
gclose - Close the gripper.
openwide - Open the gripper to its wide open position.
griptest - Test the gripper functionality and return a report.
abump amount direction - Nudge the gripper by the specified amount of arcseconds in the specified cardinal direction. Valid directions are "w", "e", "n" and "s".
bump amount direction - Nudge the gripper by the specified amount of steps in the specified cardinal direction. Valid directions are "w", "e", "n" and "s".
offset dx dy ?vel? ?accel? - Incrementally offset from the current position. Substitute default values for missing arguments.
dropit - Put down a button (if there is one...) at the current location. If the fiber in trouble structure is not empty, calculate and record new information for that fiber.
mark button - This procedure let the user view a button an mark it as the button to be remembered when later you decide to correct the button.
move button x y ?deadzone? - Move a button to the specified location. If the difference beetwen the current location of the button and its target position is smaller than the specified deadzone then the button is assumed to be at the target position.
park button - Move a button to its parked position.
thisis - Handle failures to grab and drop buttons and it helps to identify unknown buttons in the gripper.
ThisIs button - Bring the specified button to the current gripper location. This routine is used to tweak button positions to corrected coordinates interactively.
unstow button - Move the button specified in the argument from its stow position to its park position. If the specified button happens to be the current button in troubles then its trouble condition is cleared.
aload filename - Load a star field. It first looks for it in the directories in environment variables FIBFIELDS and STDFIELDS. If this variables are not defined attempt loading the file using filename as a complete path/filename name.
assign userid button - Attempt to assign the specified object to a button. If the assignment is valid then the button is moved to the object position. The userid corresponds to the id given by the user to each one of the objects of the star field.
configure filename - This procedure configure the star field in file filename.
config1 id x y - This function is much like procedure "configure" except that it takes as an argument a fiber and a coordinate which it passes on to the transition program. This procedure always leave unused fibers alone.
preview first last time - This procedure view the set of objects whoes internal id are beetwen the "first" and "last" specified values. It waits for "time" seconds to get to the next object.
save filename - This procedure save the currently loaded field including tweaks, unassignments, etc been made.
setup field - This command step the astronomet through the field configuration process in order to simplify the instrumental configuration. For a complete description read The Setup Field Command.
configmode boolean - This procedure turns the configuration flag on or off. correct Bring the "current" button to the current gripper location. The current button is the last one that was moved or viewed. In some cases, there may not be a current button. This routine is used to tweak button positions to corrected coordinates interactively.
concenmode boolean - Turn the button concentricity correction on/off.
flexmode boolean - Turn the gravitational flexure mapping on or off.
thermmode boolean - Turn the thermal expansion correction on or off.
scalemode boolean - Turn the stage characteristic curve mapping on or off.
lit ?arg arg ...? - This procedure sends its argument list directly to the controller and return just the controller first answer.
ping - This procedure performs a simple test to check communcation towards the Galil Box. It sends a TP command and shows the response. This is the procedure suggested by the vendor to test communications. With good communications you would expect to get a bunch of numbers indicating the current motor positions.
dangle declination - Set the global variable that holds the declination angle. This value is used in flexure calculations.
hangle hourangle - Set the global variable that holds the hour angle. This value is used in flexure calculations.
setcable cable - Set the current cable to the specified cable.
thermval val - Set the instrument temperature to the specified value.
hist - This procedure will open an xterm terminal to show the current session log file.
listdump mode - This procedure when called with argument mode set to "i" dump the iraf file for the currently loaded field and eventually tell the gwc world that it just made it. If called with argument mode set to "c" then dump the currently loaded field to disk and open an xterm running the view program displaying the file contents.
listtag tagid - This procedure will print the coordinates in the tag entry for the specified tag id.
status - Print a summary of the system status. This summary include the current exposure information and the correction flags that are currently working.
where - Return a the encoder positions and corrections.
whereis name/number ?type? - This procedure returns the location of the specified fiber, object, slit or FOPS. The first argument for this procedure can be either an alpha character or an integer. If an alpha character (A, B, C ...) the argument is supposed to be a FOP. If an integer the argument is supposed to be a fiber. A second optional argument can be added to specify what is this integer identifying. Type "f" for fiber, "o" for object and "s" for slit.
purge - Close, compress, and re-open the position archive.
restore - Restore the internal database of button locations from the disk file.
xparked button - This procedure force the software to update a button location to be the parked position.
xstowed button - This procedure force the software to update a buttons location to be the stowed position. If the specified button happens to be the current button in troubles then its trouble condition is cleared.
zdb option - This procedure will zero the database to either stowed or parked position. Set argument position to "parked" to zero to park position and "stowed" to zero to stowed position.
listTI - List the Galil Box Input assignments
listTS - Show the current status of Galil Box switches.
inputchart - Display a window showing the Galil Box inputs.
swchart - Display a window showing the Galil Box switches.
execfile - Source the specified script.
complamp off|tha|etalon|pen|qua|hene - Turn the complams system on/off.
led option ?arg? - This command let the user turn the bank of LEDs on/off and set the current intensity for the light of the LEDs. To turn the LEDs on set argument option to "on". To turn the LEDs off set argument option to "off". To set the current intensity set argument option to "illum" and specify the desired intensity with a number from 1 to 3.
help - Dump the current list of commands and a short description.
plate boolean - Flat/warp the focal plate.
quit - This command exits the application cleanly saving all what has to be saved and leaving the system in a known state.
3. Field Display Tool
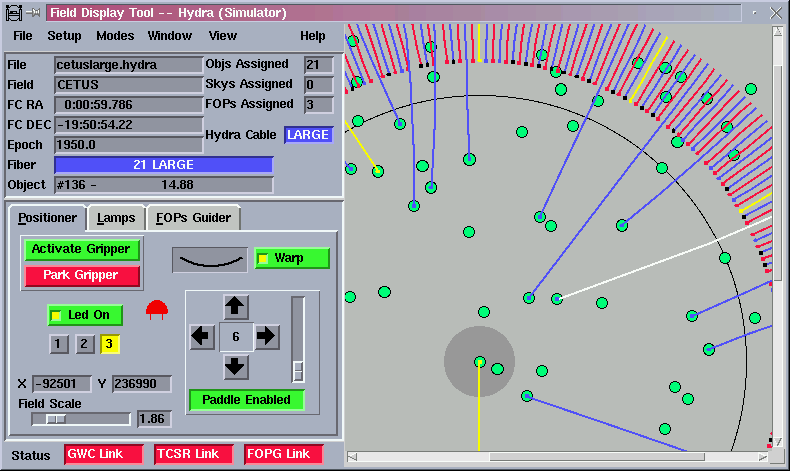
The field display tool window is the main point of interaction between the user and the instrument. The Field Display Tool allow the user to do from basic things, like commanding the X-Y stages to move, to more high level stuff like configuring a star field using assignment files. It also provide an interface to other systems like the FOPS guider and the comparison lamps.
The field display tool include a menu bar, a field info panel, positioner, comparison lamps and FOPS guider control pages, a status bar and a field display.
3.1 Menu Bar
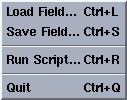
The menu bar has six options: File, Setup, Modes, Windows, View and Help
3.1.1 File Menu
3.1.1.1 Load Field
Use the Load Field option to load a star field file. The Hydra-CTIO simulator includes three files of this type that can be used as examples to create your own files. When loaded the objects in the file will be presented in the field display area as springgreen circles, the FOPS as blueviolet circles and the sky positions as lightskyblue squares. Click on the circles and squares to present the name and current assignment of the objects. The related CLI command is aload.
3.1.1.2 Save Field
Use the Save Field option to save a star field and you current fiber assignments. Fibers not assigned to objects will be saved as random sky positions. The associated CLI command is save.
3.1.1.3 Run Script
Use the Run Script option to run command scripts. The associated CLI command is execfile.
3.1.1.4 Quit
Use the Quit option to exit the application. Before actually exiting the application will prompt the user to decide if he really wants to exit the application. It will also prompt to decide if the X-Y stages have to be left at their transport position (remove from telescope). The user must answer yes to this question only if Hydra is about to be removed from telescope. Finally the user will be prompted to answer yes or no to turn the drives off. We recomend turning the drives off only if you are planning to finish the observing night.
3.1.2 Setup Menu
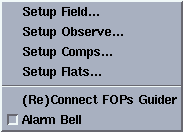
In order to simplify the instrumental configuration, we have created user commands which step the astronomer through the configuration process.
3.1.2.1 Setup Field...
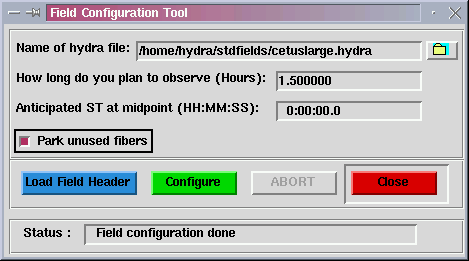
Use this option to configure a star field using a assignment files. When selected a dialog box as the one showed below will come up.
Enter the name of the configuration file you are planning to use in the text entry labeled "Name of hydra file". You can use a complete path or just the name. In this last case the Configuration Tool will search for the requested file at the fields directory. You can also browse to find the configuration file by pressing the button with a folder on it. A file open dialog box will came up and let you select your configuration file.
Press the button labeled "Load Field" to load the configuration file. If the file is not designed for the currently selected fiber cable, a warning message will be given and you will have the opportunity to switch to the cable that your field is designed for. NOTE: This only changes a software flag of cable type. You must still verify that the Bench Spectrograph has the appropriate cable installed. (The cable installed on the Bench Spectrograph should be displayed in the HYDRA-GRAPHICS display.)
Here you will be given the opportunity to modify how long you plan to observe the field in this configuration and what the anticipated midpoint sidereal time will be. Both of these values will be used to fine tune the atmospheric refraction component of the astrometry. If you are rerunning a setup due to a button problem, make sure that you answer these questions in an identical manner as before or the positioner may end up tweaking each and every fiber instead of picking up where it had left off.
You have the option to either park all unused fibers or leave unused fibers where they are as long as they don't interfere with fiber placement by clicking on the check box labeled "Park unused fibers". Leaving them where they are allows such fibers to be flagged as random sky positions and also decreases the configuration overhead since the positioner doesn't have to spend time moving them.
The program will then check certain aspects of the instrument status (plate flat, comps off, rotator at zero degrees), compute the new astrometry, and proceed to move the fibers.
When all fibers have been positioned, the .iraf file will be generated and fiber information will be passed to the CCD for inclusion in the data headers.
NOTE: The instrument is not yet ready to take the observations. You MUST execute the setup observe command.
You can always abort the configuration precedure by pressing the abort button or by typing ^C at the command line. The associated CLI command is setup field.
3.1.2.2 Setup Observe...
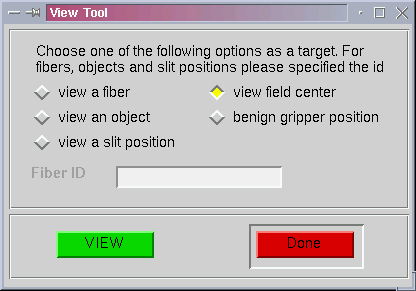
Use this option to prepare the instrument to start observing. First the gripper LEDs will be turned off, the X-Y stages will move to the field center and the user will be prompt to see if he wants to view any fibers. Answering yes will pop up a window to view the desired fibers by fiber name, by slit position or by assigned object.
Next either you finish viewing fiber or you answer no to view any fibers, the gripper will be parked. Then you are ready to begin observing. The associated CLI command is setup observe.
3.1.2.3 Setup Comps...
Use this option to prepare the instrument to start taking comparison lamps exposures. The gripper LEDs will be turned off and the X-Y stages will be parked. The associated CLI command is setup comps.
3.1.2.4 Setup Flats...
Use this option to prepare the instrument to start taking flats. The gripper LEDs will be turned off, the comparison lamps sources will be turned off and the X-Y stages will be parked. The associated CLI command is setup flats.
3.1.2.5 (re) Connect FOPs Guider
Use this option to open a connection to the FOPS guider. Not very useful since the automatic recovery procedure was implemented.
3.1.2.6 Alarm Bell
Use this option to turn the audible alarm tone on or off.
3.1.3 Mode Menu
Use this menu to turn on/off the different types of corrections applied by the model to the x-y coordinates. The thermal expansion correction corrects for thermal expansion in the linear encoders according to vendor specifications. The concentricity correction corrects for the small offset between the center of the button and the fiber. The stage/screw distorsion correction compensate for small distorsion in the stages. The gravitational flexure corrections correct for gravitational effects over the stages.
3.1.4 Window Menu
Use this option to open an xterm window showing the current log file and to open an xterm window showing the currently loaded assignment file.
3.1.5 View Menu
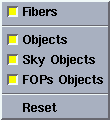
Use this option to show/hide objects, fops, fibers and sky positions at the field display. The Reset option show all the object types in the field.
3.1.6 Help Menu
Use this option to open an xterm window with the available CLI commands.
3.2 Field Info Panel
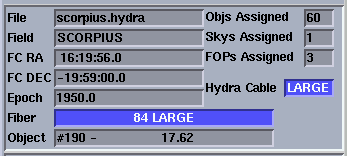
The status panel consists of a set of labels that show information about the currently loaded star field. The information include header information plus assignment statistics and fiber object cross references.
When the user click over an object or a fiber in the field, the Fiber and/or the Obect entry shows the id of the object and its assigned fiber/object.
3.3 Positioner, Lamps and Guider Tabs
3.3.1 Positioner Tab
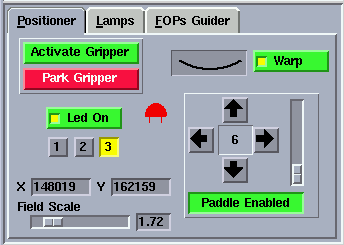
The positioner tab present a graphic interface to some common user commands to the instrument. Two buttons allow the user to park and activate the gripper. When parked the gripper is moved out of the field and the motor drives are turned off.
Another button allow the user to warp the plate. An animation let the user wait untill the plate is flat or warped before moving fibers.
Another button control the gripper LEDs state and their intensity. There are three available intensities ranging from low to high.
A paddle let the user cruise around using different step sizes. To use the paddle the user must press the button that says "Paddle Disabled". The button will turn green an its text will change to "Paddle Enabled". The arrows keys will change their disable condition to active. Click in the arrows to move the stages. The size of the step in microns can be changed by moving the scale at the right side of the paddle.
The positioner tab also include the x-y coordinates of the cursor while over the field display area and the field display scale control.
3.3.2 Lamps Tab
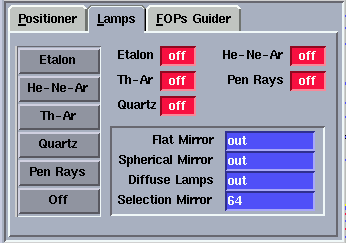
The lamps tab allow the user to turn the comparison lamps system on/off and to select the comparison lamps sources.
When no motion is sensed, the status labels are blue and white. When a mechanism is active or moving the status labels blink and the background color goes yellow to reflect the new status. If no status information is available or an error condition is sensed the status labels blink and the background goes red.
3.3.3 Guider Tab
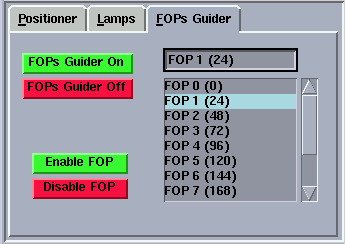
The guider bab allow the user to remotely turn the FOPS guider on/off an to enable/disable specific FOPS for guiding.
3.4 Status Bar
The status bar present the communication links status. The Hydra-CTIO GUI communicates with the FOPS guider through a socket connection and with the TCS through the GWC router. When the communication is working the status labels are green. When the communication links is broken the status labels go red.
Last Modified: May 9, 2000
rcantarutti
Updated on April 12, 2024, 5:19 am

