NEWFIRM Manual
NEWFIRM Observing Guide
Here we describe the NEWFIRM observing GUI and discuss other information relevant for observing. This document is structured so that it follows the course of an observing night, starting with opening the NEWFIRM observing GUI, taking daytime calibrations, start of the night procedures, observing, and shutting down the NEWFIRM observing GUI at the end of the night. The individual sections first show step by step instructions of the procedures with accompanying screen captures and relevant sections of the GUI highlighted. Where deemed necessary, additional information is provided.
Startup:
NEWFIRM Observing GUI
- Open VNC viewers [NEWFIRM Obs and NEWFIRM IRAF and NEWFIRM NICC (optional)]
- The NEWFIRM support scientist of Telescope Operations support staff will help
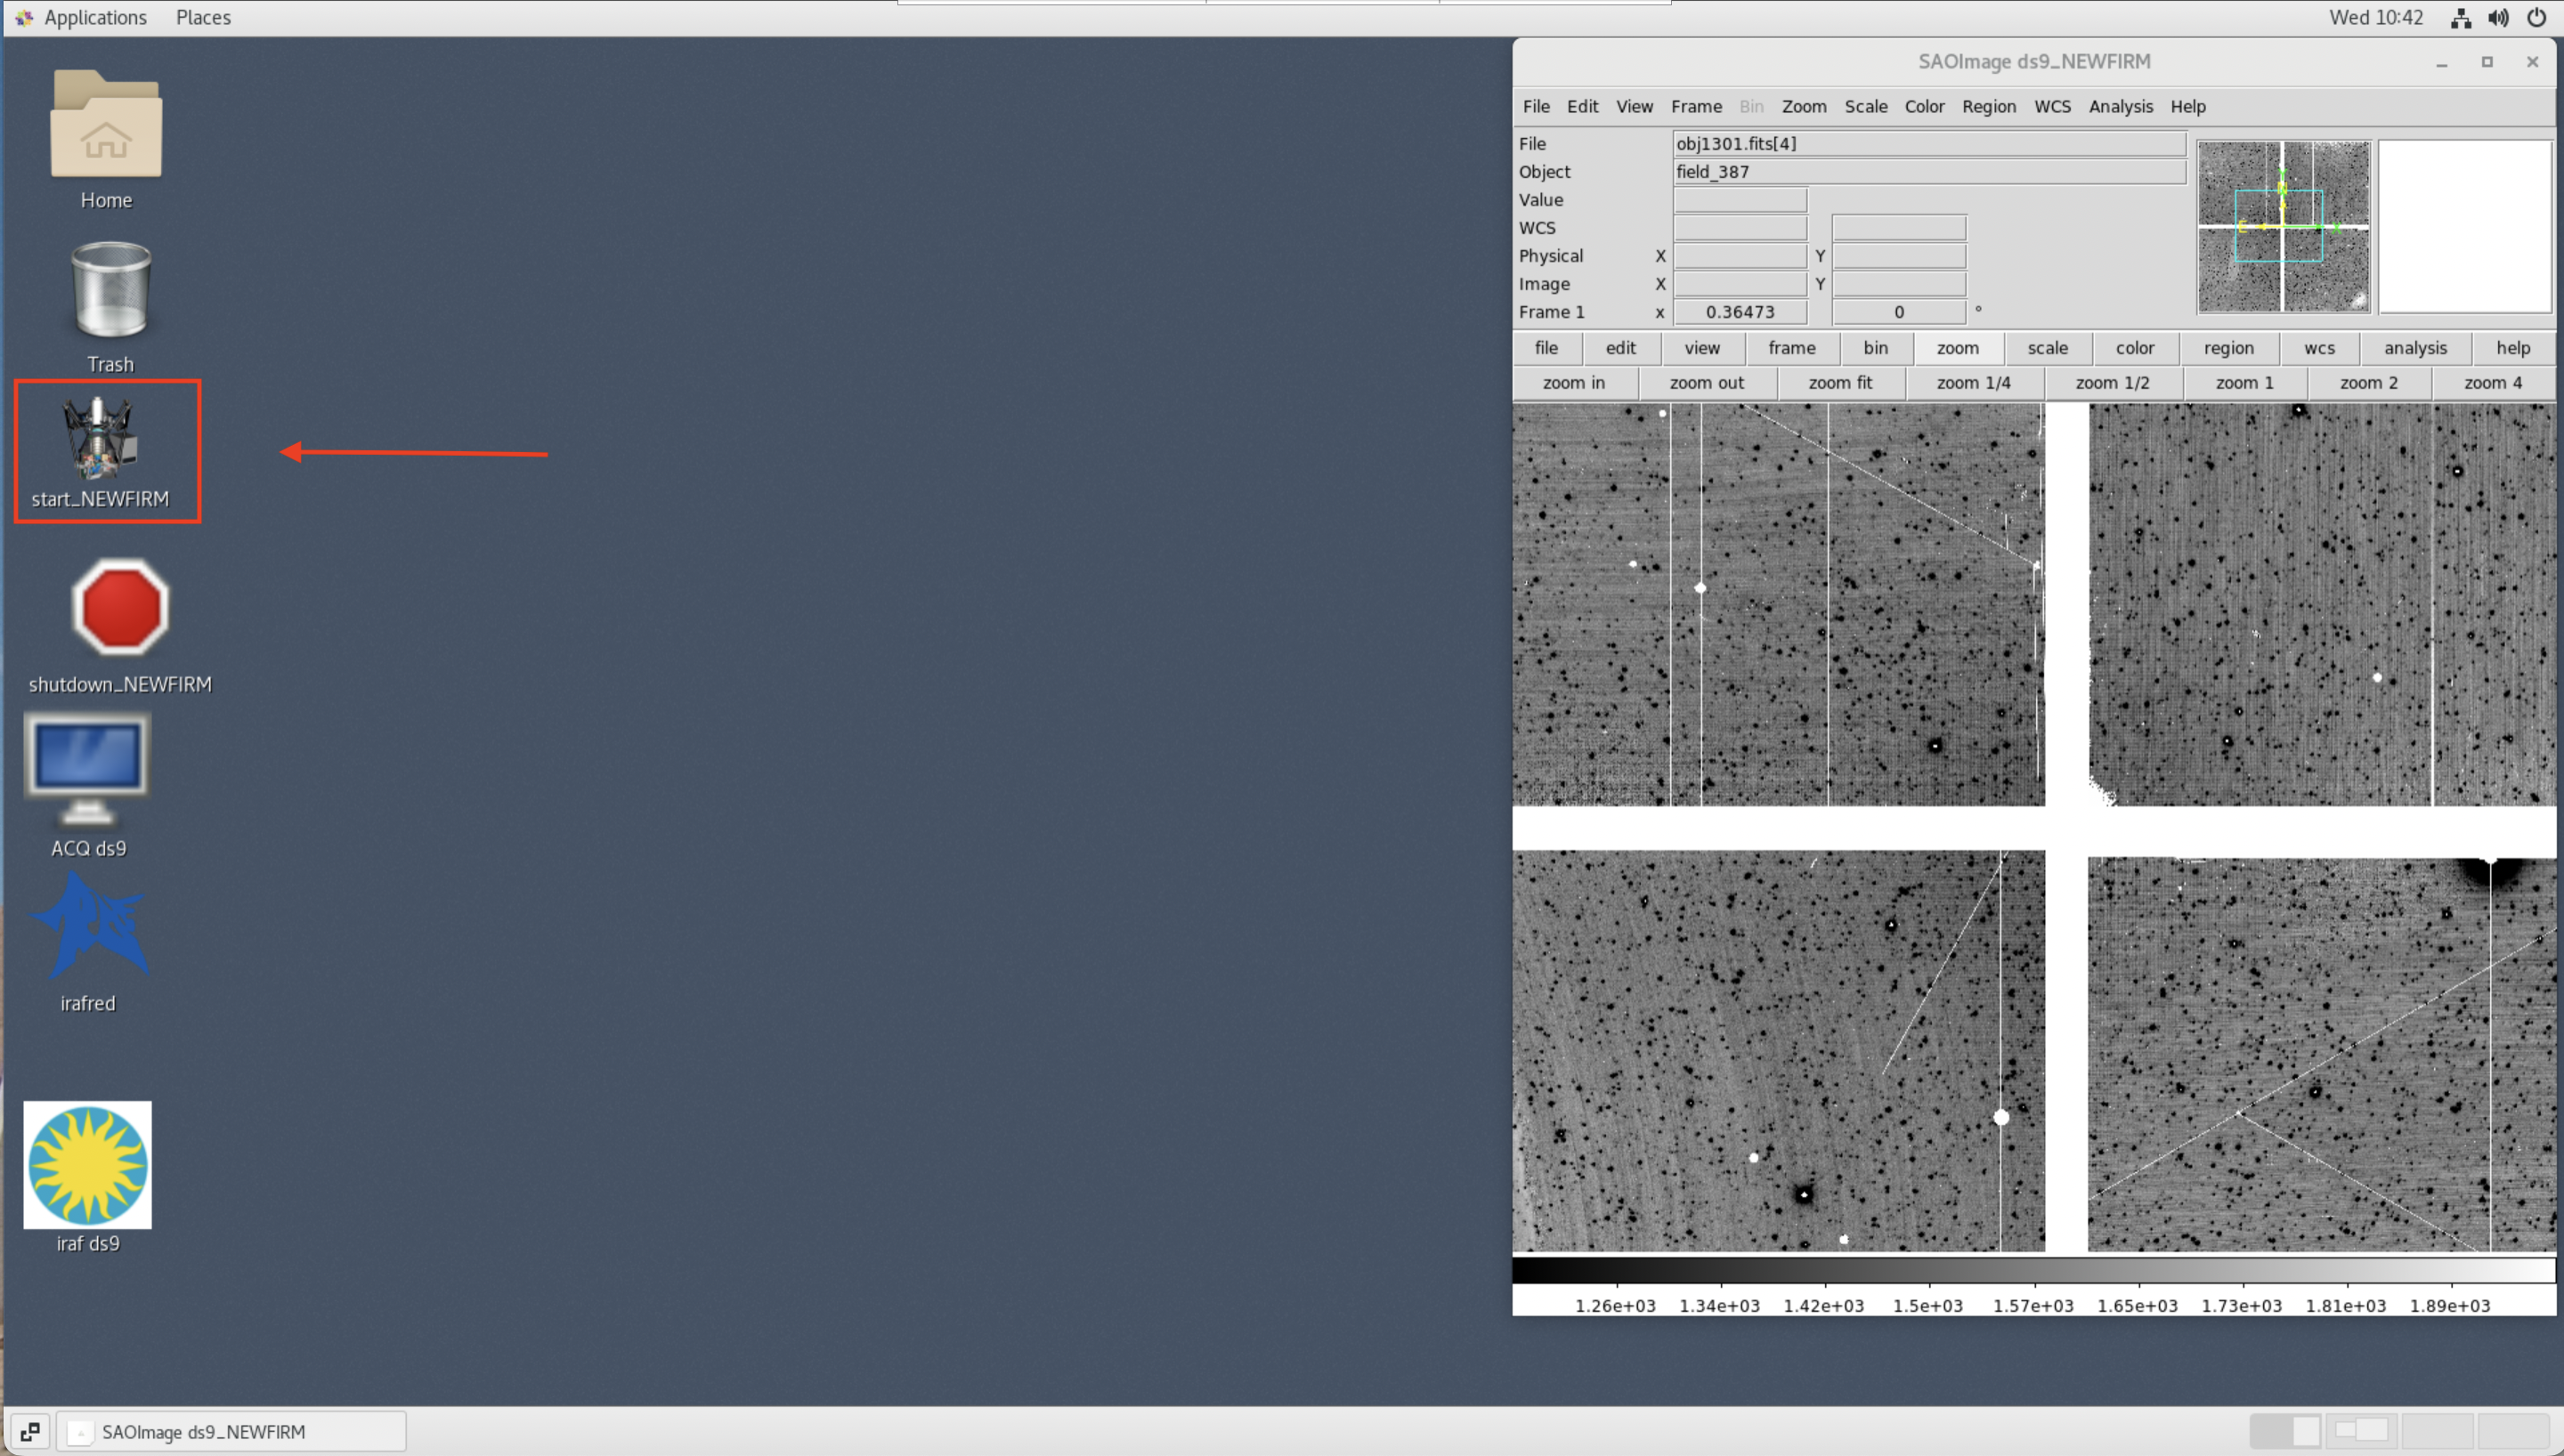
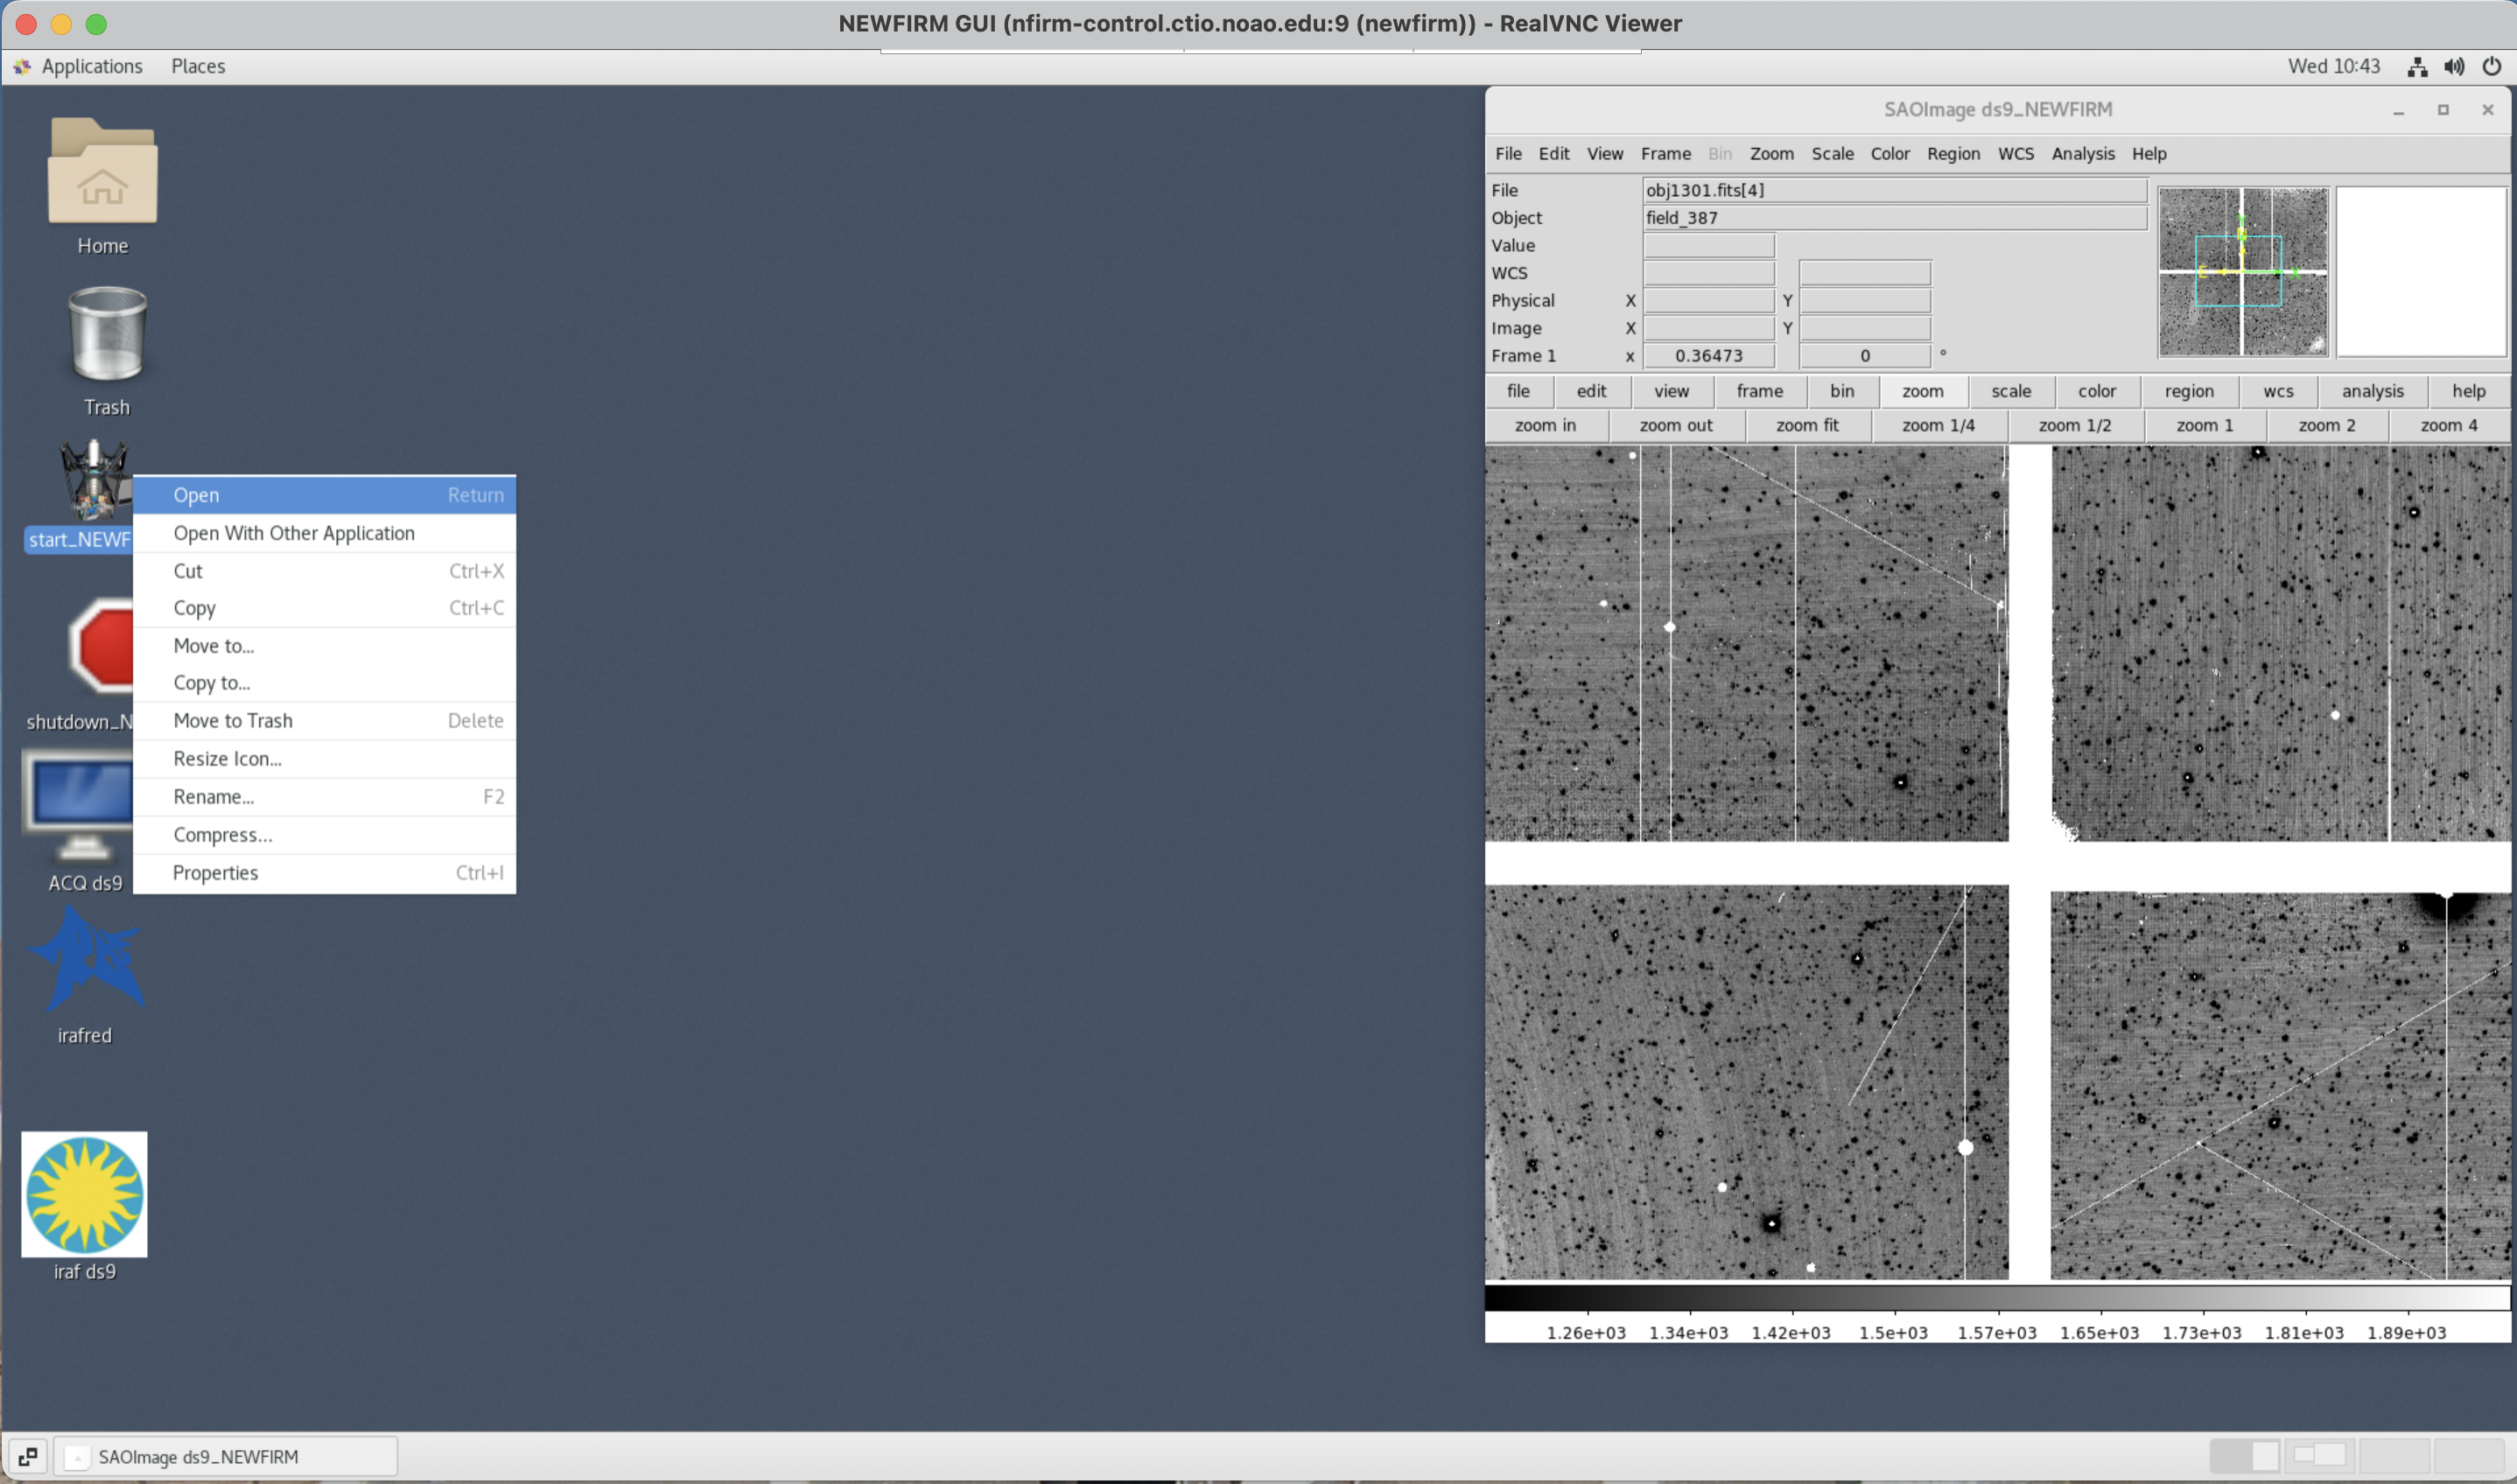
- Start NEWFIRM GUI in Obs VNC viewer
- Press "Start of Night"
- This should open the environmental cover.
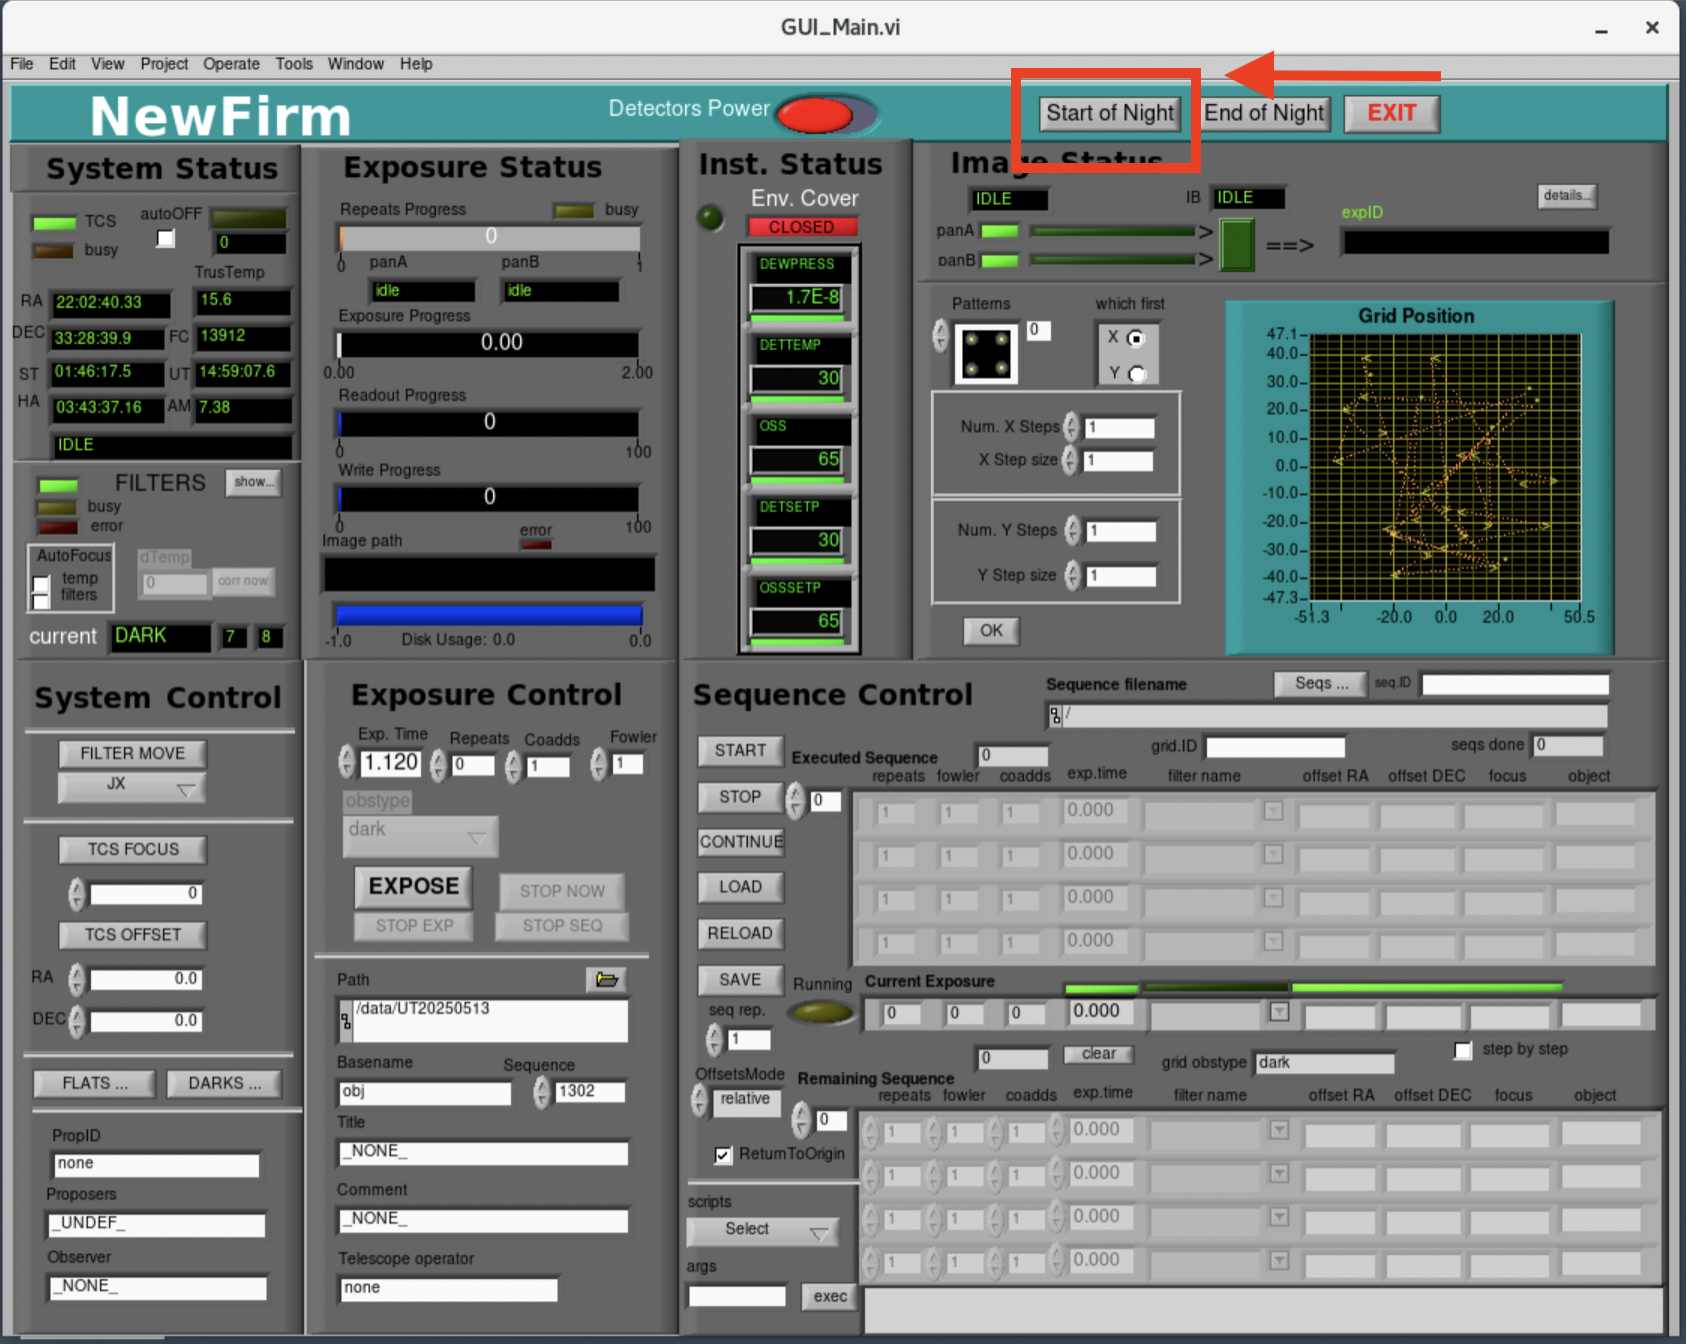
- Check that environmental cover is open on the NEWFIRM NICC vncviewer. At present the environmental cover sensor is not working so the NEWFIRM Observing GUI always has the status "Closed".


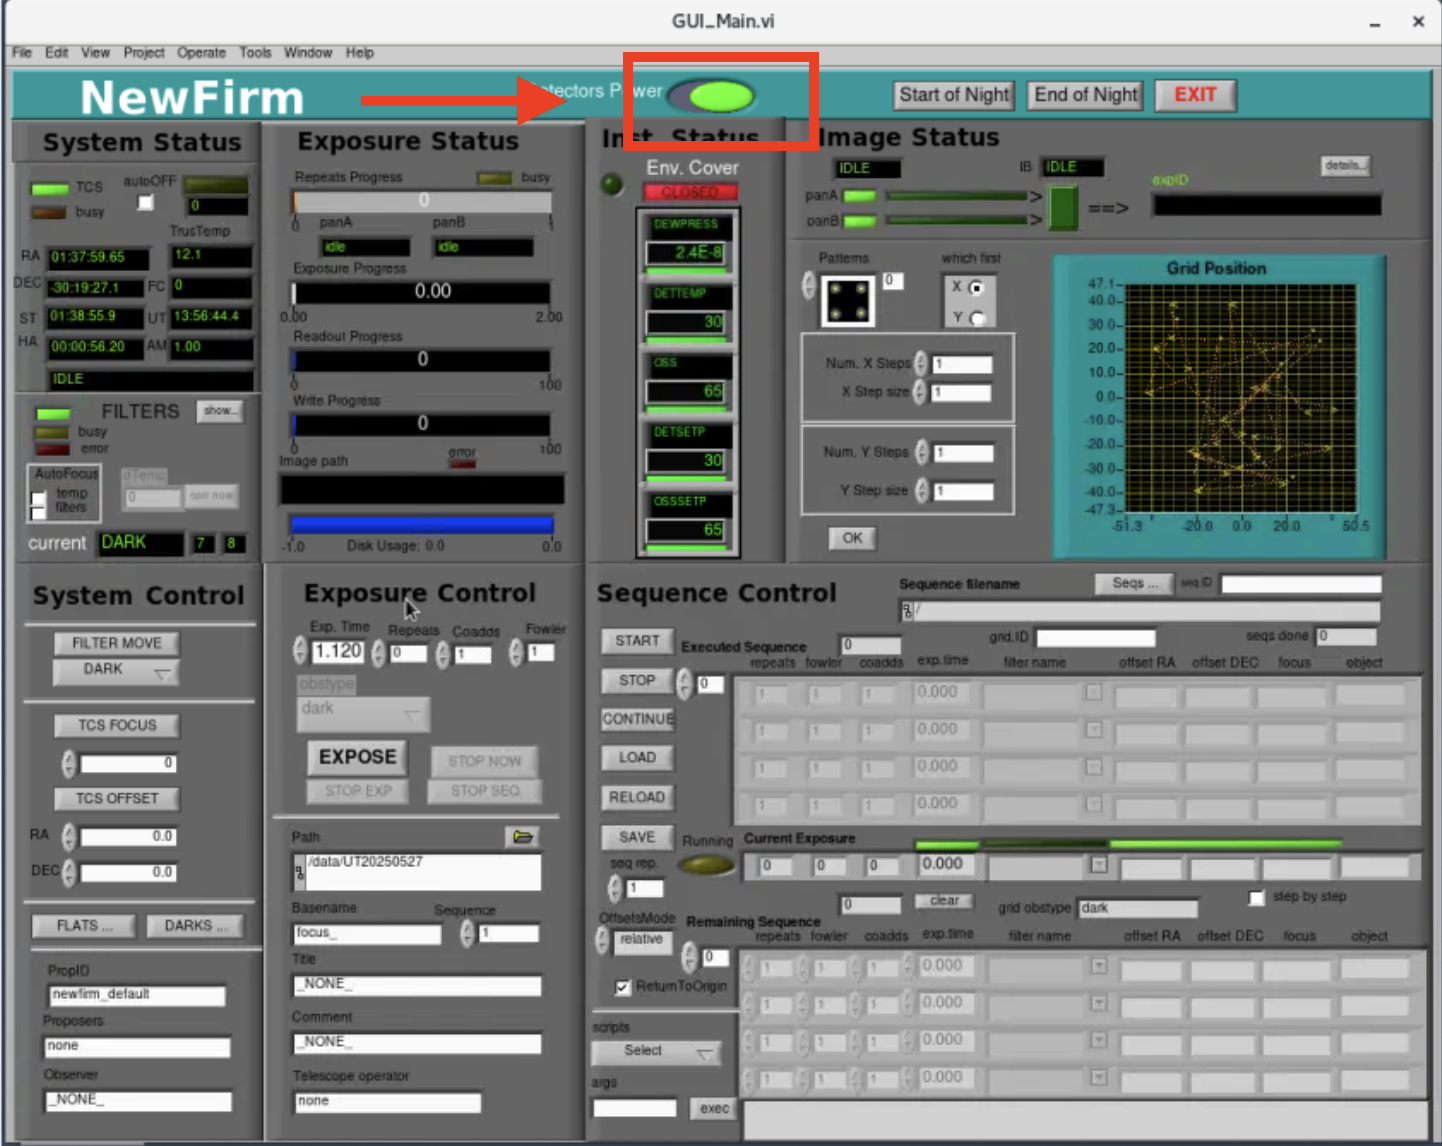
- Turn on the detector power


- Open the filter tool

- Initialize the filters and close when done


- Check that the current filter position is set to "DARK". Move filter position to "DARK" if the dark filter is not in position.


- Set Proposal ID (PropID)
- This will load the proposal PI and co-Is
- No images can be taken unless the PropID is set to a valid PropID

- Take a junk image to reset image counter/number
- The image counter does not reset to 1 at the beginning of the night
- Make sure dark filter is in place
- Under Exposure Control:
- Set Basename to "ajunk_"
- Set Title to "Junk"
- Set Exp. Time to "2.000"
- Set Repeats to "0"
- Set Coadds to "1"
- Set Fowler to "1"
- Set Sequence to "1"; This must be the last step.
- Click "Expose"
- The image counter will now be reset and calibration data will start with image number *0002*

NEWFIRM IRAF Interface
- Open NEWFIRM IRAF VNC viewer
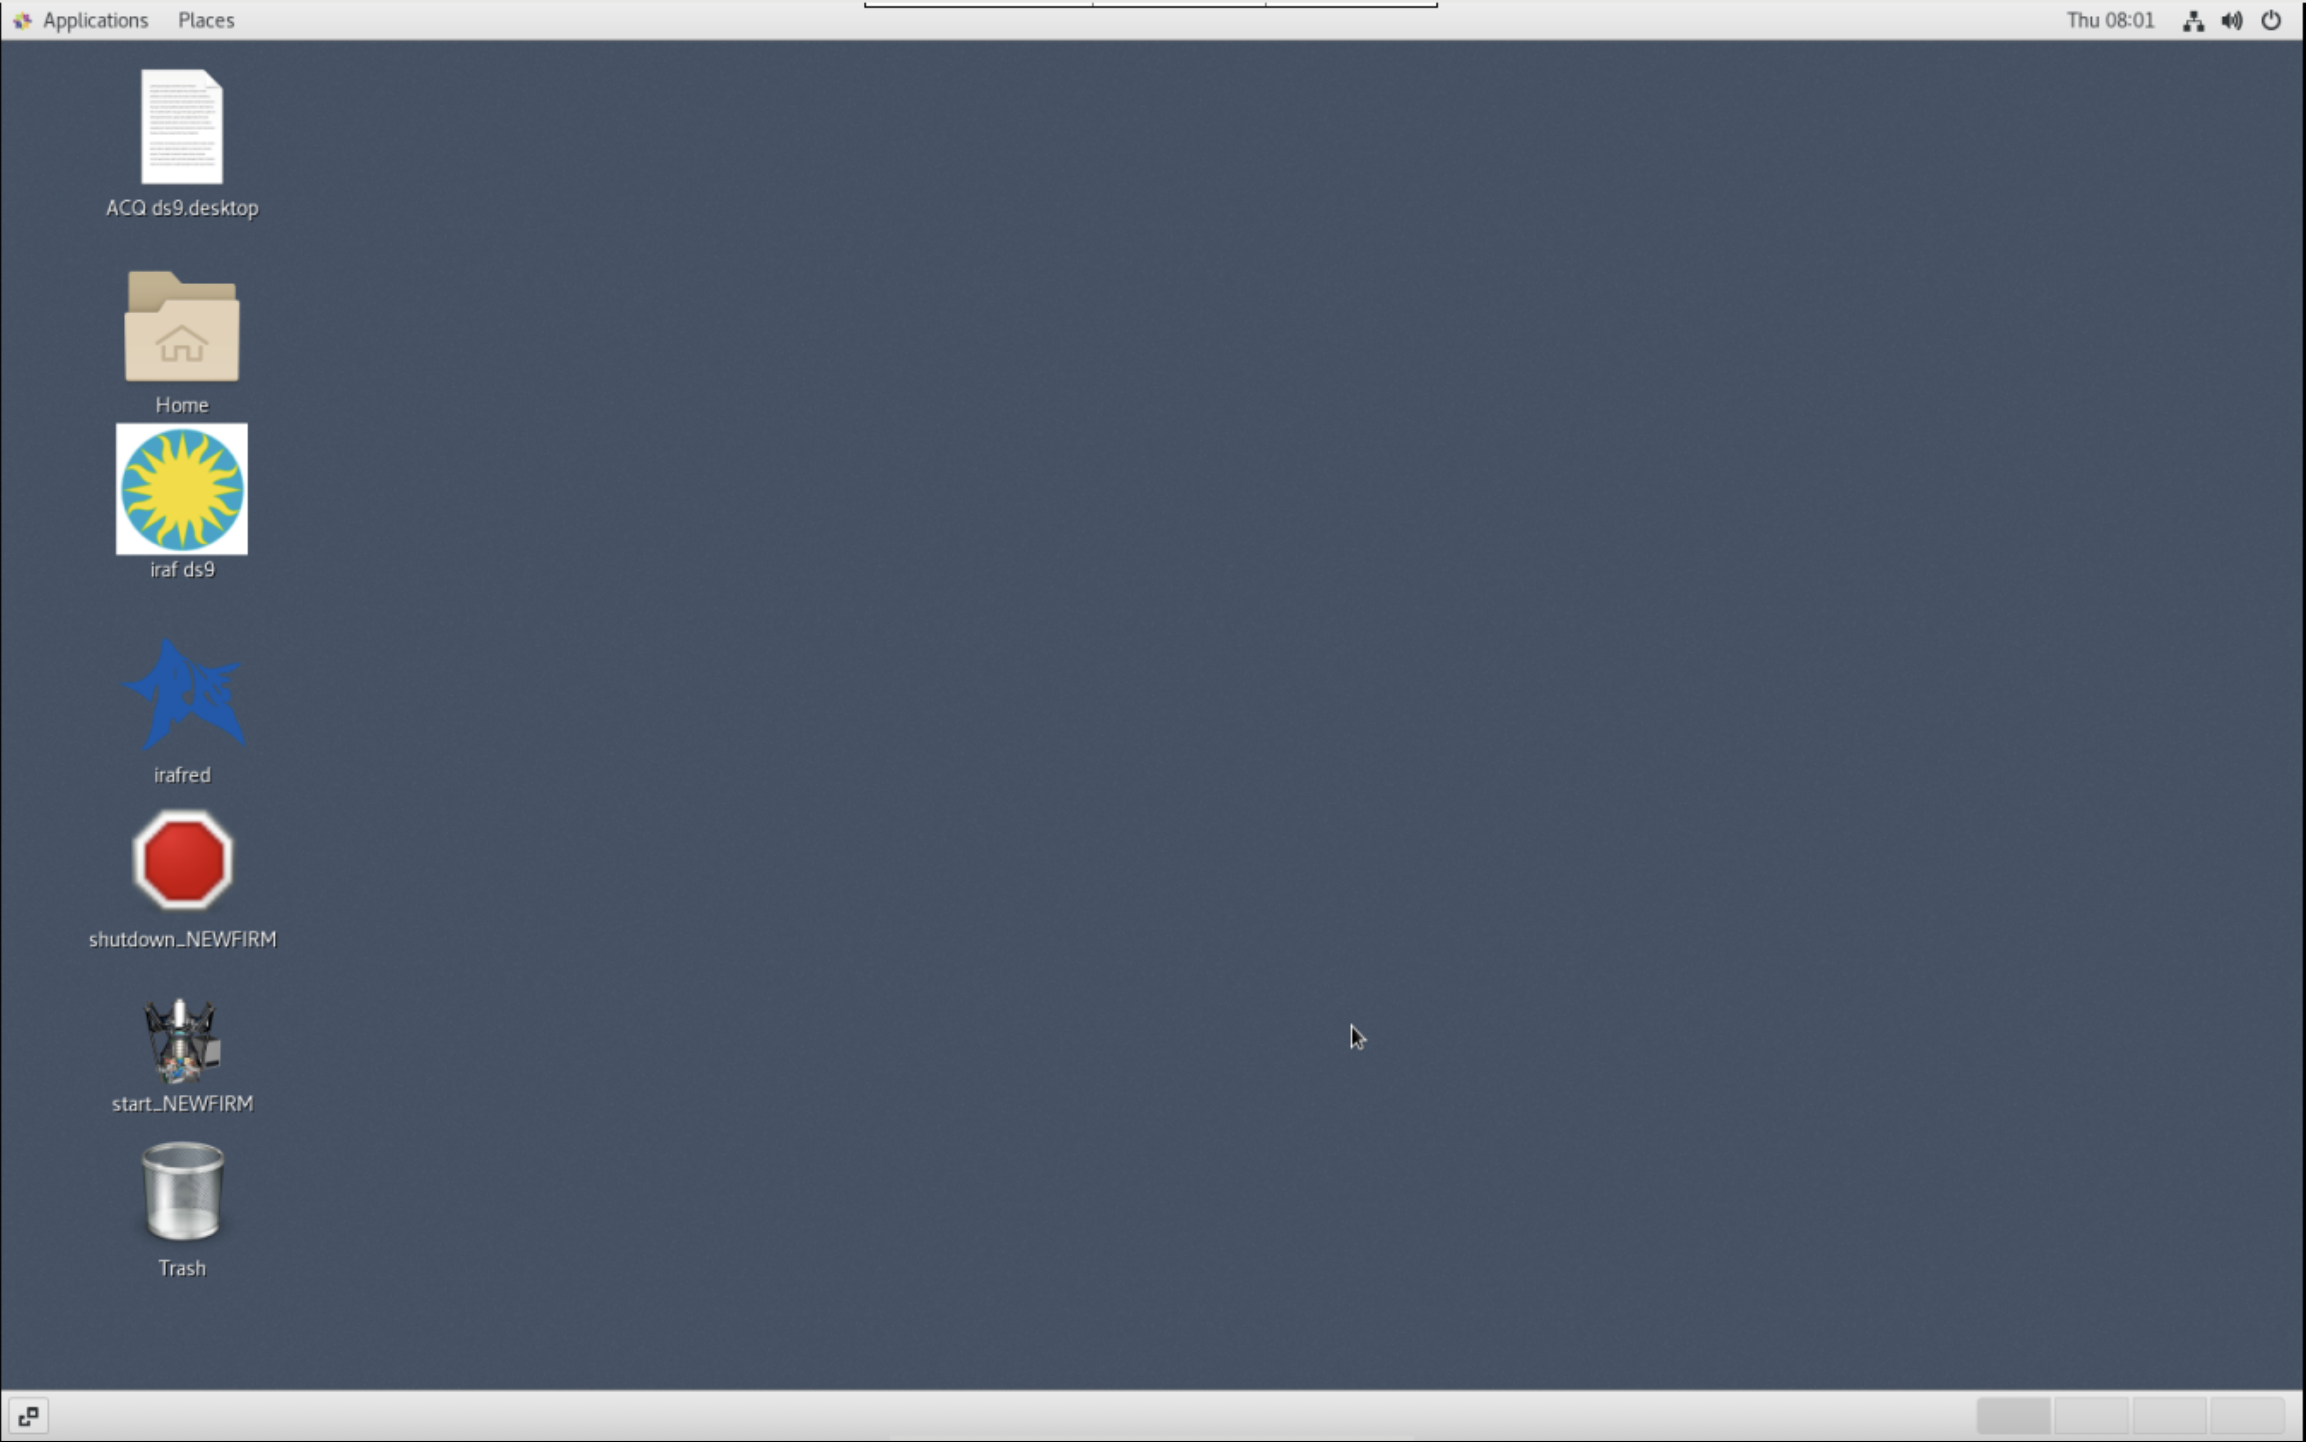
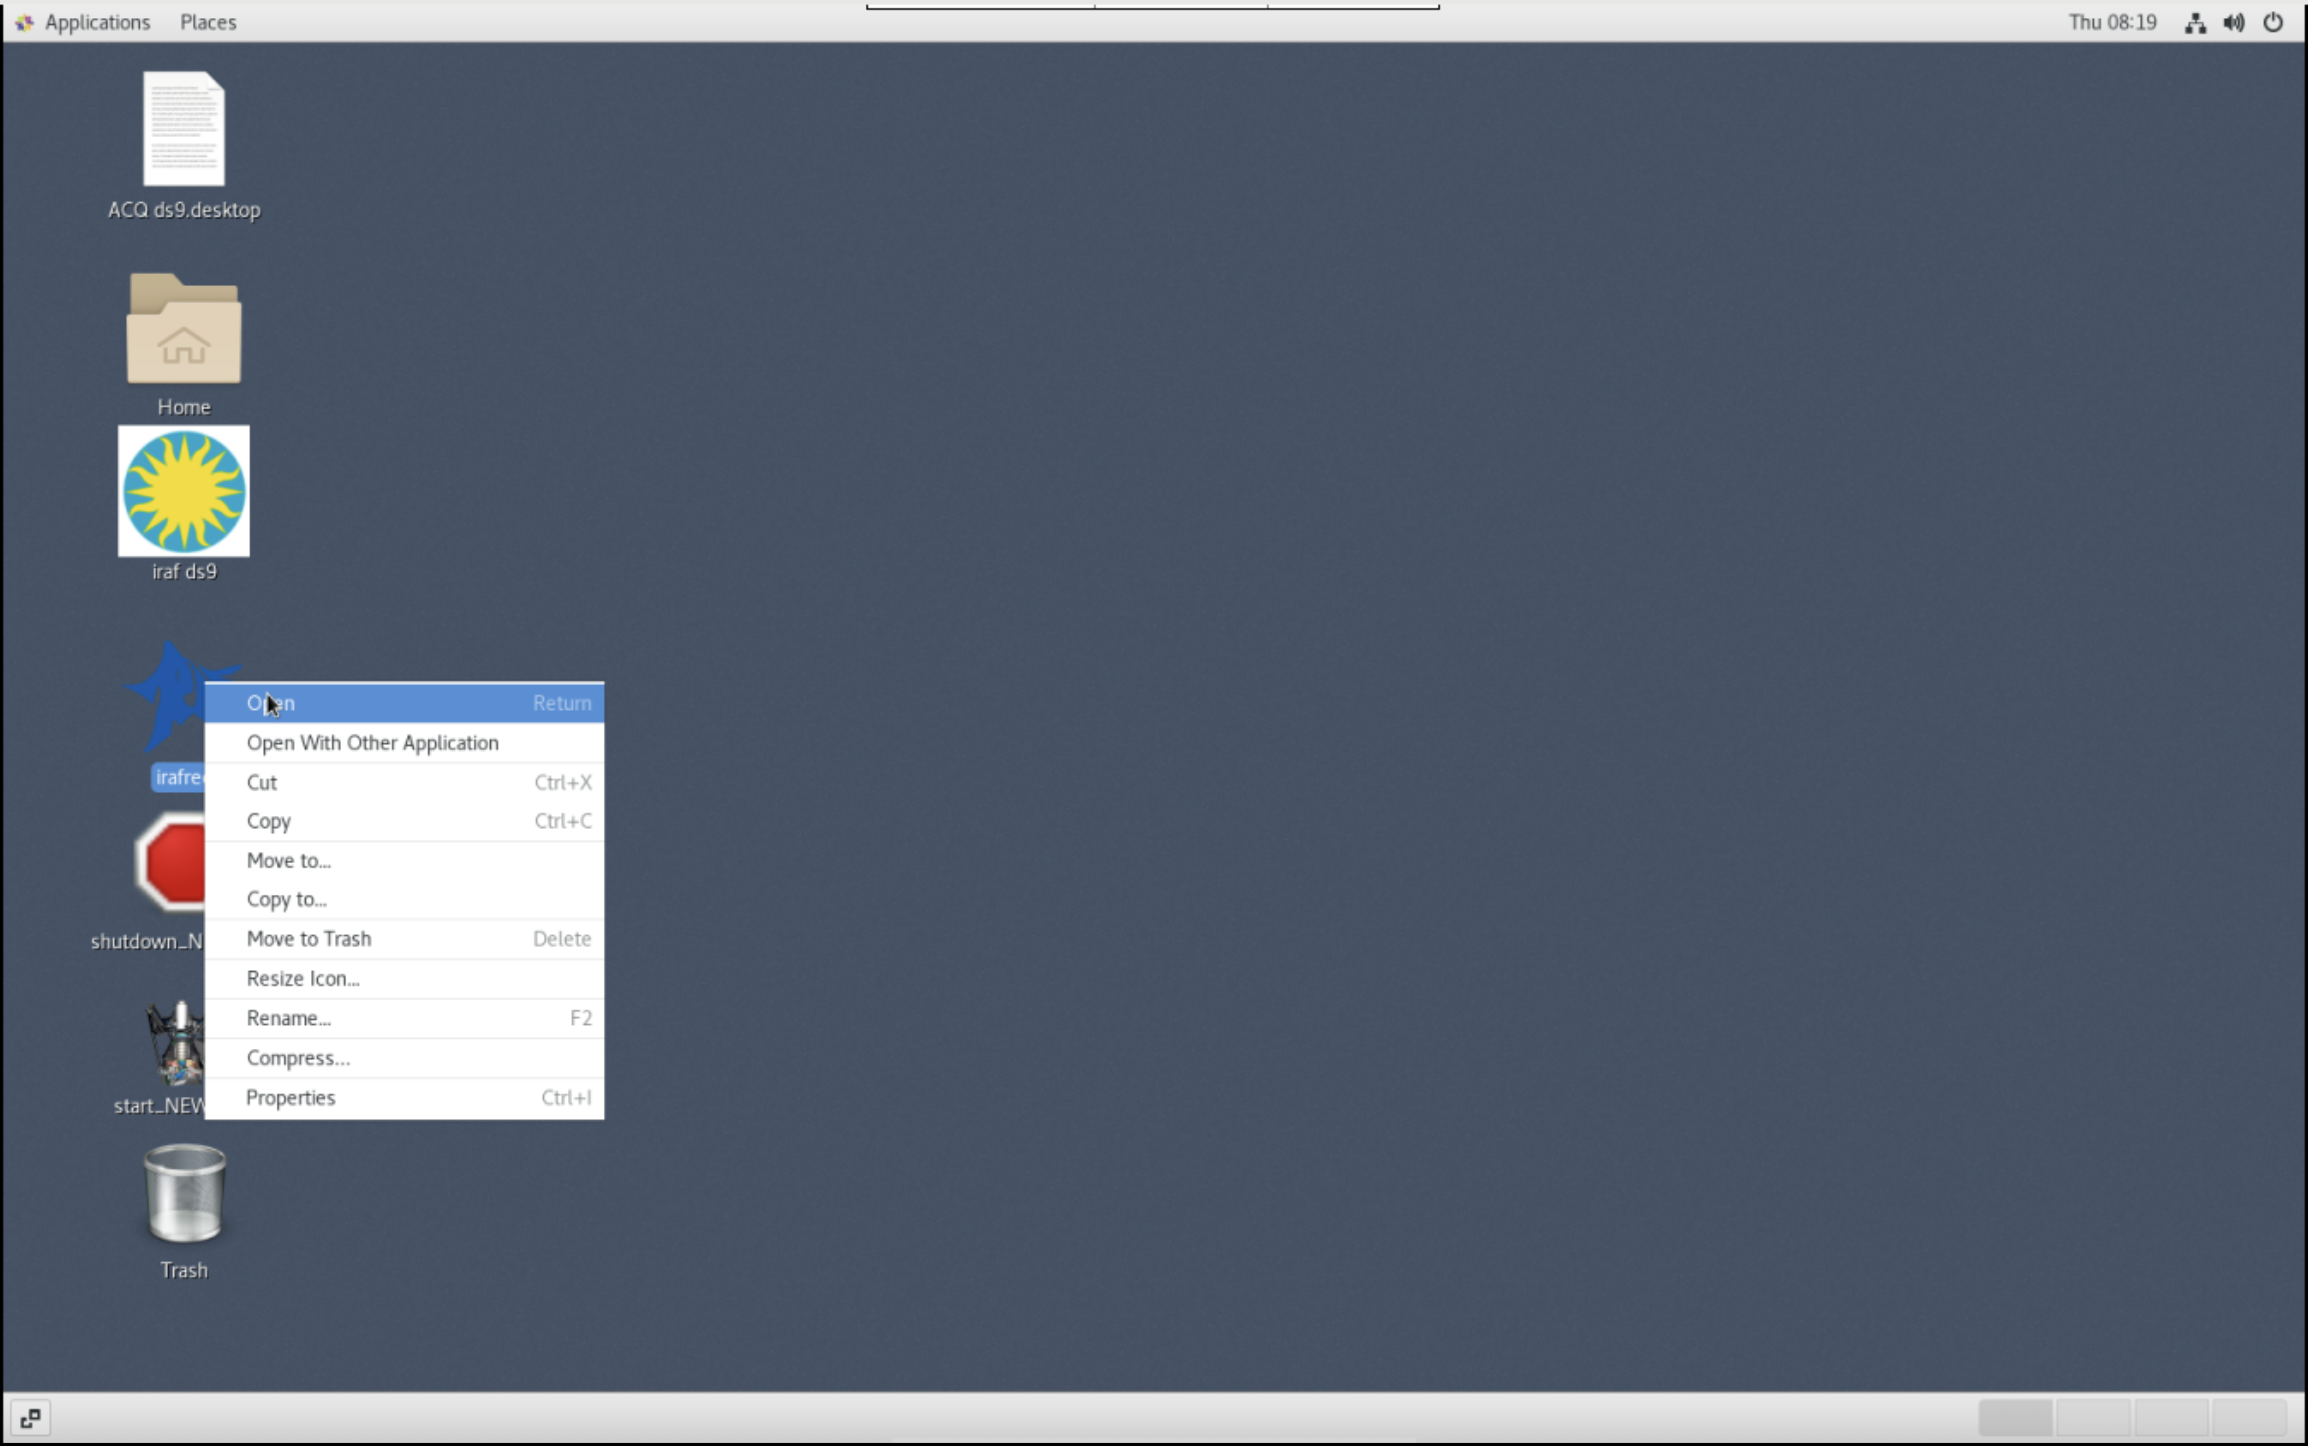
- Start IRAF window by clicking on the IRAF icon and click open

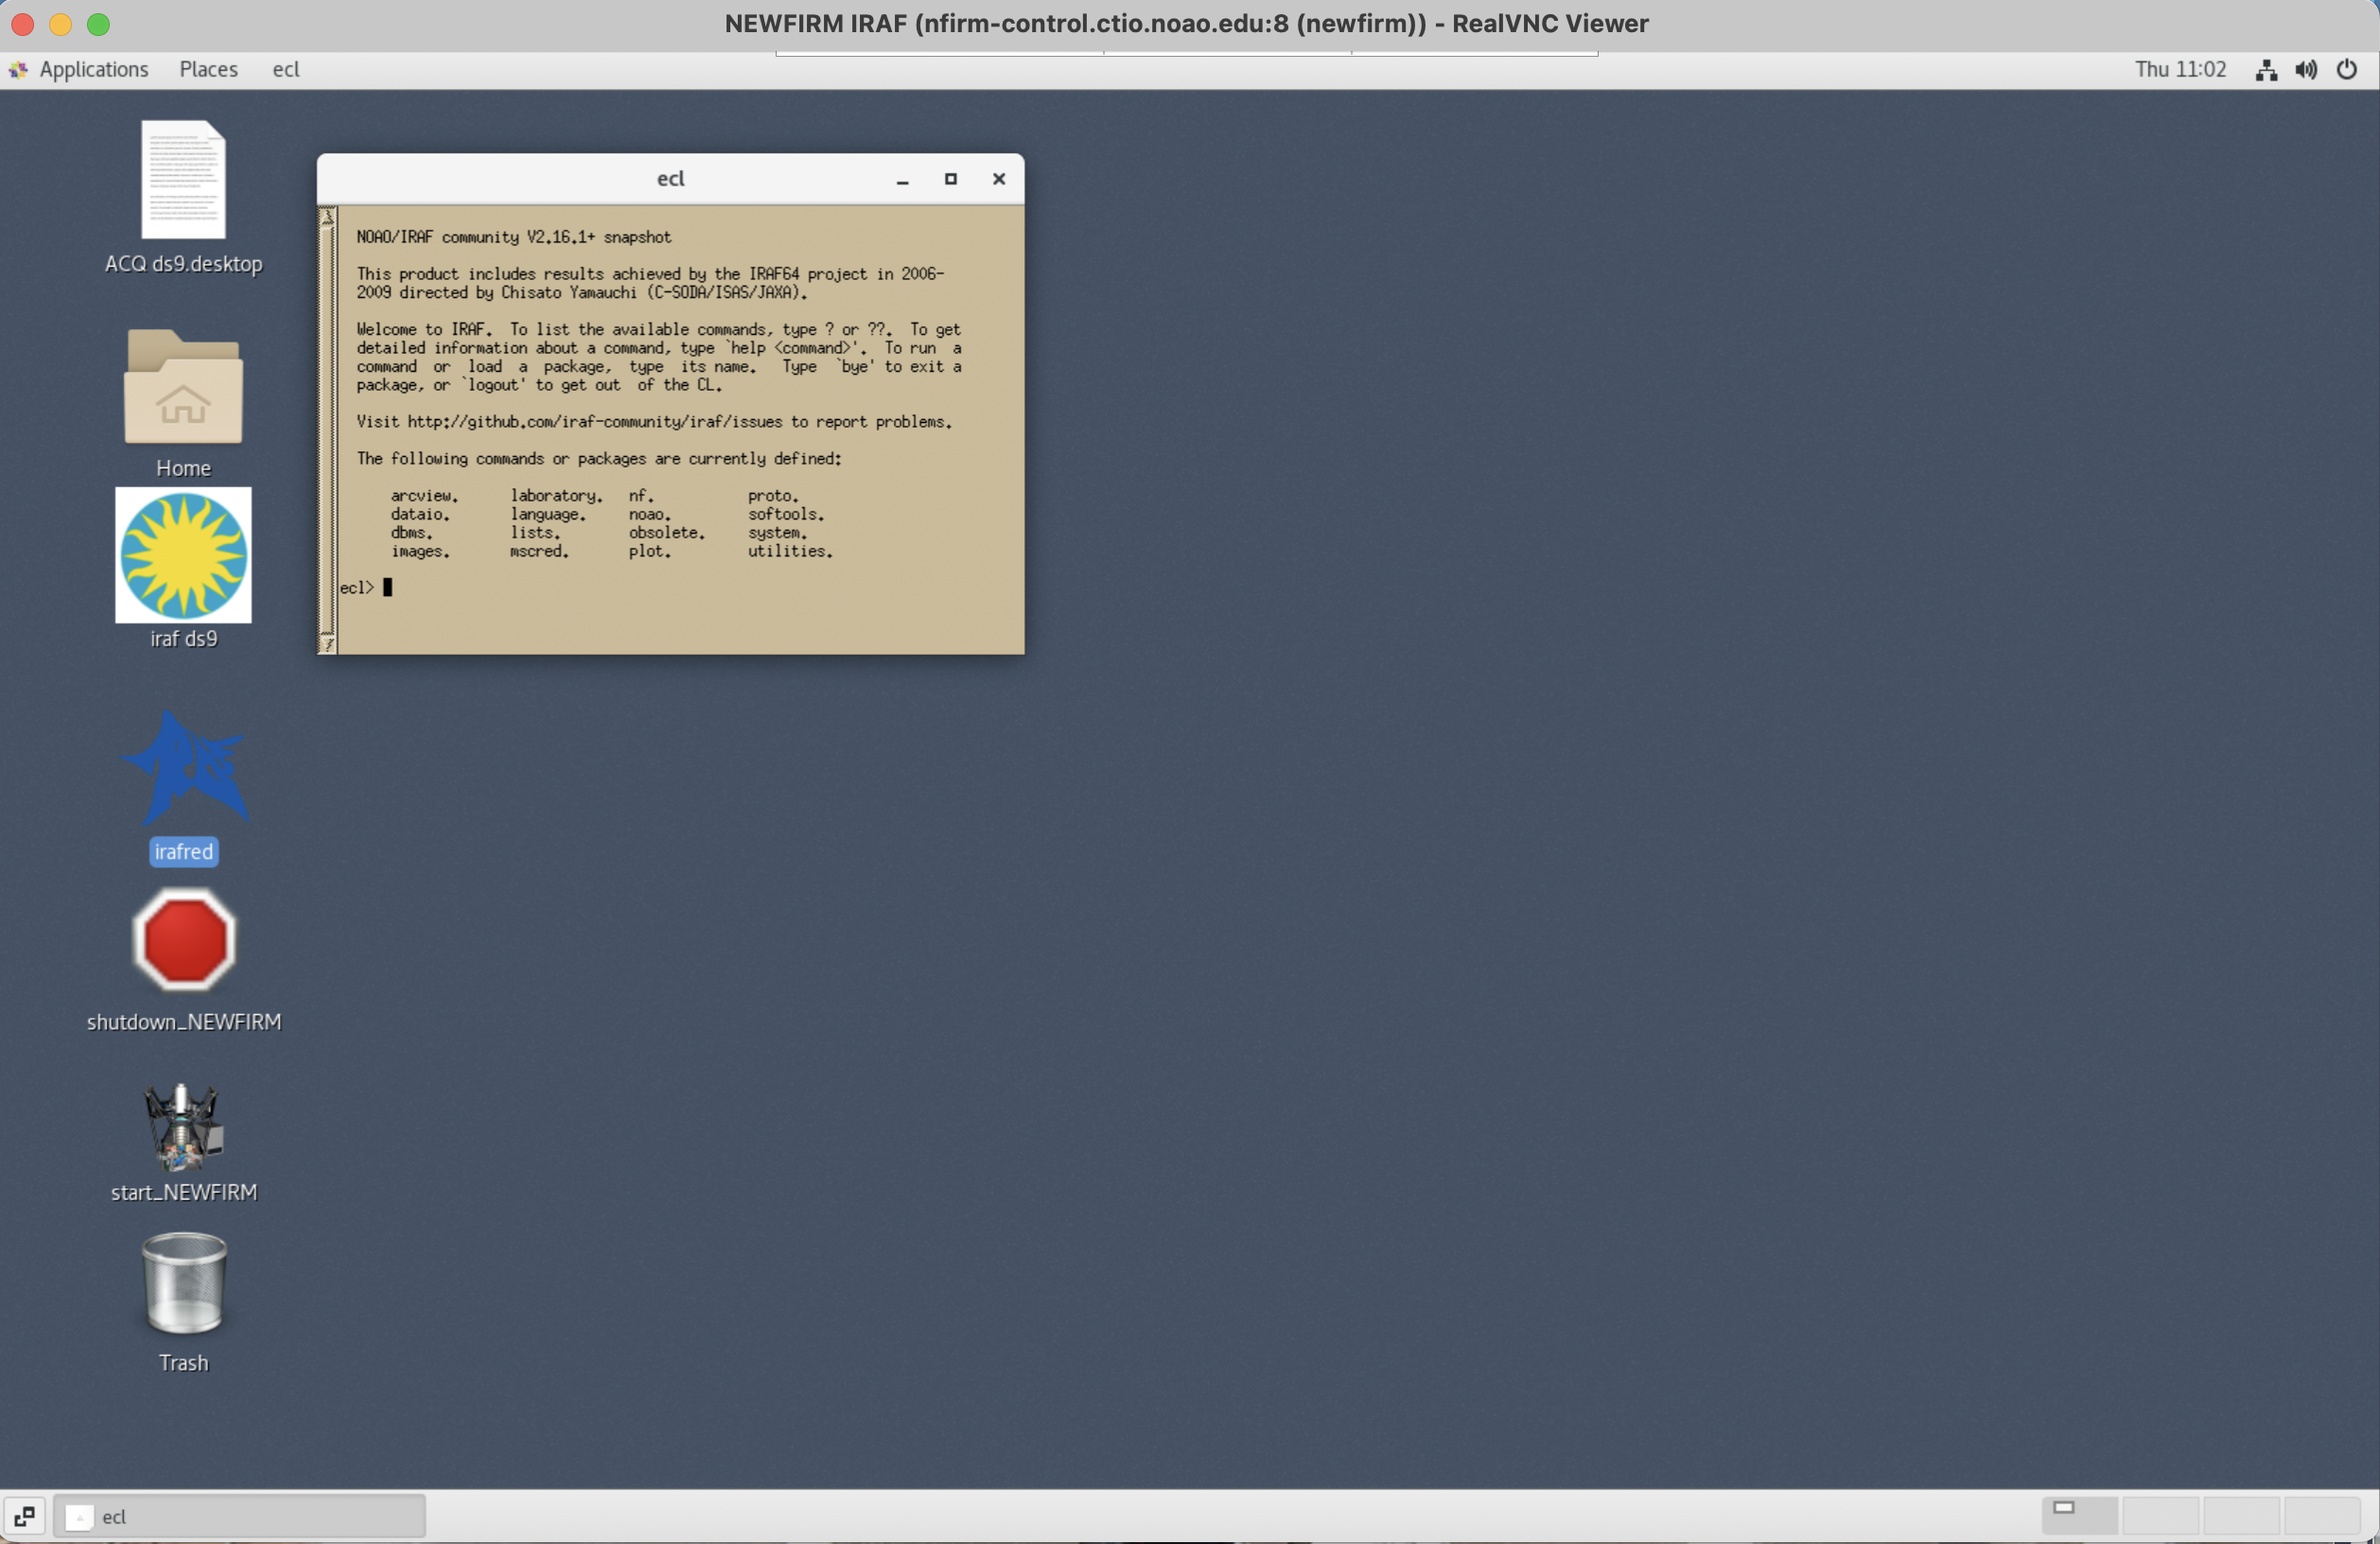
- The IRAF terminal should now be on your screen.
-
Open the IRAF ds9 window
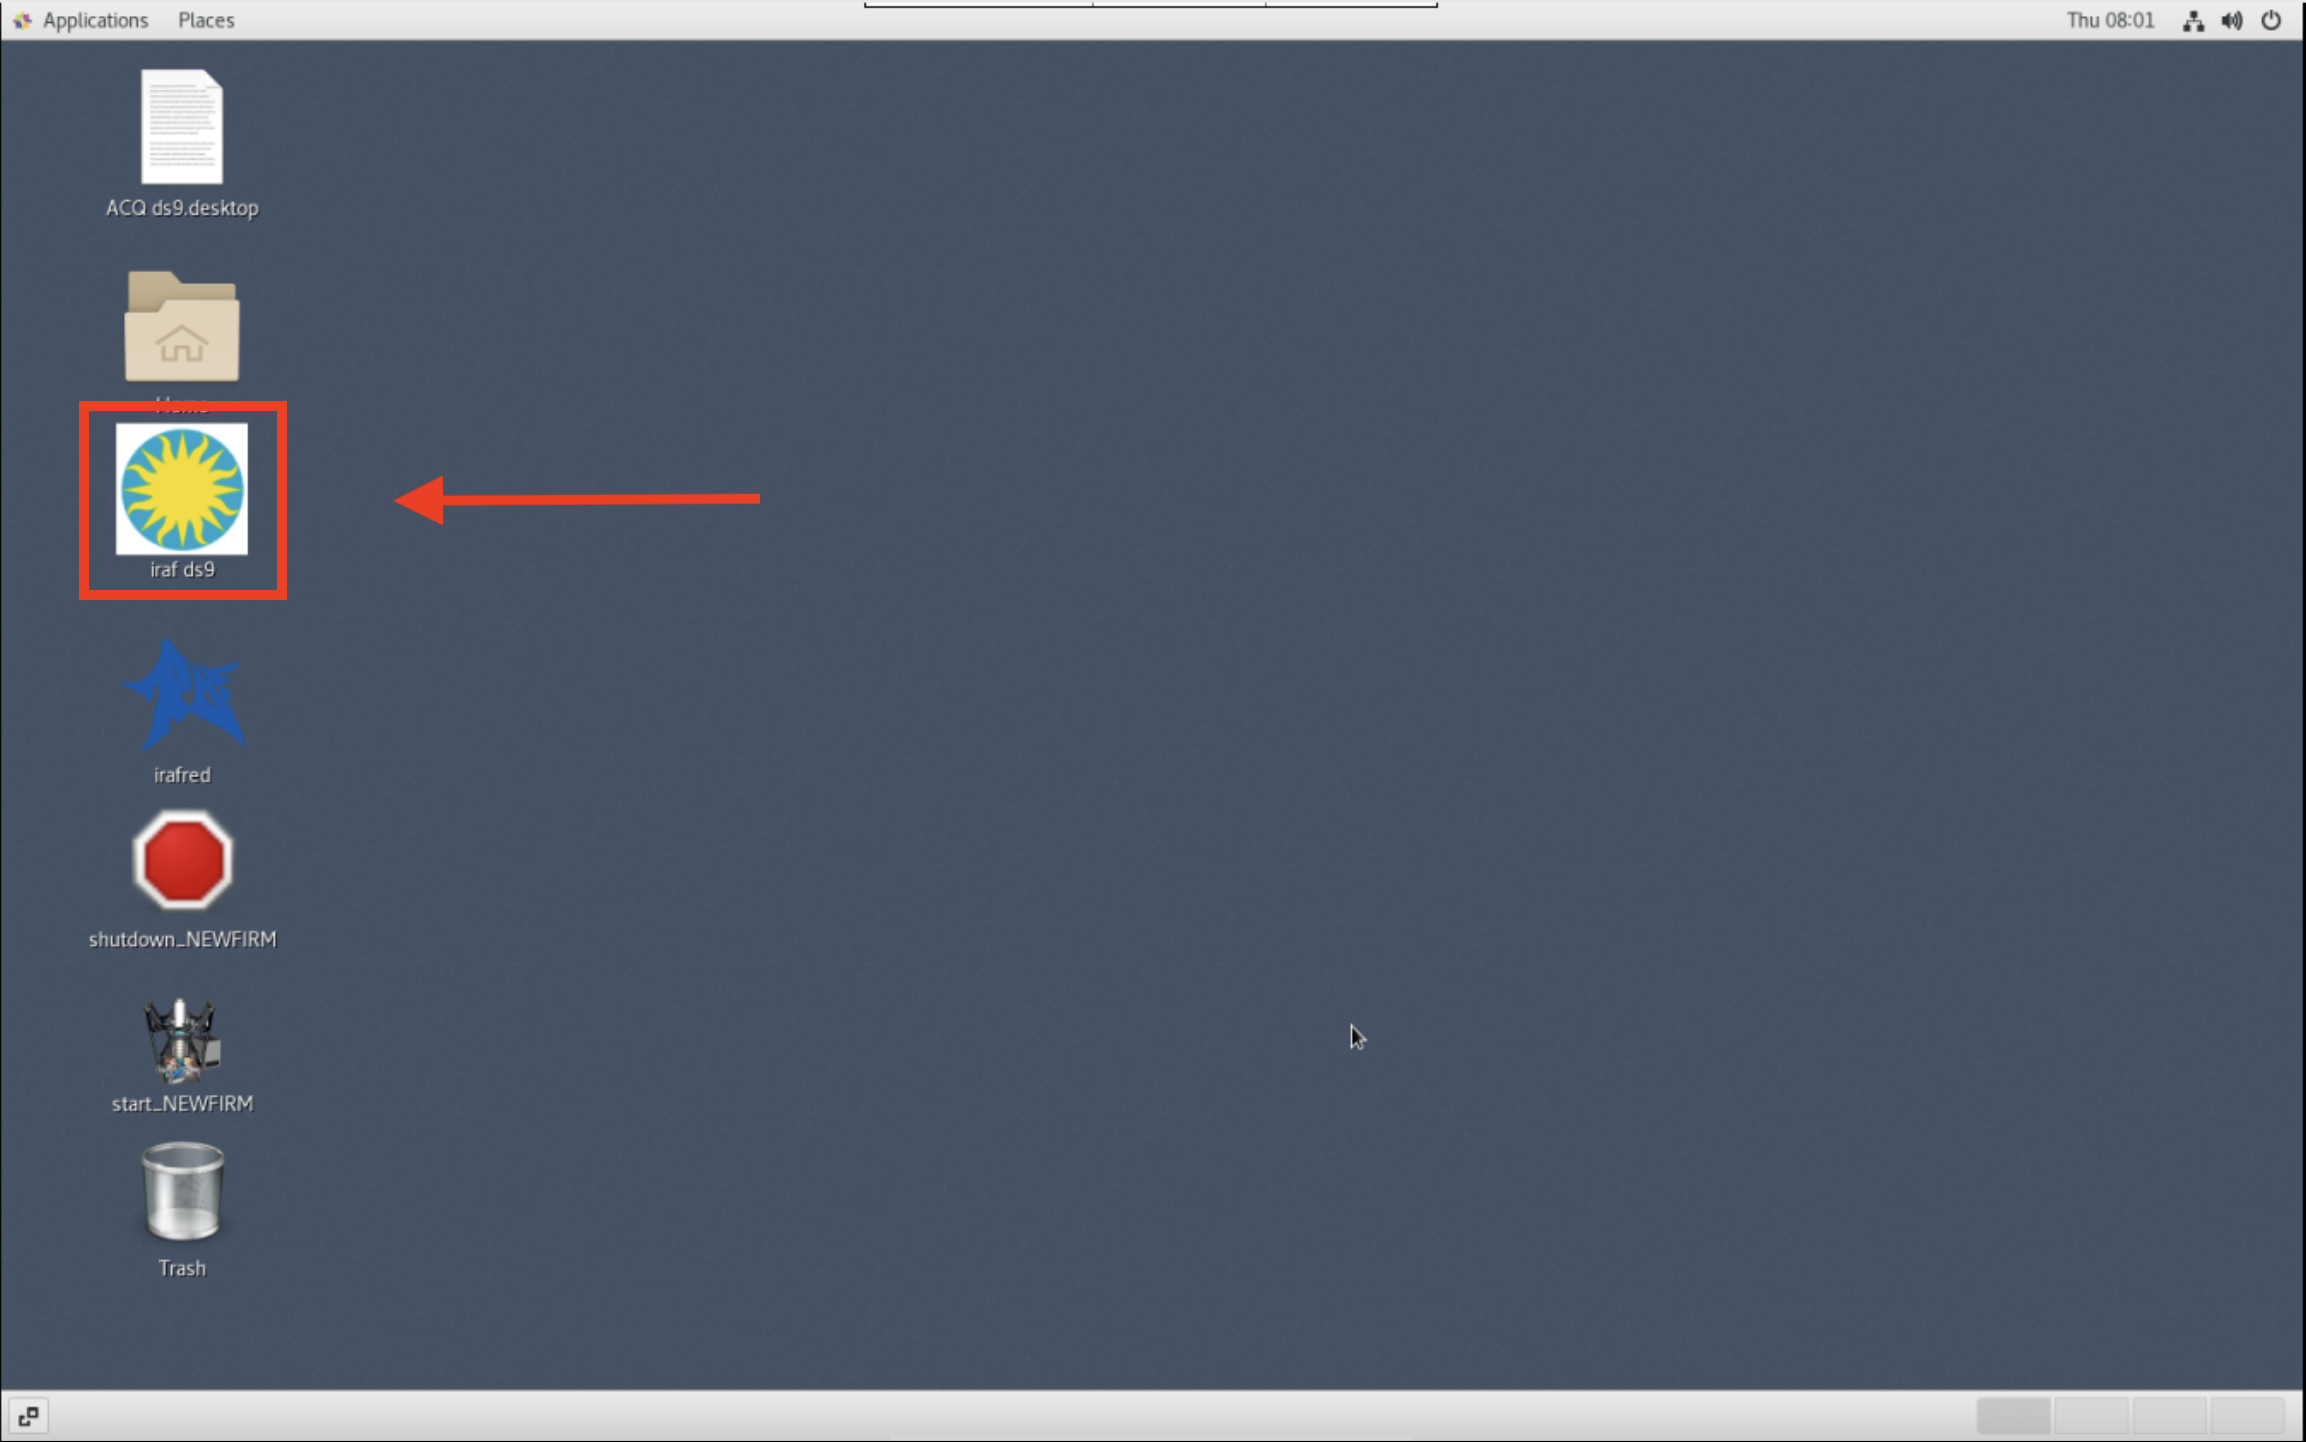
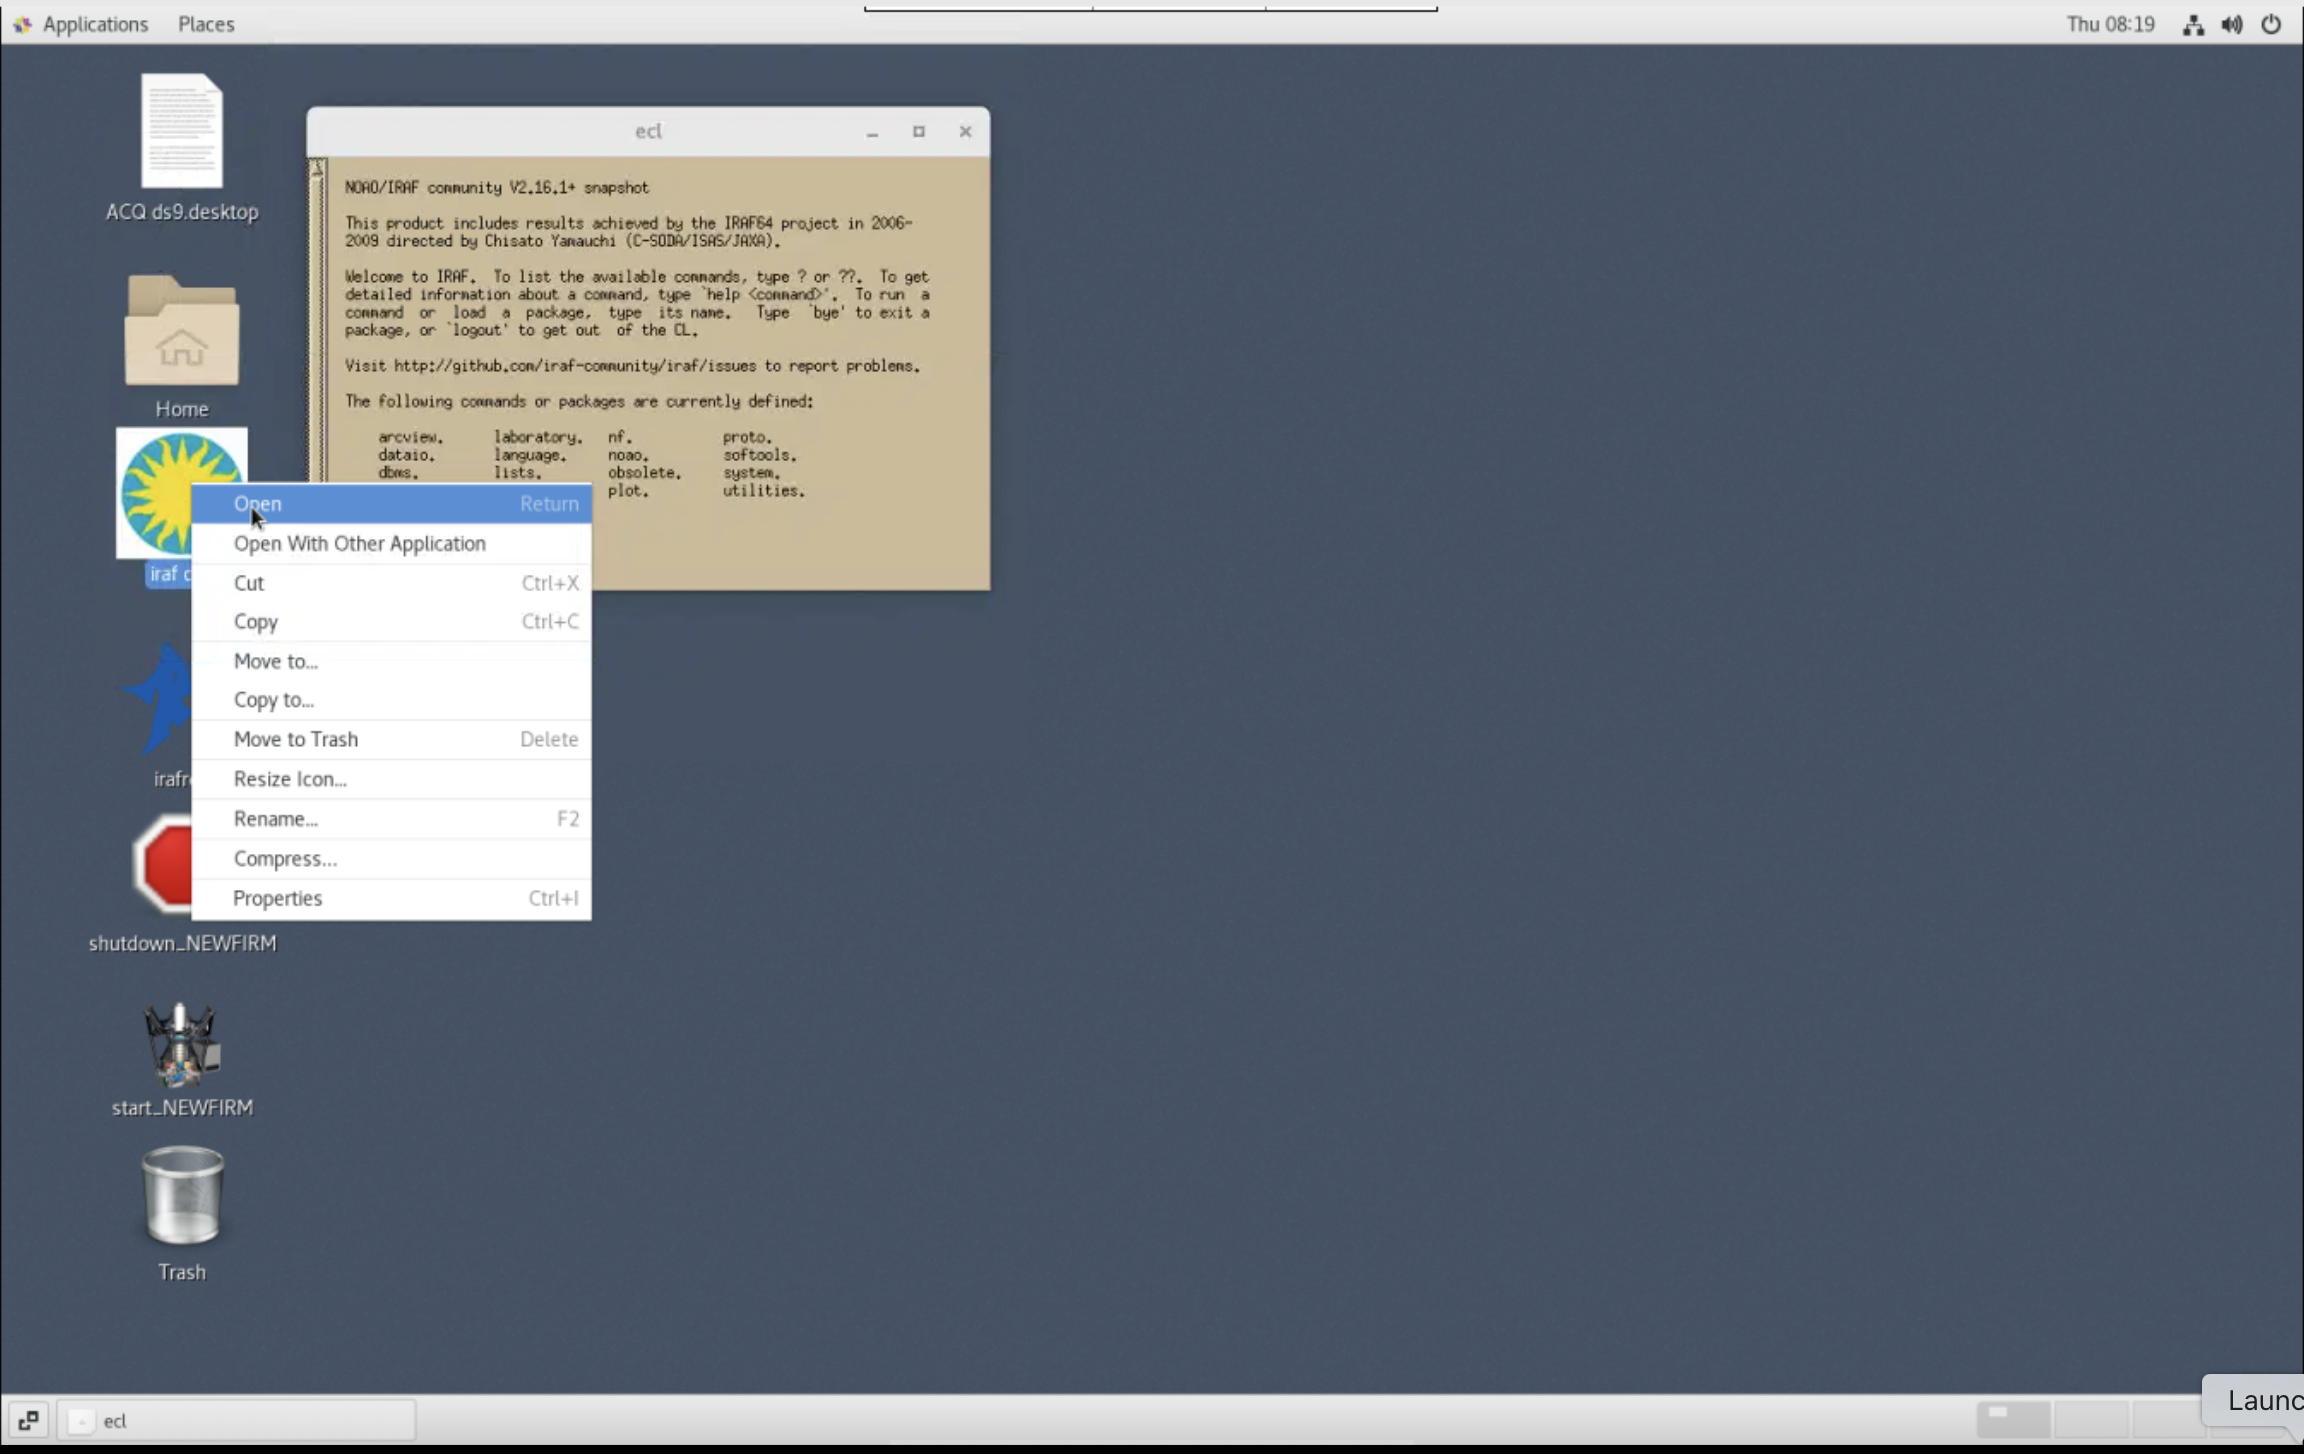
- The ds9 window should now be on the screen.
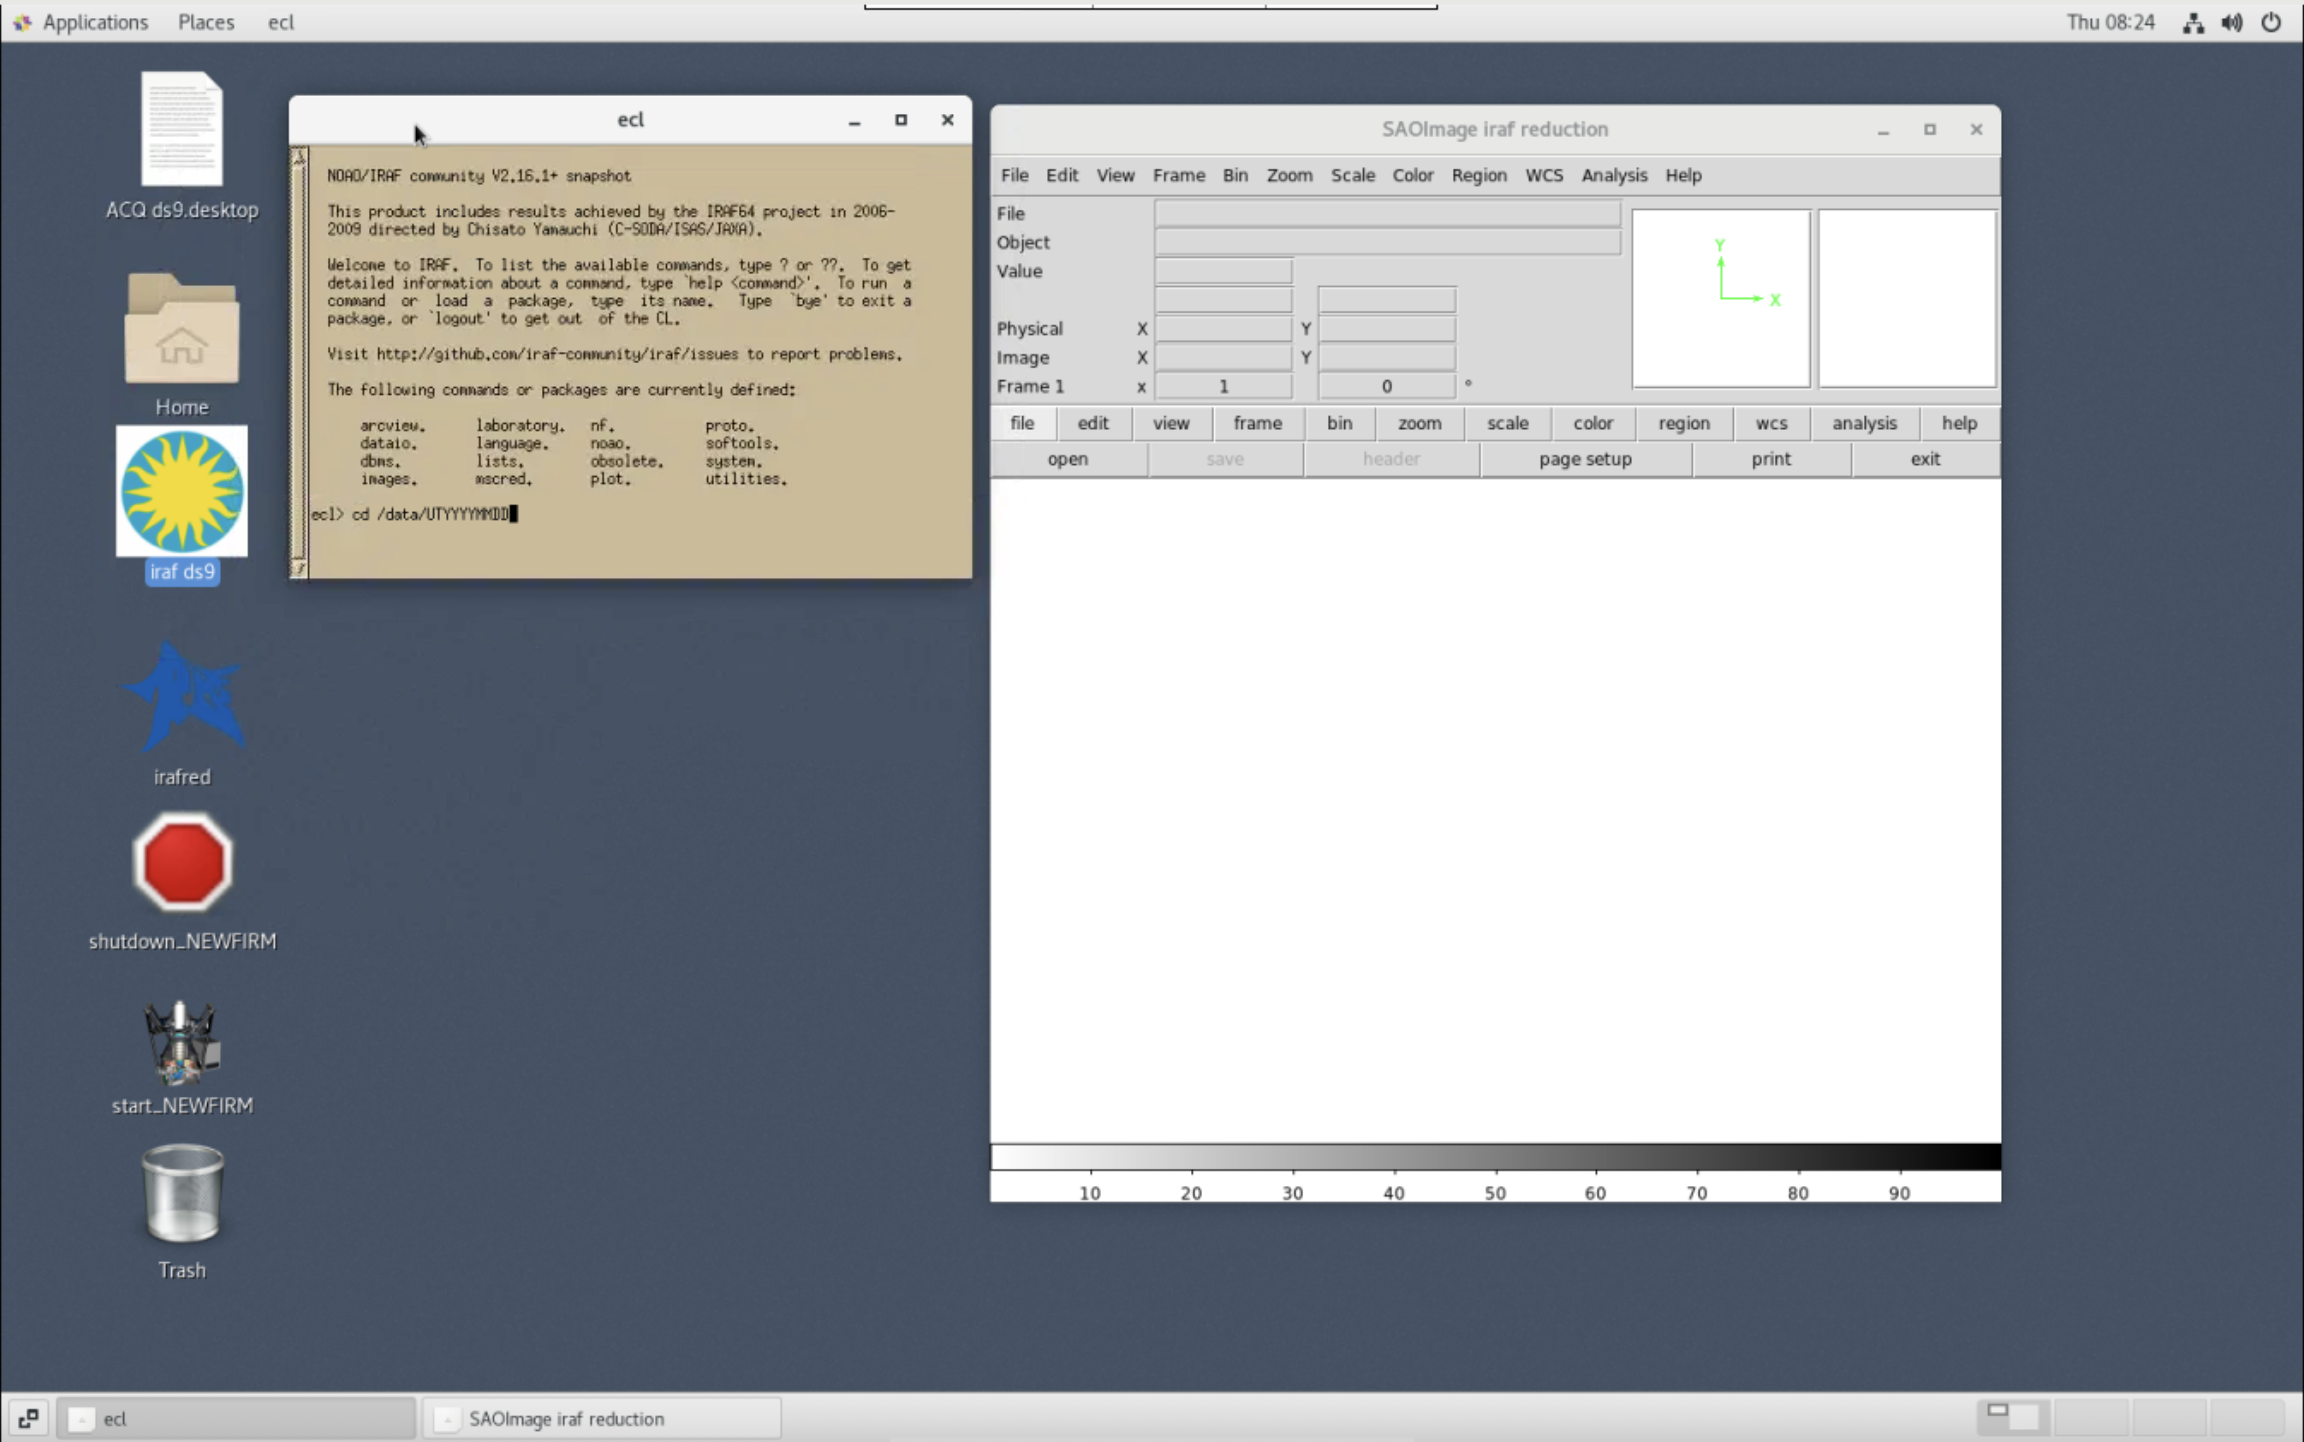
-
Change directory to the current data directory:
"cd /data/UTYYYYMMDD"

-
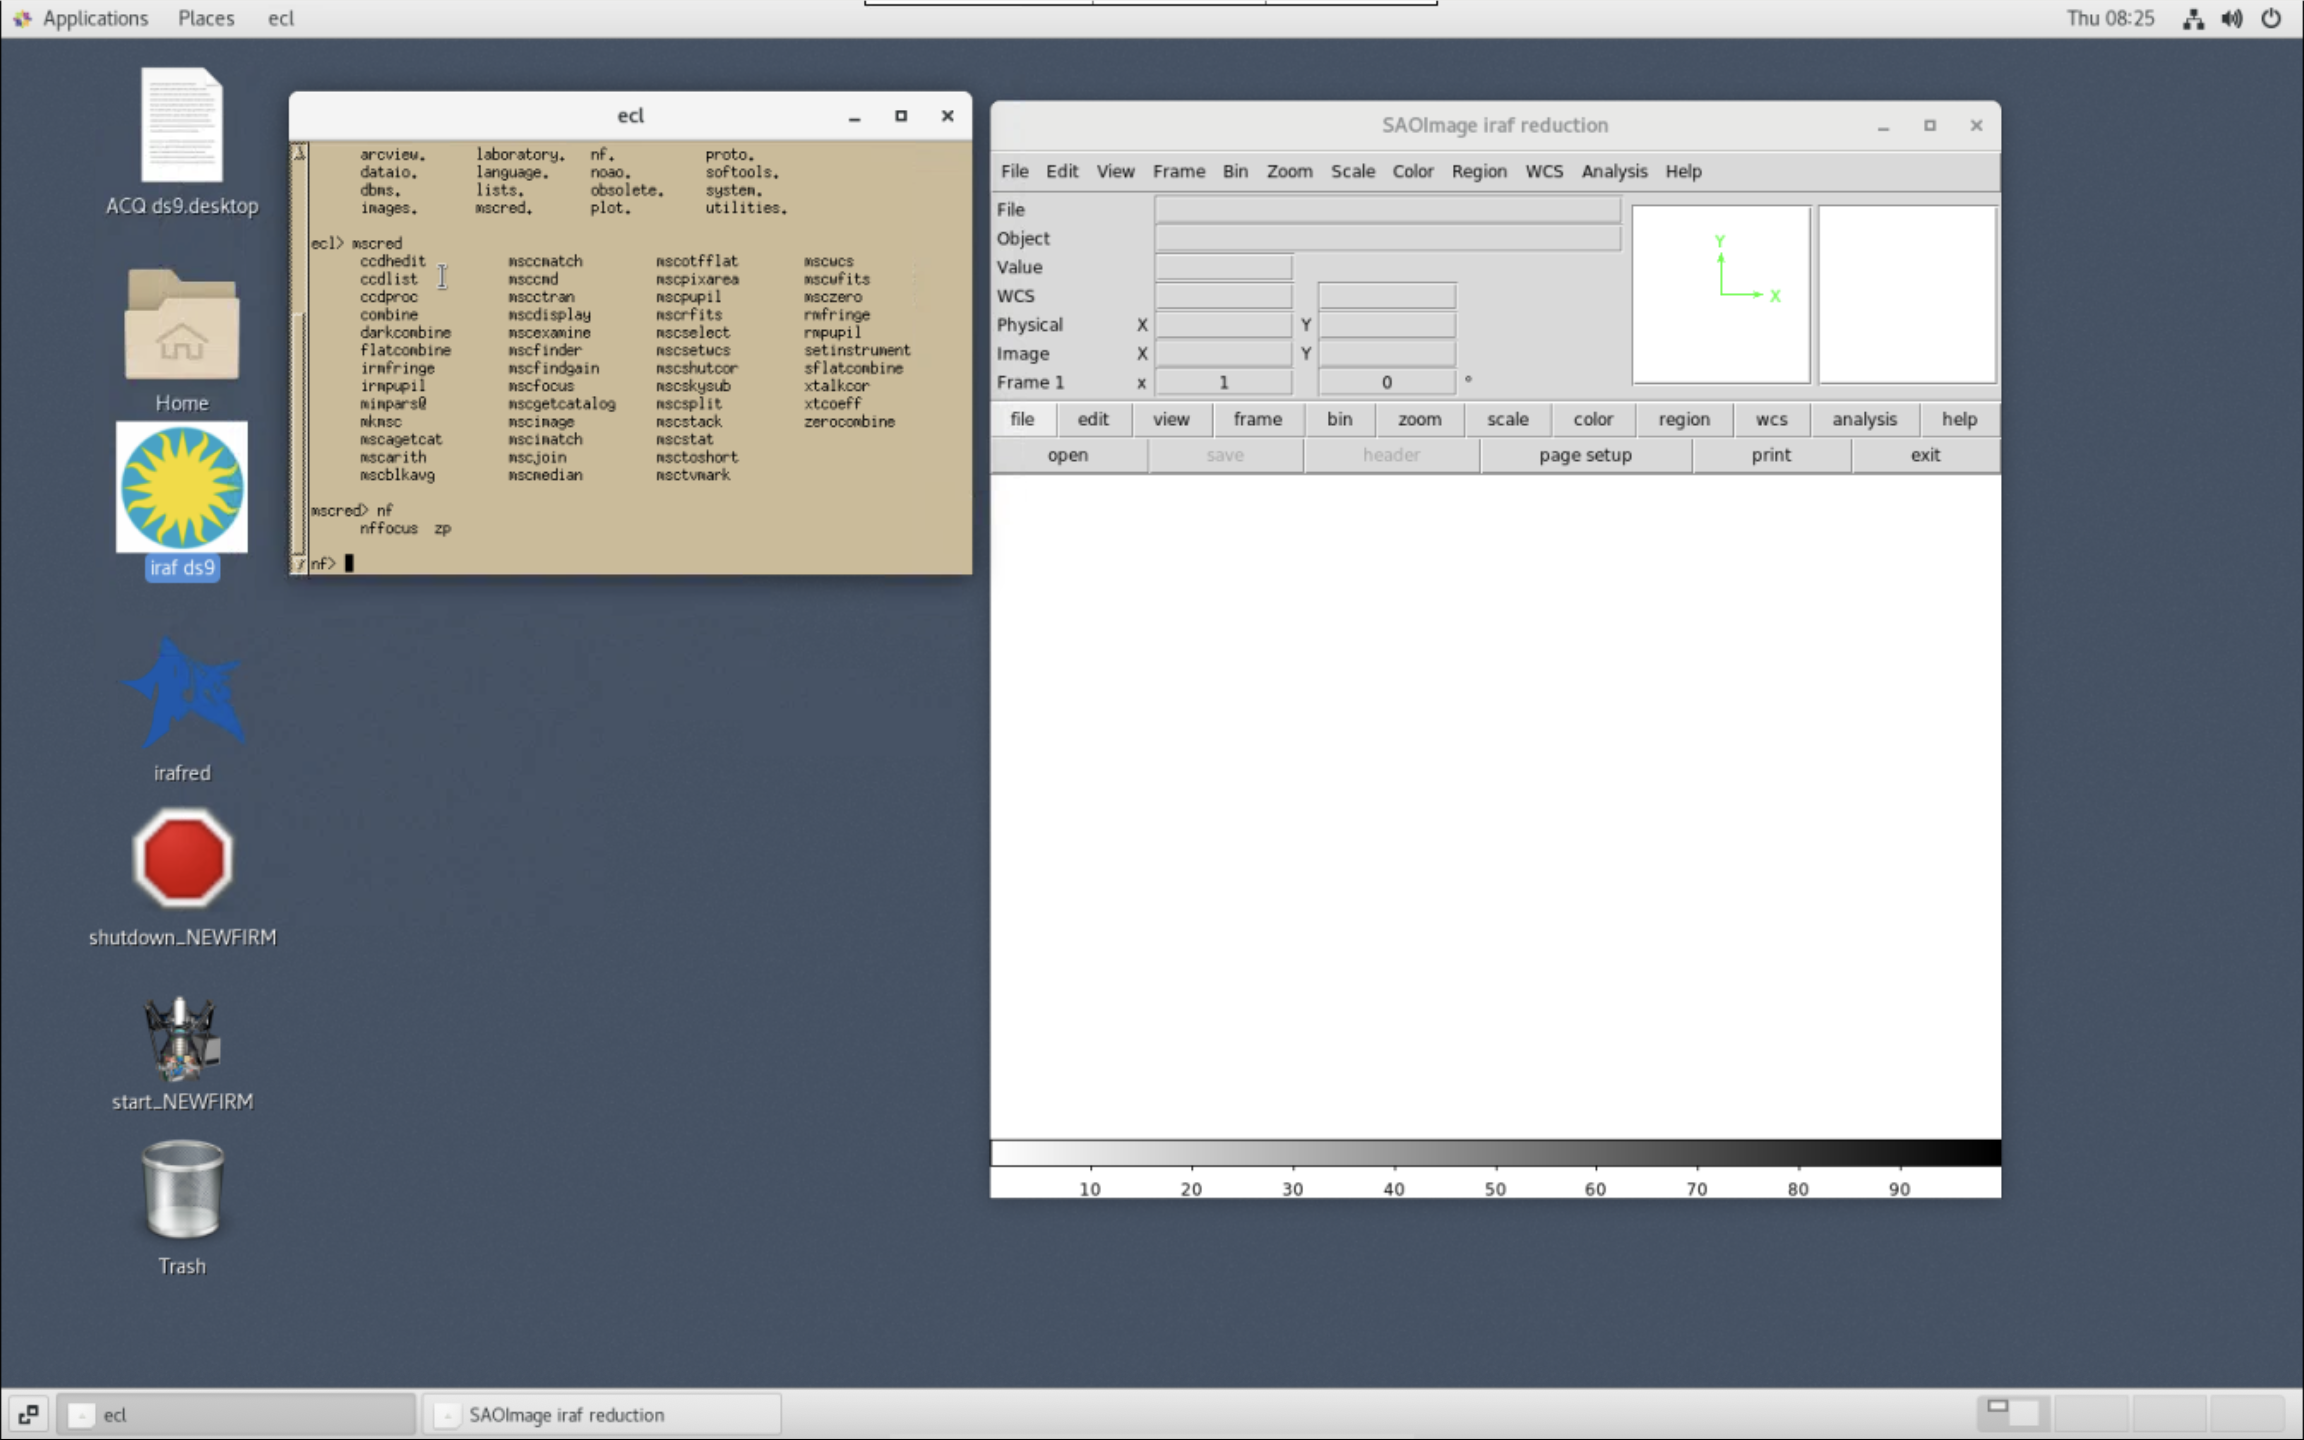
Start the IRAF mscred and nf packages in the IRAF ecl window.

Daytime Calibrations
Dome Flats
- Change the filter from "DARK" to filter of the first flat to take. In general, this is "JX".
- Select the filter from the menu and click the "FILTER MOVE" button.


- After completion, the "JX" filter will be in position.

- Open the "FLATS" tool
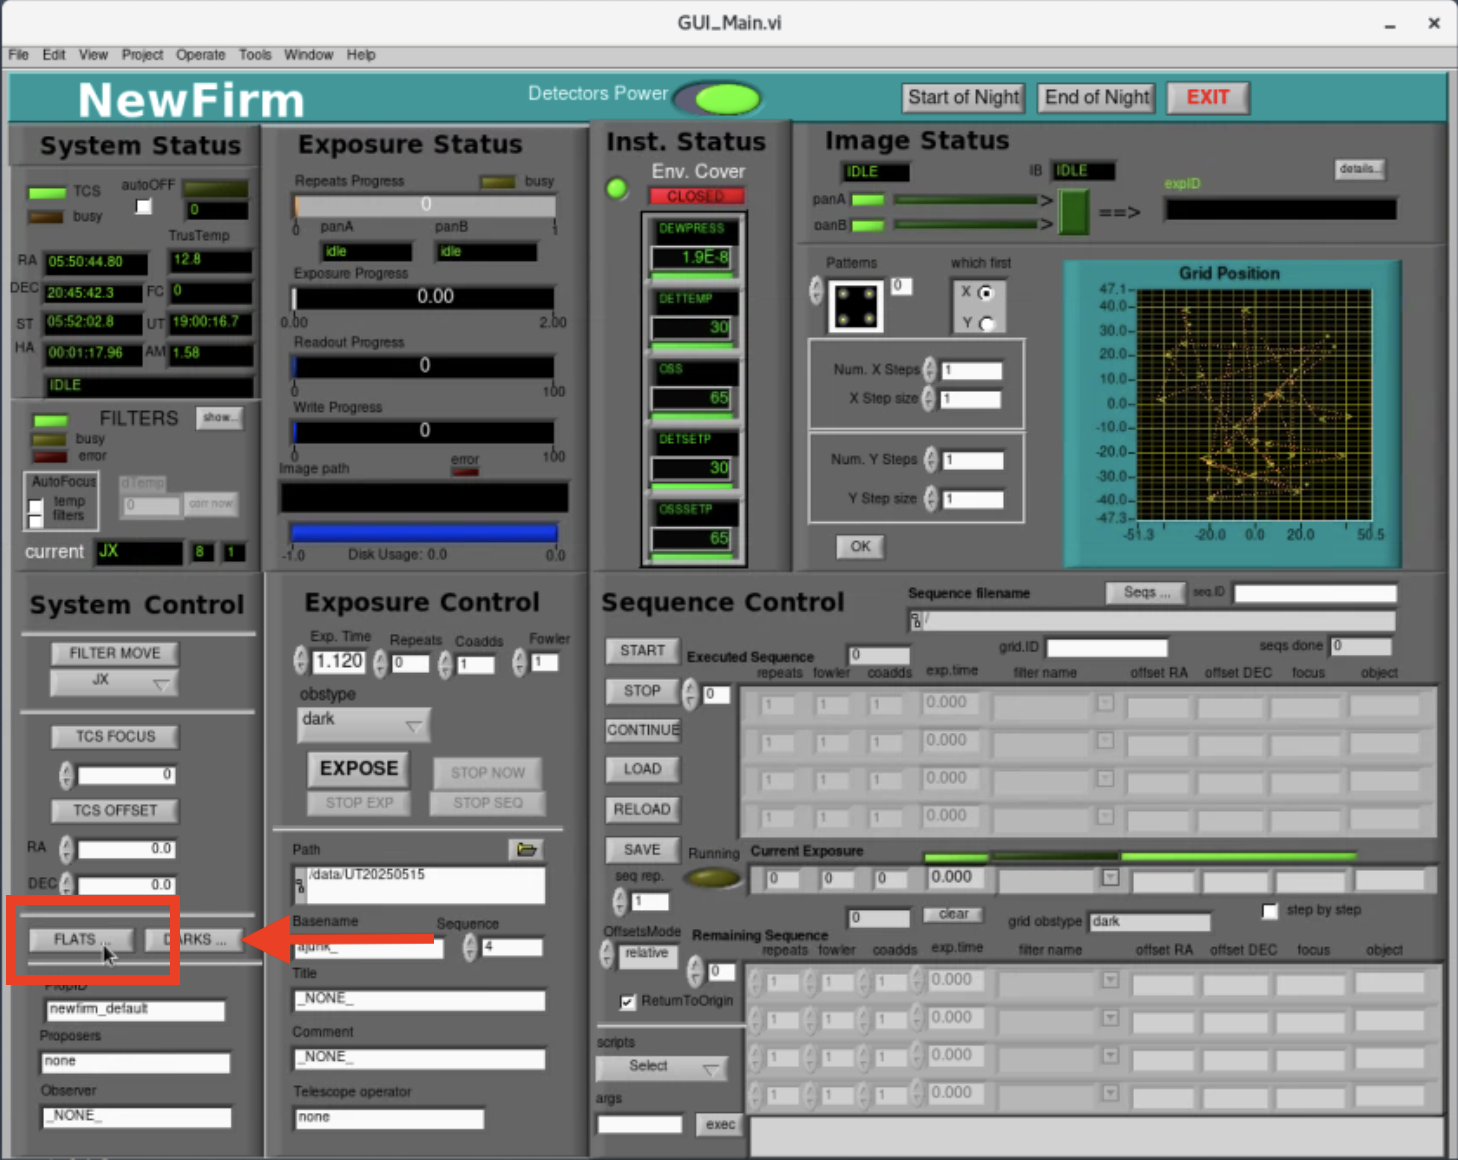
- This opens the "Flats" dialog box where predefined scripts to take the flats exist. Pre-existing scripts to obtain a sequence of flats can be found by clicking the folder icon.

- Choose the flat script you want to run and click "OK".

- Click "Load" to load the script and "GO" to execute the script.

- Press "QUIT" when the dome flat sequence is complete.
Additional Details for Observers
The configuration files to take flats are located in the directory "/home/newfirm/flats/" and should serve most purposes. Custom flat configuration files can be made. As is customary for NIR observations, flats are taken with the dome lamps turned "On" and "Off". The default configuration file takes flats for the following filters: JX, HX, KXs, 1644, 2124, and 2168. The currently used values for the exposure times and lamp intensities are given in a table below. The format of the configuration of a sequence for the JX filter is:
[1]
title="Dflat J On"
exptime=15.000
nimages=11
fowler=1
coadds=1
filter="JX"
lamp="QUARTZ"
intensity=100.000000
[2]
title="Dflat J Off"
exptime=15.000
nimages=11
fowler=1
coadds=1
filter="JX"
lamp="QUARTZ"
intensity=0.000000
The "exptime" parameter determines the exposure time of the image. The "nimages" parameter controls how many images are taken. The "filter" parameter selects the filter and the "intensity" parameter sets the dome lamp intensity. The permitted filter names are in the table below. The number of "fowler" samples and "coadds" should be "1". The custom configuration file can be uploaded and used to take flats as described above. It is not recommended taking flats directly using the GUI. An example of the flats file is found here.
|
Flat Name |
Exposure Time (s) |
Lamp Intensity (%) |
Expected Counts (DN) |
| JX | 15 | 100 | ~5600 |
| JX | 15 | 0 | ~750 |
| HX | 3 | 100 | ~6900 |
| HX | 3 | 0 | ~200 |
| KXs | 2 | 100 | ~6300 |
| KXs | 2 | 0 | ~3000 |
| J1 | 10 | 100 | ~6300 |
| J1 | 10 | 0 | ~450 |
| 1066 | 480 | 100 | ~4900 |
| 1066 | 480 | 0 | ~10 |
| 1187 | 240 | 100 | ~4400 |
| 1187 | 240 | 0 | ~150 |
| 1644 | 45 | 100 | ~6300 |
| 1644 | 45 | 0 | ~50 |
| 2096 | 30 | 100 | ~4900 |
| 2096 | 30 | 0 | ~1200 |
| 2124 | 20 | 100 | ~4100 |
| 2124 | 20 | 0 | ~1600 |
| 2168 | 20 | 100 | ~4400 |
| 2168 | 20 | 0 | ~2200 |
Darks
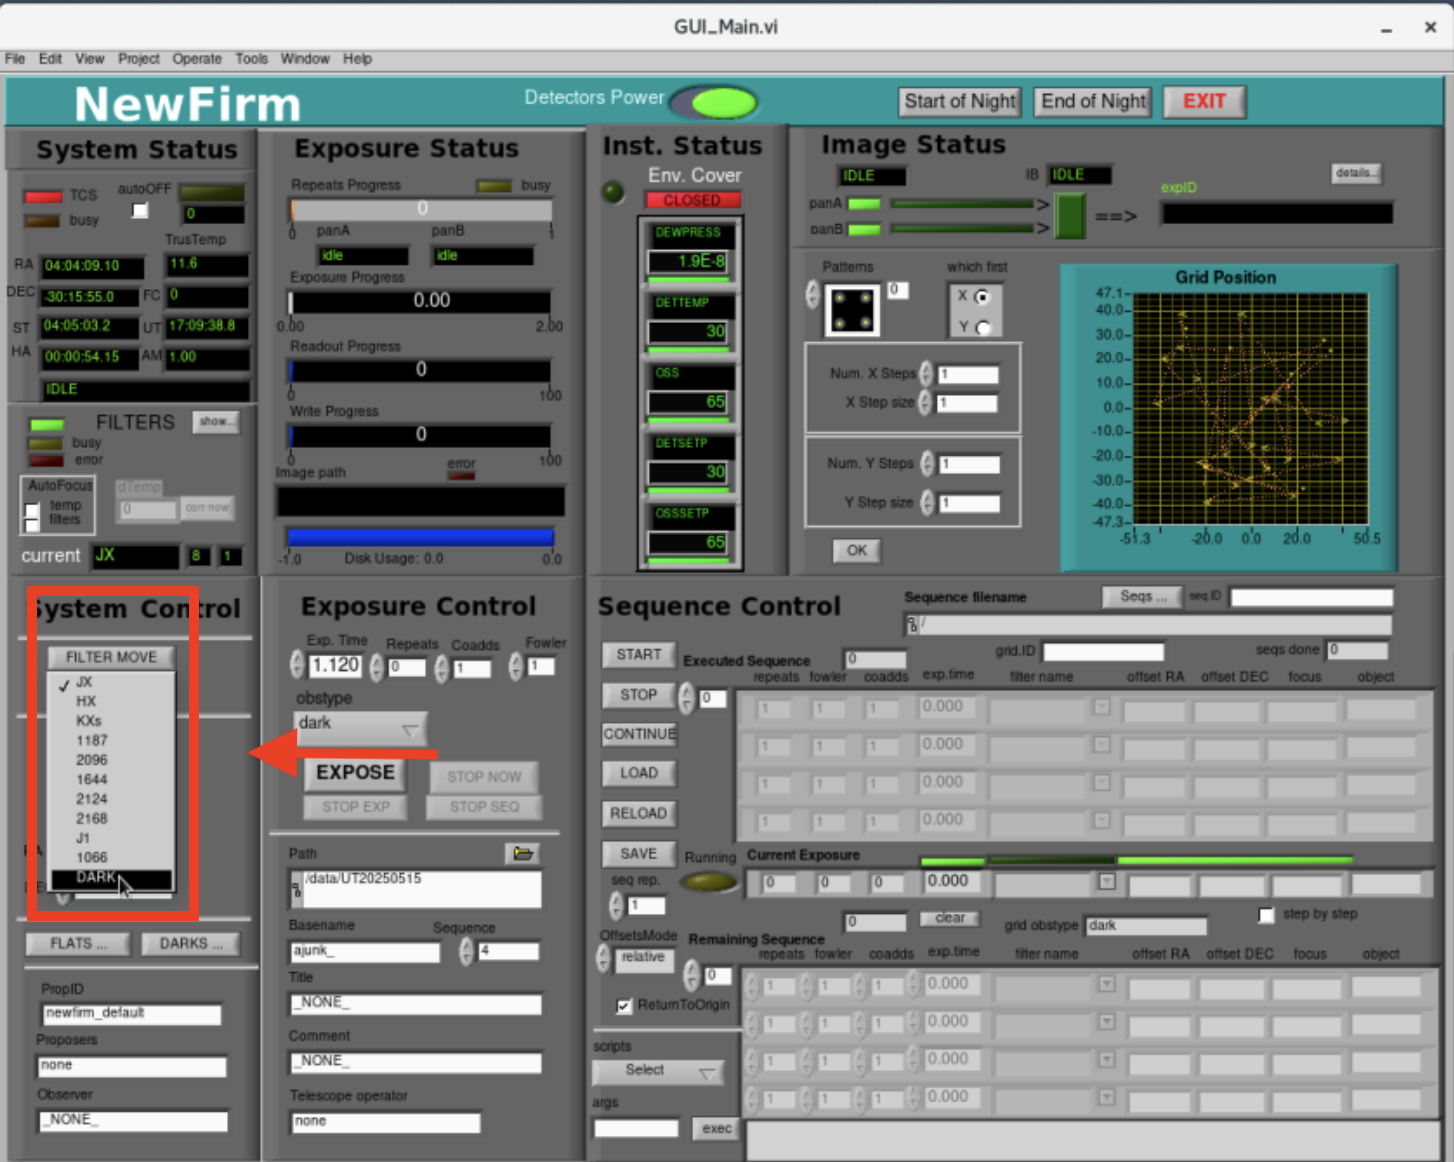
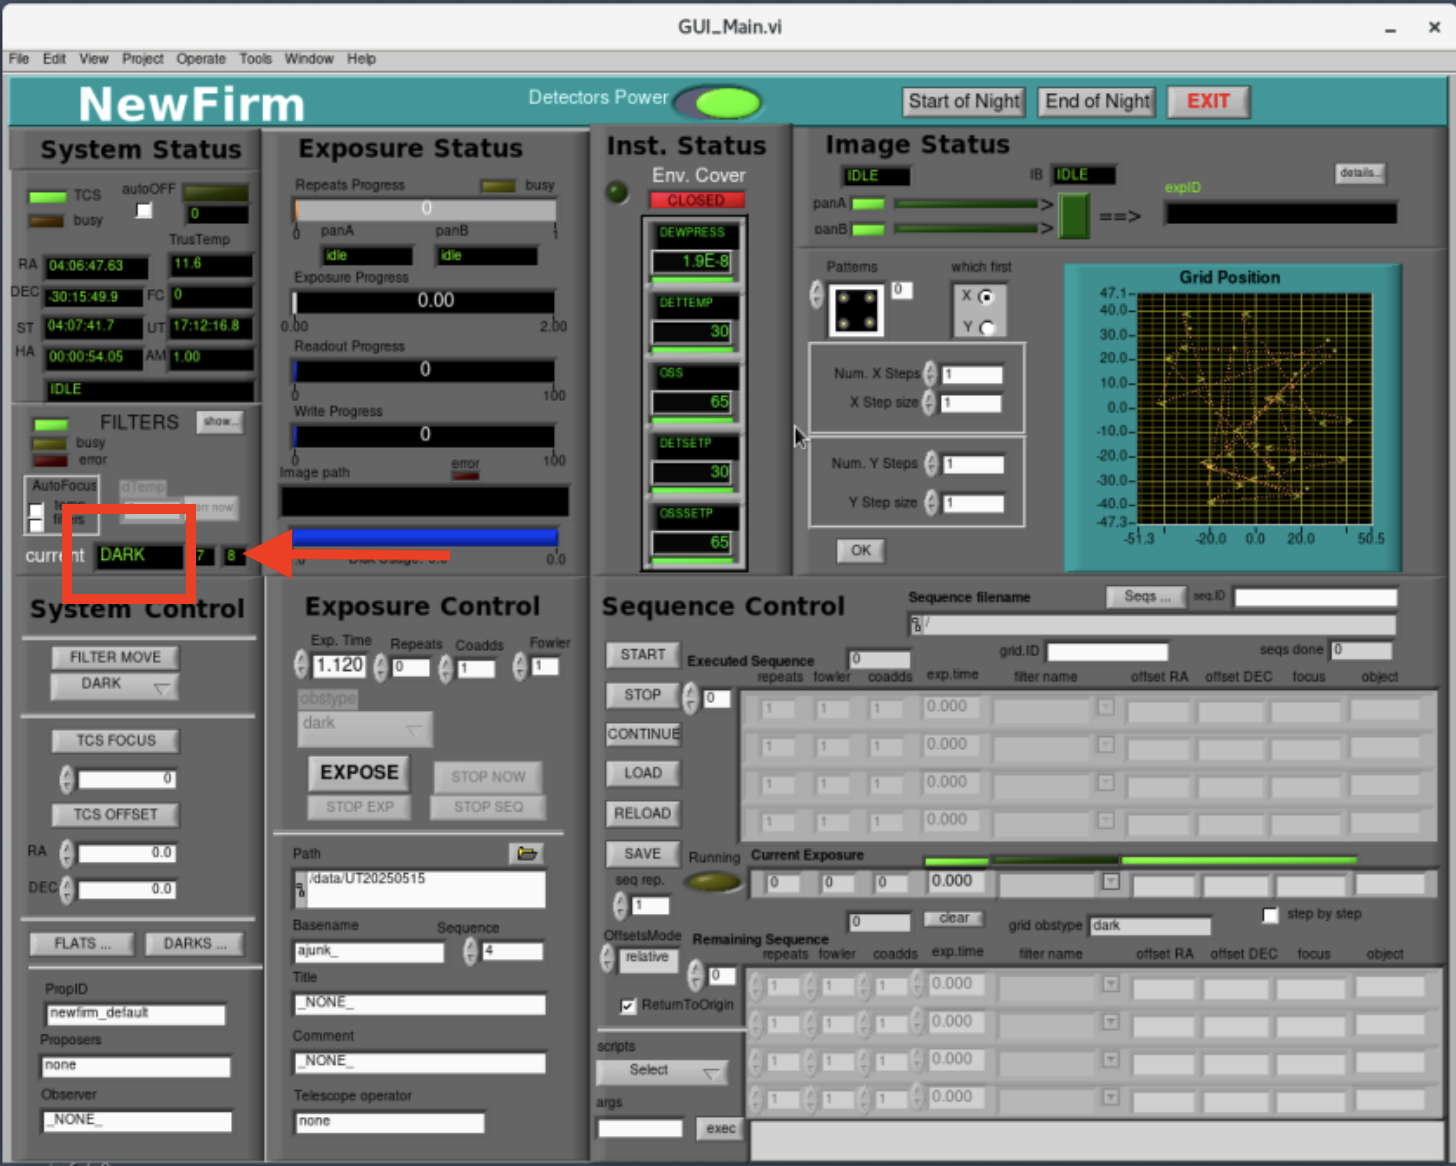
- Change the filter to "DARK" by selecting the DARK filter in the menu and click "FILTER MOVE". Wait until the DARK filter is in position.
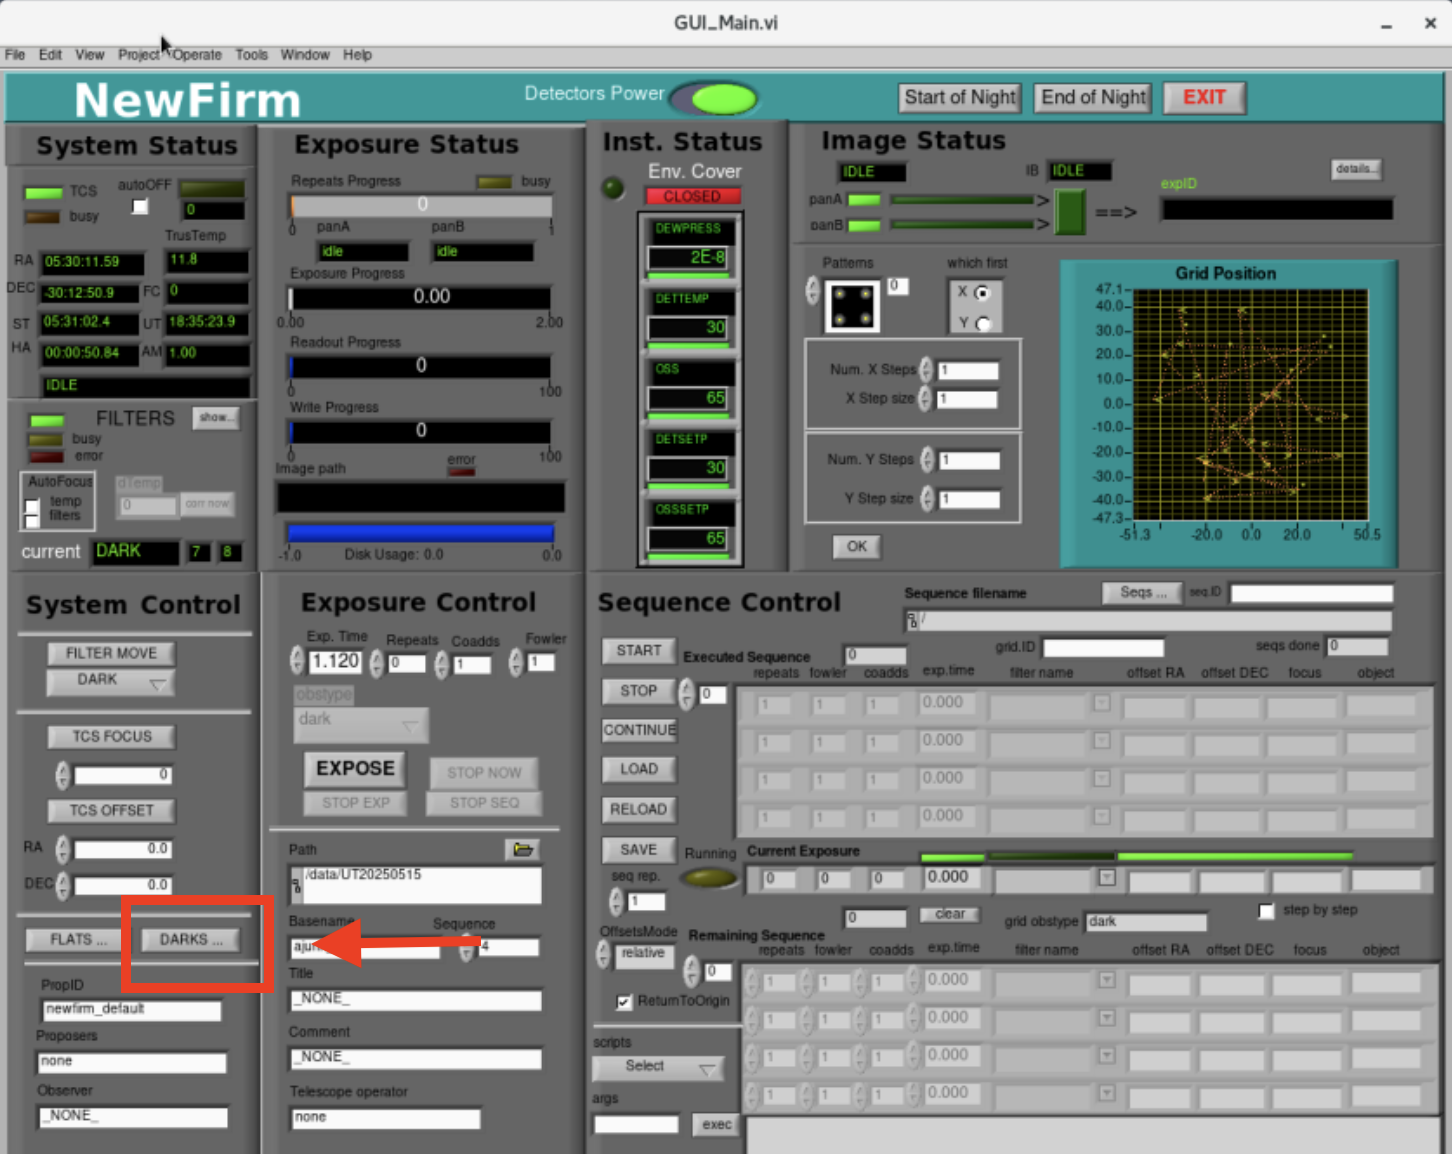
- Open the "DARKS" tool.
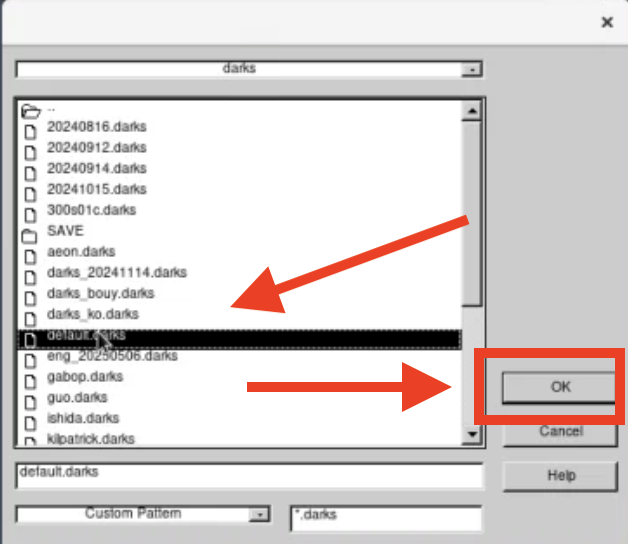
- This opens the DARKS dialog box where you can choose the dark script to run. Pre-existing scripts to obtain a sequence of darks can be found by clicking the folder icon.

- Choose the dark script you want to run and click "OK".
- Click "Load" button to load the script and "GO" to execute the script.
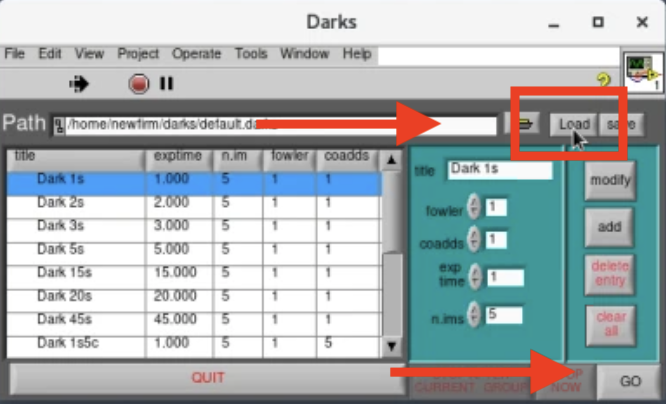
- Press "QUIT" when the dark sequence is complete.
Additional Details for Observers
The configuration files that take the dark exposures are located in the directory "/home/newfirm/darks/". The darks need to be taken in the same observing configuration as the science observations of the night, i.e., matching the exposure time, number of coadds, and fowler samples. The format of a darks configuration file is:
[1]
title="Dark 001s01c01f"
exptime=1.000
nimages=5
fowler=1
coadds=1
for a dark with an exposure time of 1 second, a Fowler sample of 1, and 1 coadd.
[2]
title="Dark 180s02c08f"
exptime=180.000
nimages=5
fowler=8
coadds=2
for a dark with exposure time of 180 seconds, a Fowler sample of 8, and 2 coadds. The dark configuration file for observations can be loaded and executed by following the procedure described above. It is not recommended taking darks directly using the GUI. An example of the darks file can be found here.
Telescope Pointing
At the beginning of the night, the first task is to check the telescope pointing. This procedure is detailed below.
- Move to a bright star (6th-8th mag)
- Put the JX filter in place by selecting the JX filter from the list and press the "FILTER MOVE" button.
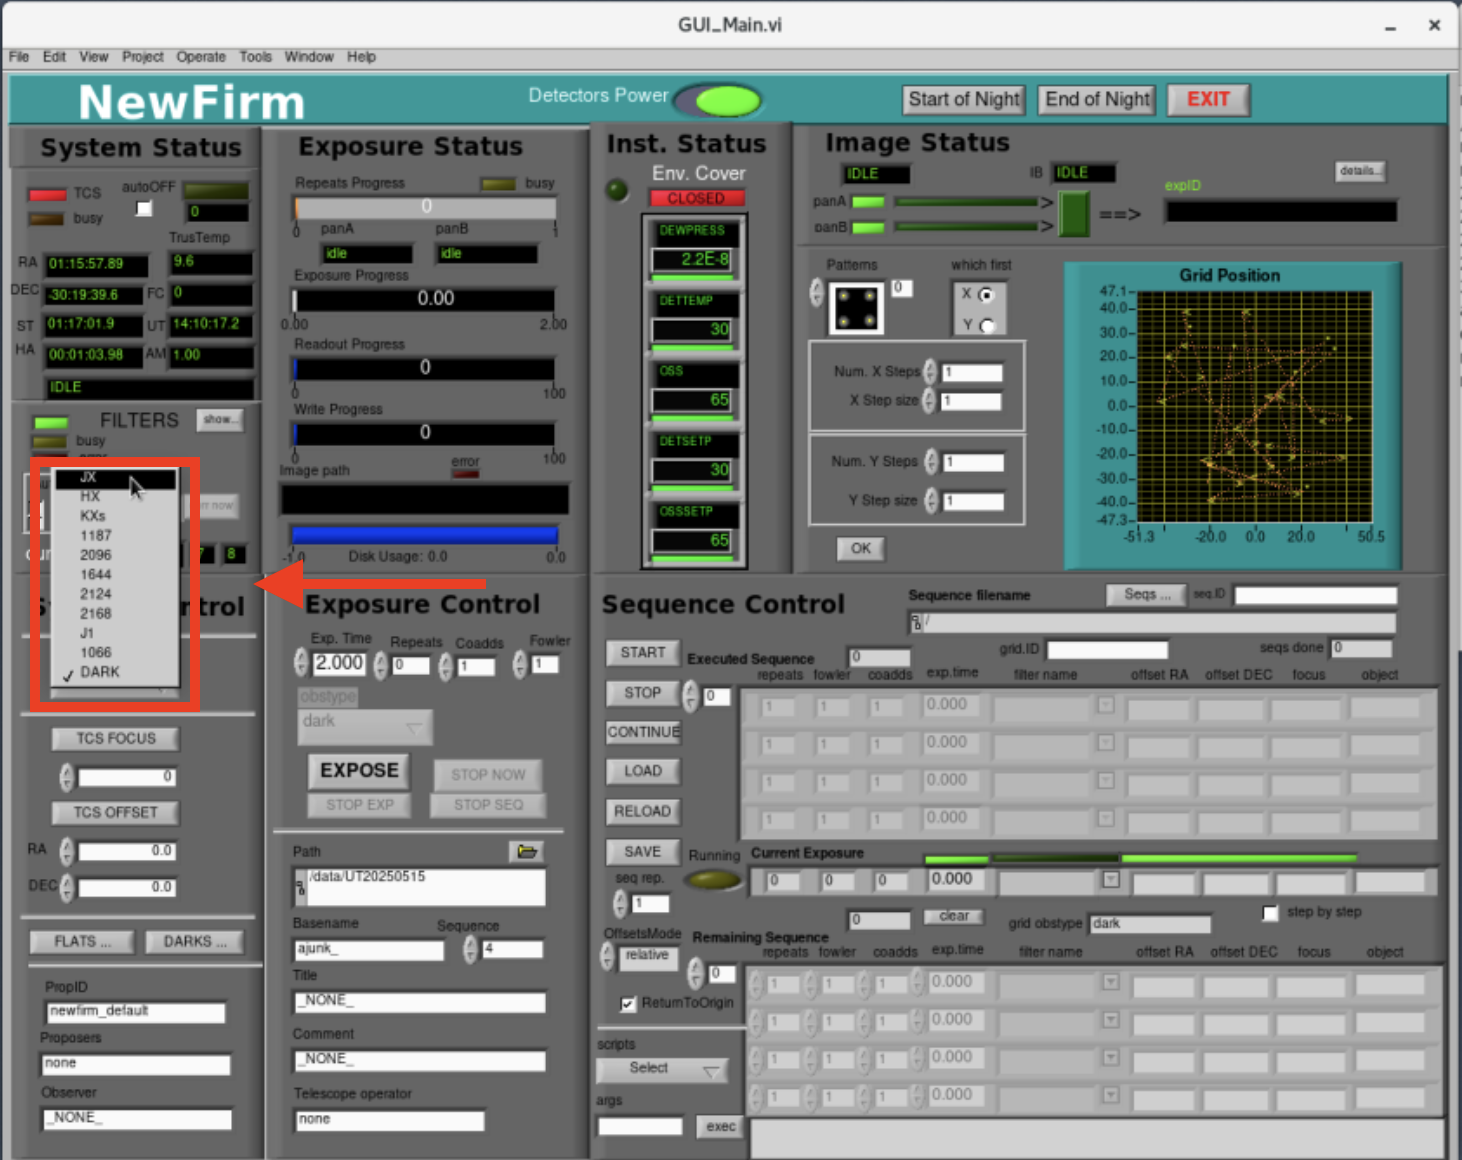
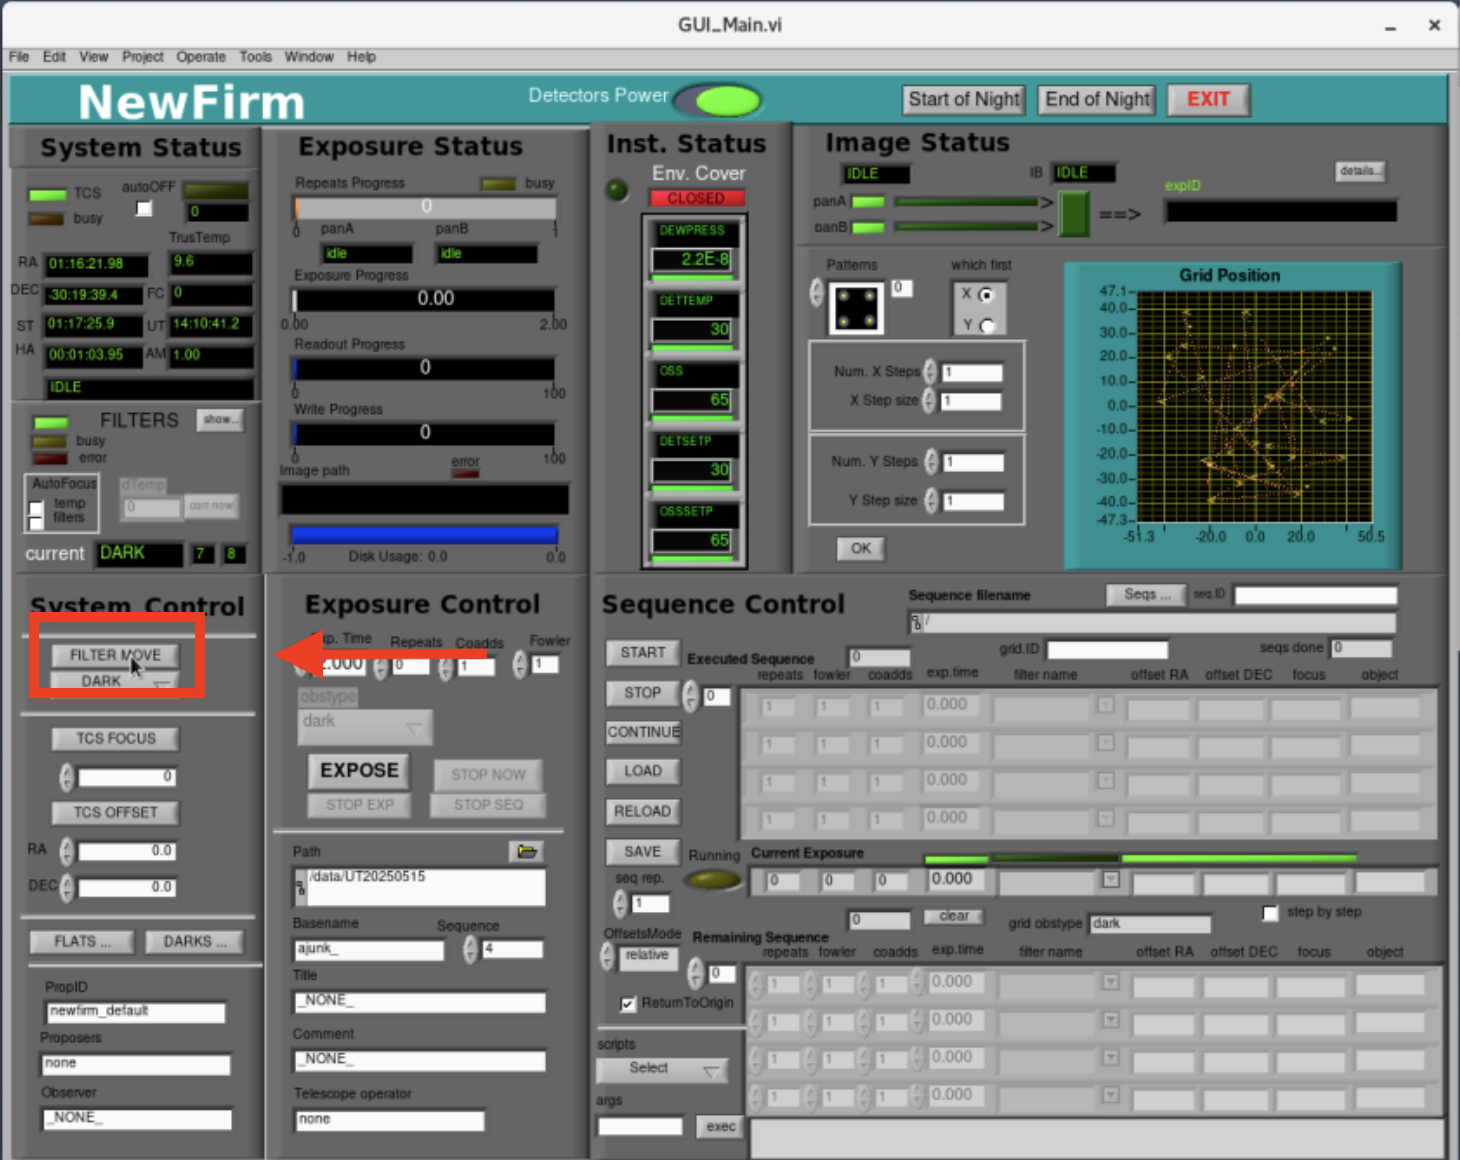
- Use the GUI interface under "Exposure Control" to take an image of the field with the following values:
- Filter = JX
- Exp Time = 2 s
- Repeats = 0
- Coadds = 1
- Fowler = 1
- ObsType = "object"
- Filename = "zp_"
- Title = "Telescope Pointing"

- Take an exposure by pressing the "EXPOSE" button.

- Use the IRAF window to display detector 3. If the pointing is close, the bright star will be located in the detector gap. To display in IRAF:
nf> display zp_0156[3] 1 zs+

- To place the bright star on a detector (detector 3 to be exact), use the NEWFIRM GUI to perform an offset of 60" N and 60" E. Enter the offset values in "System Control" panel and press the "TCS OFFSET" button to move the telescope. North/East offsets have a positive (+) sign and South/West offsets have a negative (-) sign. Take an exposure once the offset is complete.

- Use IRAF to display the new image for detector 3.
nf> displ zp_0157[3] 1 zs+

- Use the IRAF nf.zp task to calculate the offset of the star to the center of the detector gap. The "zp" task is a wrapper to the "imexam" task. Follow the on-screen instructions to determine the offset. The "zp" task can only calculate the offset if the star is in detector 3.

- Use the NEWFIRM GUI to perform an offset of 60.3" S and 96.3" W. Enter the offset values in "System Control" panel and press the "TCS OFFSET" button to move the telescope. North/East offsets have a positive (+) sign and South/West offsets have a negative (-) sign. Make sure to include the minus sign for these South/West offsets. When the offset is completed, ask the Telescope Operators to perform a telescope zero-point. Take a new image after the Operators have completed the Telescope Zero-Point.

- Check the quality of the telescope pointing of the last image by loading the image into a ds9 window.
- Open the FITS File as a "Mosaic IRAF" image.

- Select the file, e.g. "/data/UT20250513/zp_0158.fits". Make sure the path is for the current data directory.

- Change the image scaling from "Min Max" to "ZScale" in the ds9 "Scale" menu so you can see the stars.

- Open the Analysis/Catalogs/Infrared/2MASS Point Sources catalog in ds9.

- Create a source filter in the 2MASS Point Sources window, e.g. "$Jmag < 13" (or 12 or 14) and press "Filter" to display stars in the 2MASS Catalog with a J magnitude less than 13 mag (or 12 or 14 mag). The filter magnitude can be changed as necessary.

- You will see the 2MASS Point Sources overlaid on the mosaicked ds9 image.

- Open the FITS File as a "Mosaic IRAF" image.
- The Telescope Pointing is now complete.
Telescope Focus
- The Telescope Focus is performed at the beginning of the night after the Telescope Pointing check is complete. It is normally done on the same field as the Telescope Pointing.
- The Telescope Focus depends upon the ambient temperature and the selected filter. All focus exposures should be taken using the JX filter.
- Since re-commissioning NEWFIRM, we have maintained a spreadsheet on a shared Google Drive where the best focus in JX and temperature are recorded. That spreadsheet can be found here.
- Before running a focus sequence it is suggested to change the telescope focus manually to the best focus value predicted by the spreadsheet for the current temperature.
- Set filter to JX. It should already be JX after the Telescope Pointing procedure.
- Check the temperature.

- Use the spreadsheet to predict the best focus for that temperature. Enter the temperature in the cyan box below "Temp".

- Set the focus in the NEWFIRM GUI. The NEWFIRM focus tool only performs relative offsets from the current focus. Calculate the focus offset (Offset = Desired Focus - Current Focus) and enter the value in the box below "TCS FOCUS". Press the "TCS FOCUS" button when done and you should see the current focus change.

- Take an image.
- DIsplay the image in IRAF and inspect the image in IRAF with imexam. Pressing the "e" key in imexam with display a contour plot. If the image is close to focus, the contours will appear round.
nf> displ focus_0159[3] 1 zs+
nf> imexam
- Take a focus sequence. Even if the focus looks good from the previous step, taking a focus sequence records the current temperature value into a database that can be rad by the observing GUI and will alert the observer to temperature changes that require a focus offset.
- Set the observing parameters for the sequence (JX filter, 2 sec exposure time, 0 repeats, 1 coadd, 1 fowler) in the "Exposure Control" panel.

- Select the "nf_focus_wide" script in the "scripts" menu.

- Enter the expected focus value in the "args" box.

- Press "exec".

- This script will take nine focus images centered on the input expected focus value.
- Set the observing parameters for the sequence (JX filter, 2 sec exposure time, 0 repeats, 1 coadd, 1 fowler) in the "Exposure Control" panel.
- Determine the best focus using the NEWFIRM IRAF "nffocus" task.
- The "nffocus" task is a wrapper to the IRAF noao.obsutil.starfocus task. It cannot use the Multi-Extension FITS (MEF) files that the NEWFIRM control software writes to disk. It can only work on one detector.
- The NEWFIRM "nf_focus_wide" (and "nf_focus_narrow") task writes a list of the files taken during a focus sequence. This file is "/tmp/focuslist"
- Edit the file "/tmp/focuslist" so the "nffocus" task will only work on one detector. This is done by appending "[n]" to the end of the file names where n=1,2,3, or 4, corresponding to detector 1, detector 2, detector 3 or detector 4. The text editors available are: vi, gedit, and nano.
- Before editing, the entries in the file look like:
/data/UT20250513/focus_0174.fits
/data/UT20250513/focus_0175.fits
/data/UT20250513/focus_0176.fits
/data/UT20250513/focus_0177.fits
/data/UT20250513/focus_0178.fits
/data/UT20250513/focus_0179.fits
/data/UT20250513/focus_0180.fits
/data/UT20250513/focus_0181.fits
/data/UT20250513/focus_0182.fits - After editing, the entries in the file should look like the following to select detector 3:
/data/UT20250513/focus_0174.fits[3]
/data/UT20250513/focus_0175.fits[3]
/data/UT20250513/focus_0176.fits[3]
/data/UT20250513/focus_0177.fits[3]
/data/UT20250513/focus_0178.fits[3]
/data/UT20250513/focus_0179.fits[3]
/data/UT20250513/focus_0180.fits[3]
/data/UT20250513/focus_0181.fits[3]
/data/UT20250513/focus_0182.fits[3]
- Before editing, the entries in the file look like:
- Execute the IRAF "nffocus" task.
nf> nffocus - The "nffocus" task will automatically display the first image of the focus sequence. The task will then prompt the observer with the following:
** Select stars to measure with 'm' and finish with 'q'.
** Additional options are '?', 'g', and :show. - Select a star and press "m". A graph showing a plot of FWHM vs Focus and Ellipticity vs Focus will appear in the irafterm window.

- After pressing "q", the "nffocus" task will quit and display the results in the IRAF ecl window.

- Set the telescope focus to the value determined by the "nffocus" task. Calculate the offset between the desired focus and the current focus (Offset = Desired - Current) and enter the value in the box below "TCS FOCUS". Press "TCS FOCUS" to change the focus value.

- The software will also record the temperature. During the night it will compare the current temperature to the temperature during the focus sequence and display a warning if the temperature changes enough to affect the focus.

- The NEWFIRM filters are not parfocal, so the telescope focus needs to be changed when changing filters. The focus offsets have been determined during engineering time with stable and good (<1.2" FWHM) seeing. The offset values relative to JX are given here. The NEWFIRM GUI has an "AutoFocus" option that will change the focus when the filters are changed. Enable the AutoFocus tool by checking the box for "AutoFocus" for filters.

- The Telescope Focus sequence is complete.
Additional Details for Observers
1) Visual inspection of the focus images
It is a good idea to inspect the focus images while the focus sequence is being taken. This provides a check against the focus value that the IRAF nffocus task calculates. The "nffocus" task can also fail occasionally if the focus sequence starts with the telescope very out of focus or if a saturated star is selected. The "nffocus" task will report "Invalid Flux Profile" in the IRAF window (if this occurs press control-c until the message stops and type "flpr" on the IRAF command line). The best way to do this is to display the image in ds9 and use IRAF imexam to look at a non-saturated star. To display the third detector of an image in IRAF and start imexam:
nf> displ image.fits[3] 1 zs+
nf> imexam
This will start the interactive mode for imexam. The IRAF imexam cursor commands that are relevant are:
"a" - print x,y centroid values, the aperture sum of the object, the sky level, the object peak, the ellipticity, and measurements of the object's FWHM in the IRAF window.
"e" - display a contour plot of the object
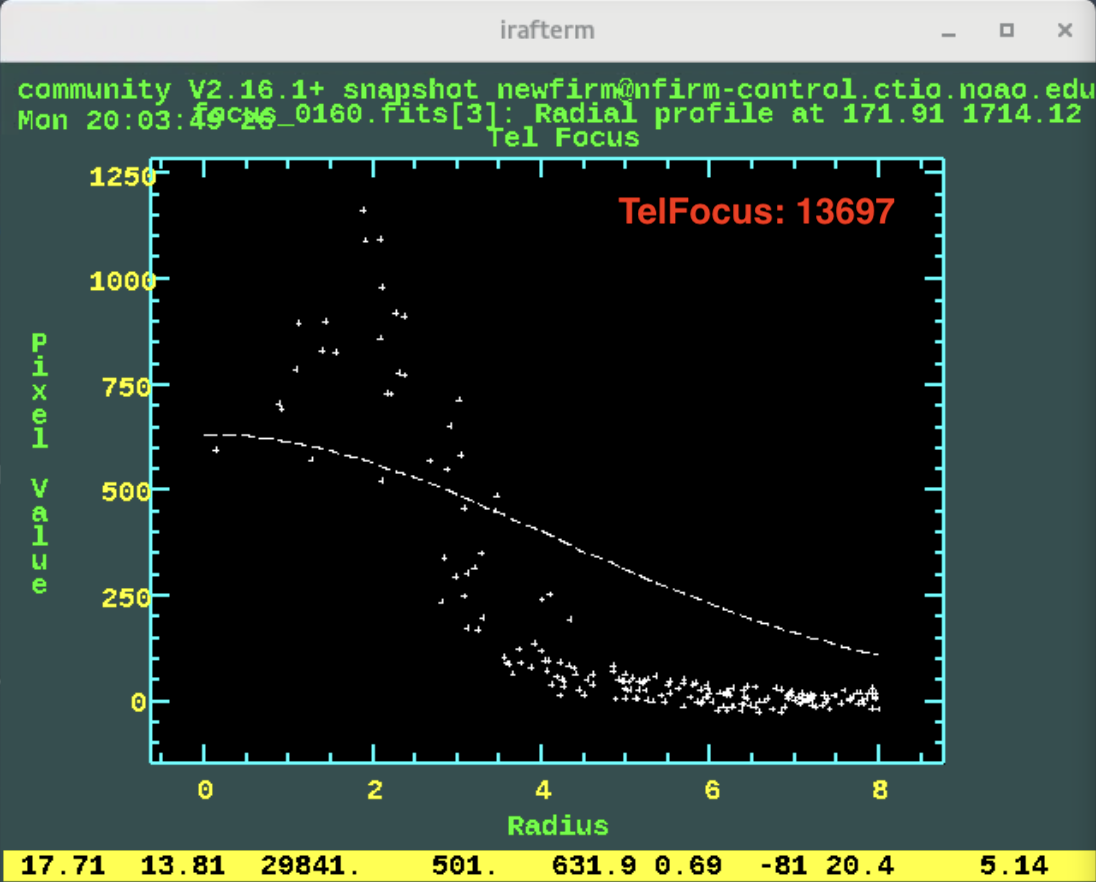
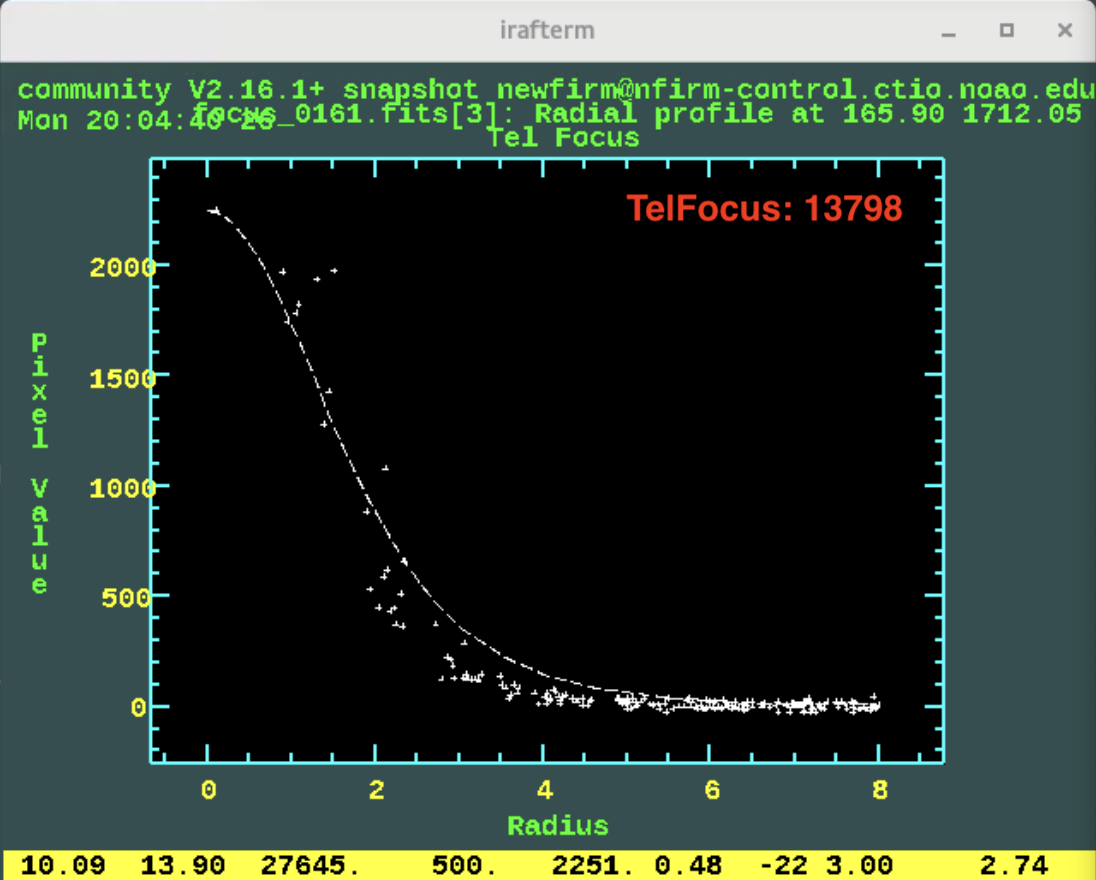
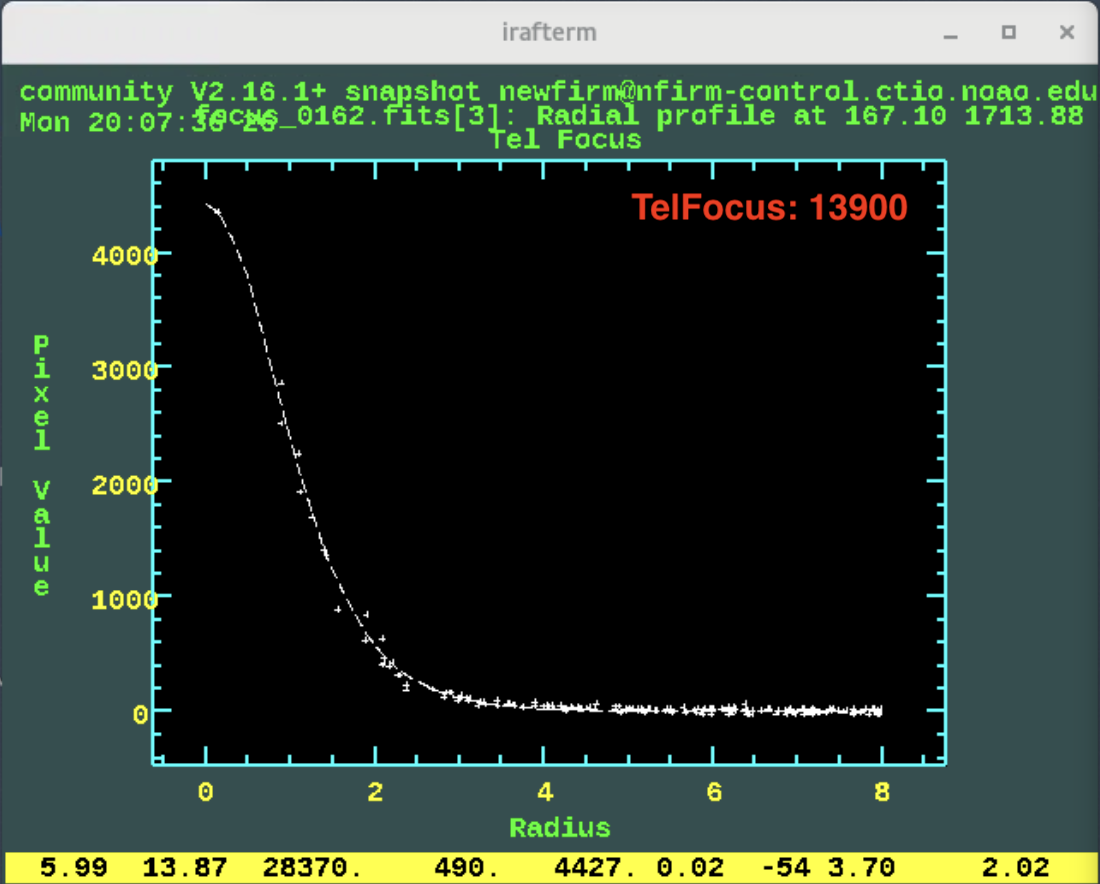
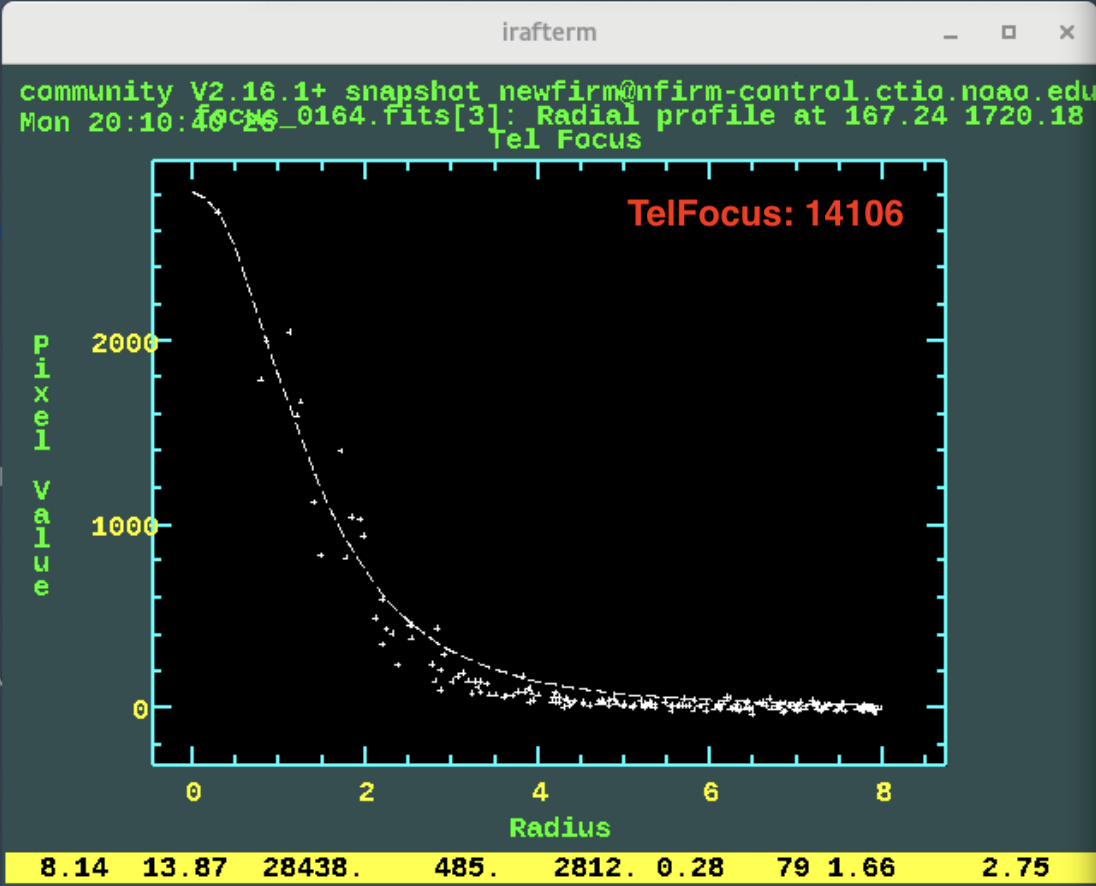
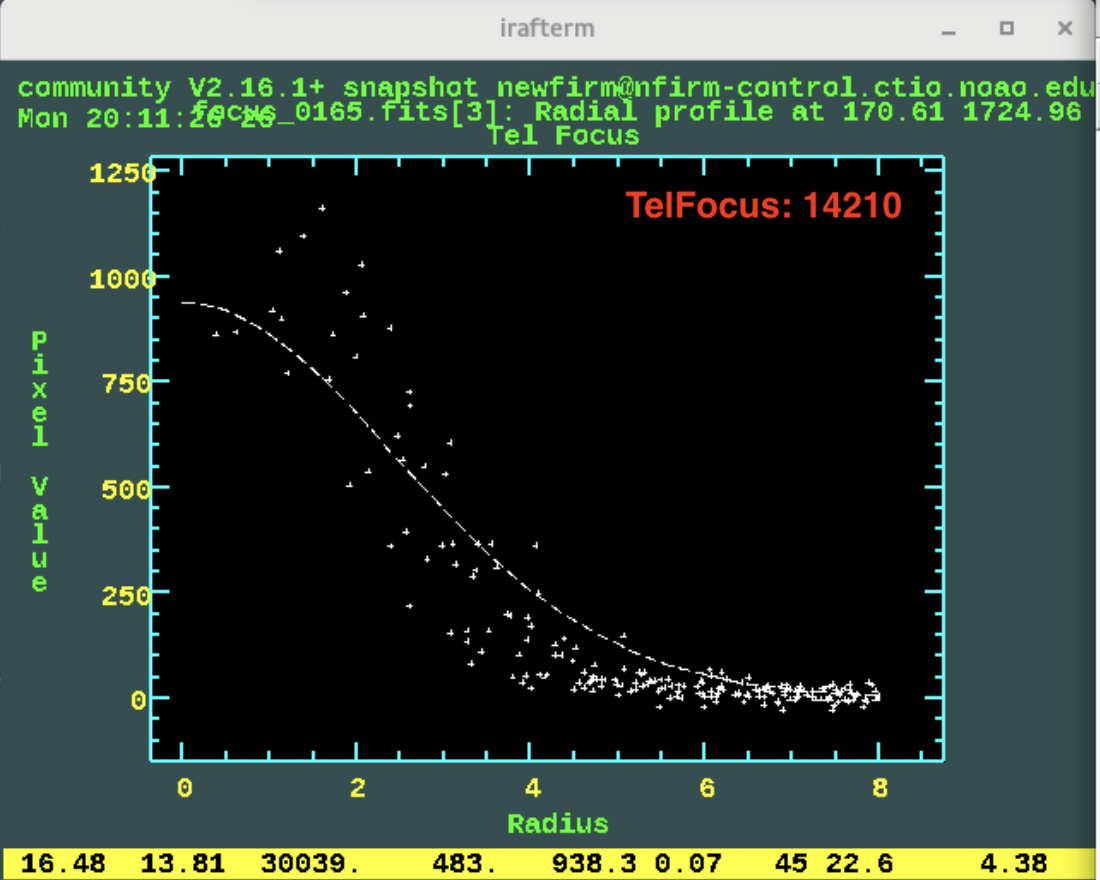
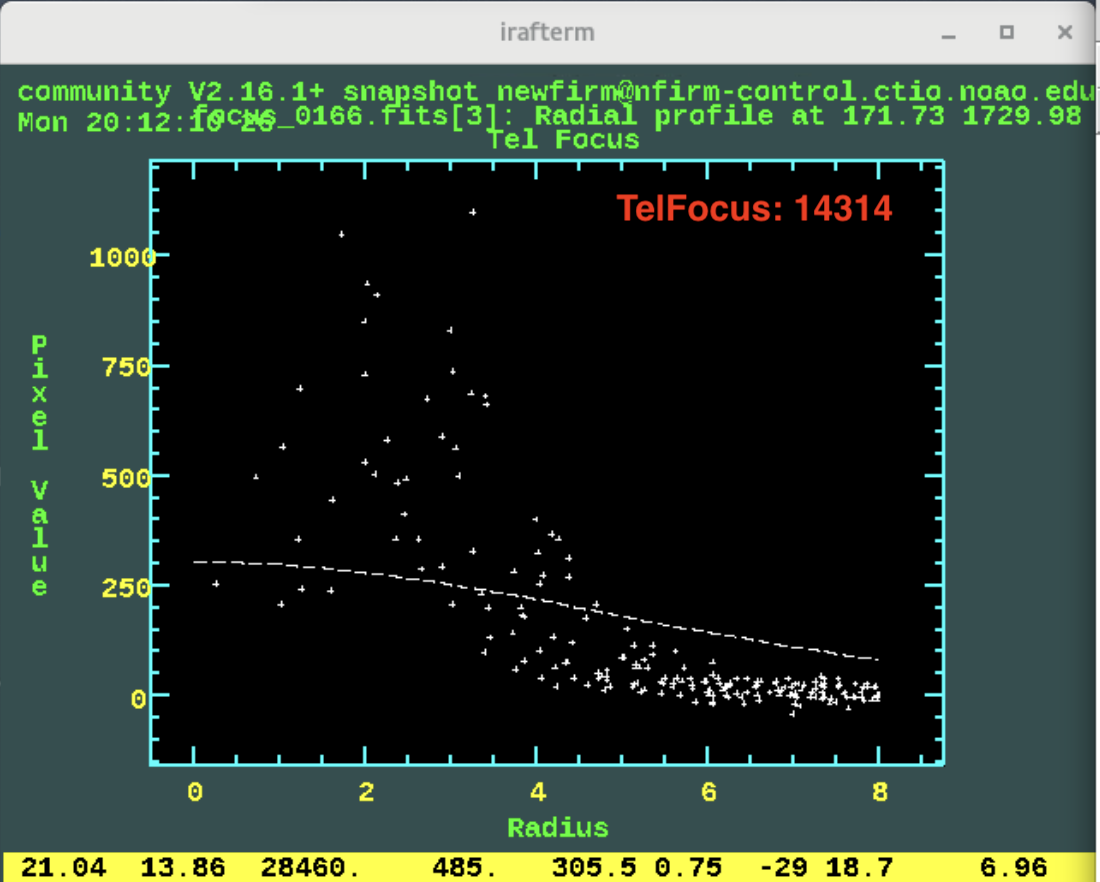
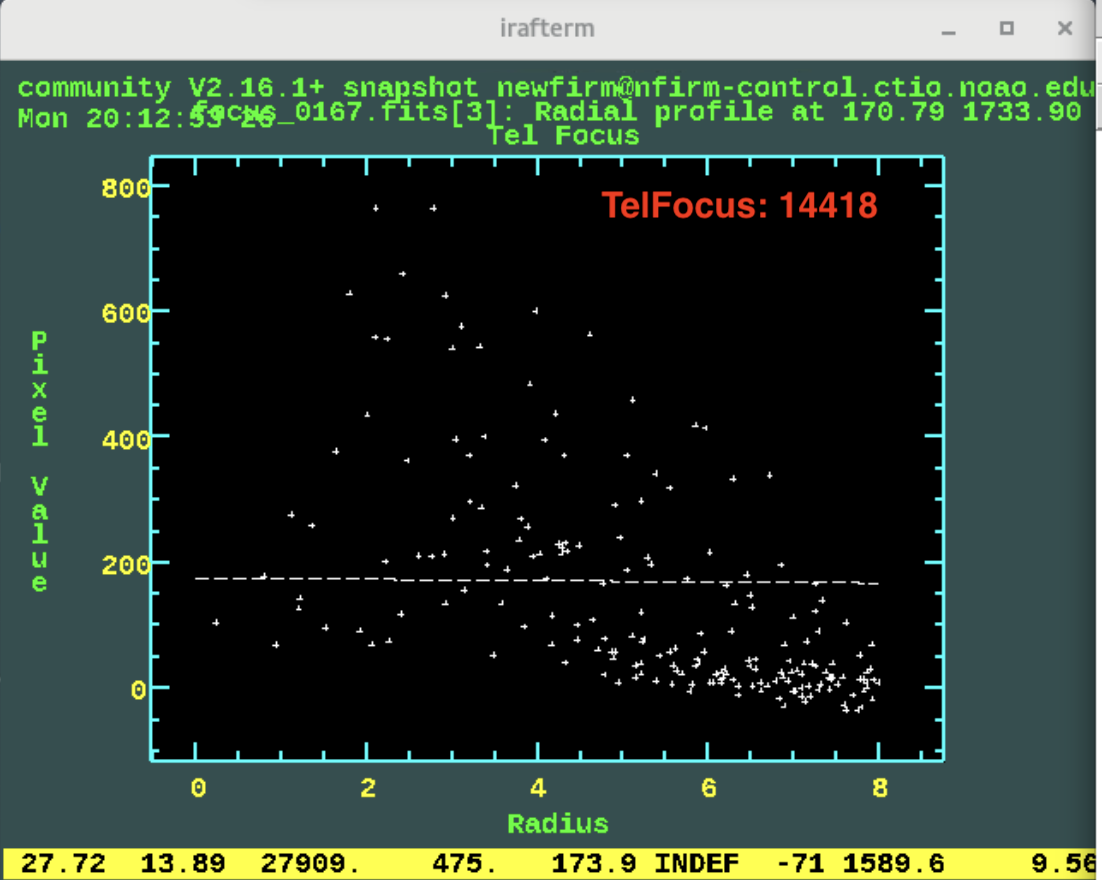
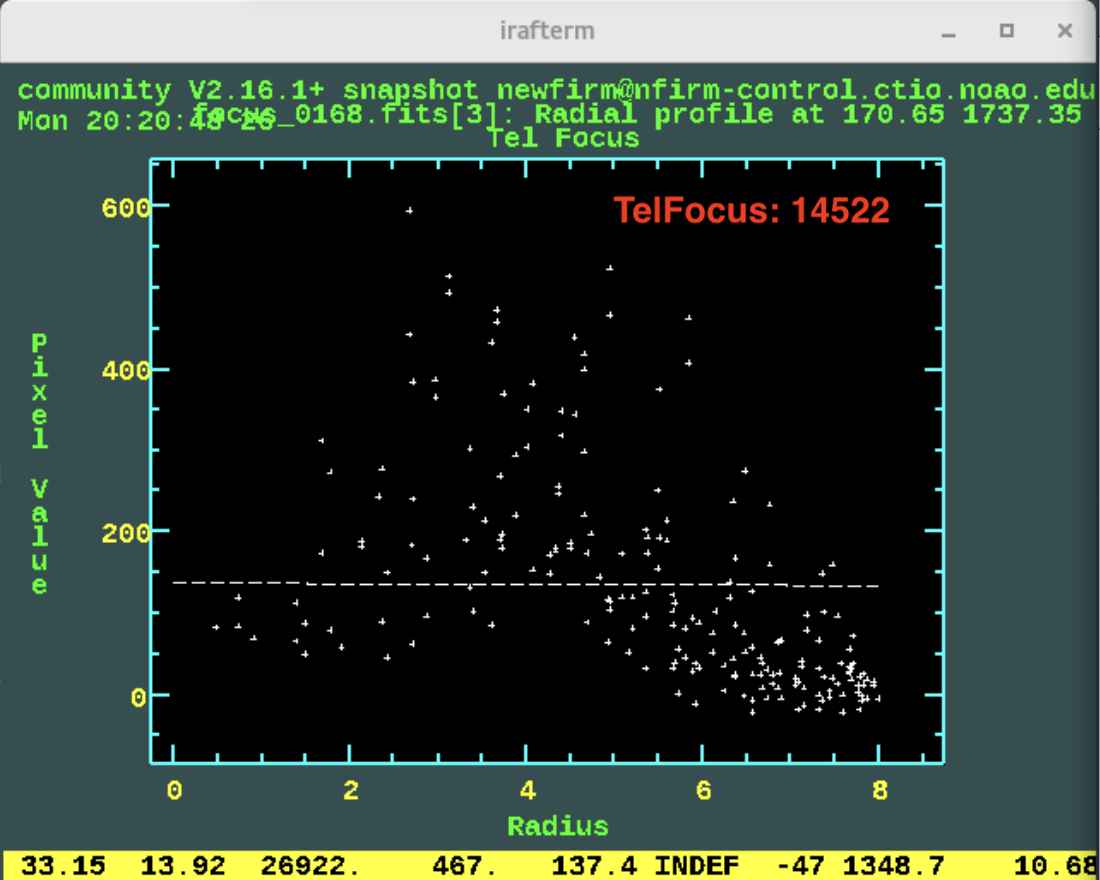
"r" - display a radial plot of the object with sky level, peak, and FWHM displayed, and
"s" - display a surface plot of the object
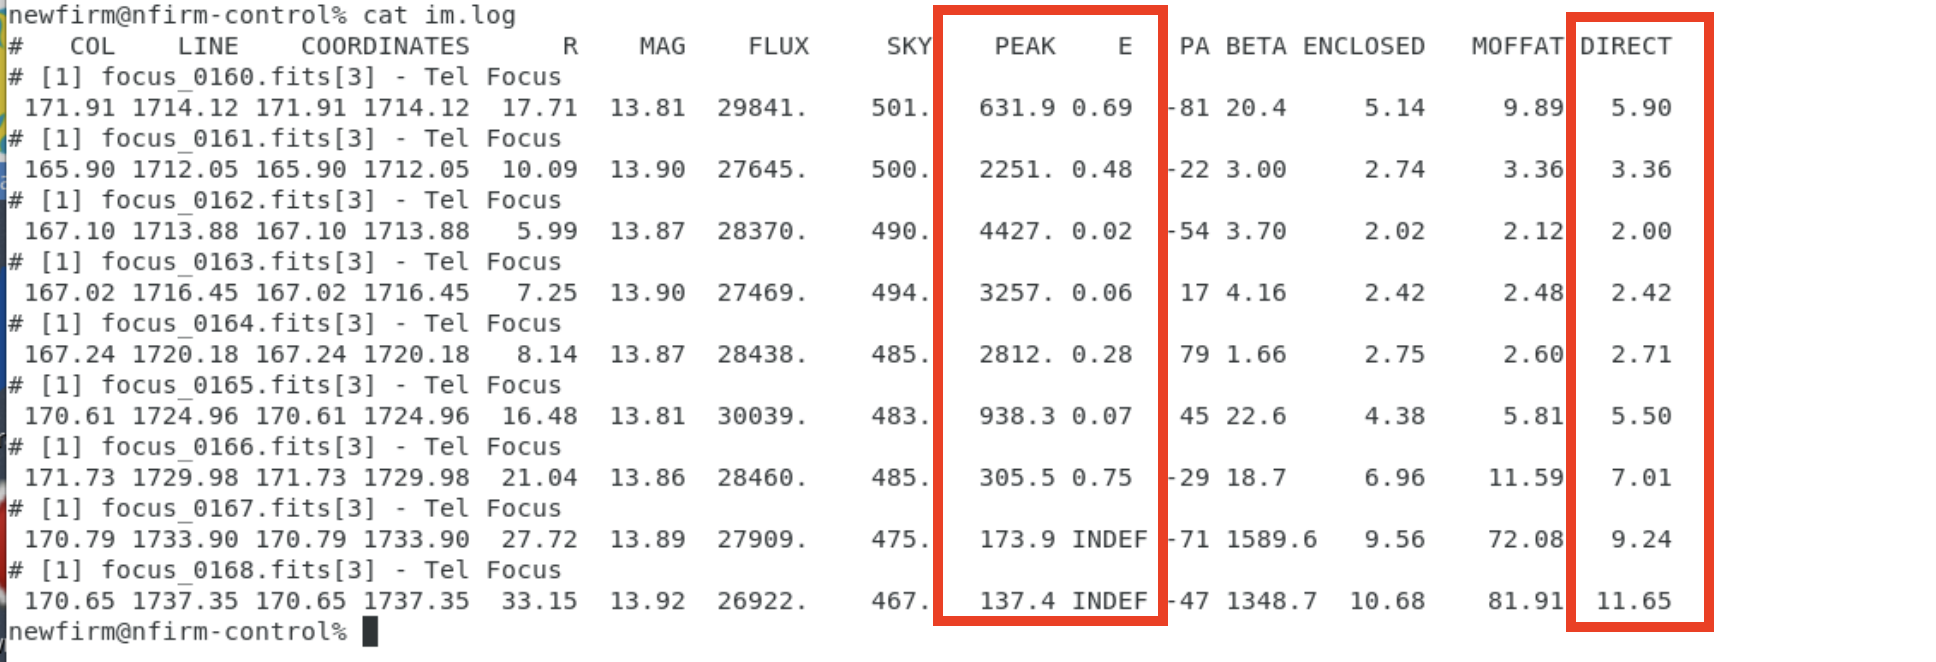
For a completed focus sequence, we see the "nffocus" results below. The best focus is determined to be 13927.5. At the start of the focus sequence, the FWHM of the selected star is ~6 pixels. As the telescope focus increases, the FWHM of the star decreases to a minimum ~2 pixels and then begins to increase until the image is so far out of focus that the FWHM drops as the flux from the star becomes spread out.
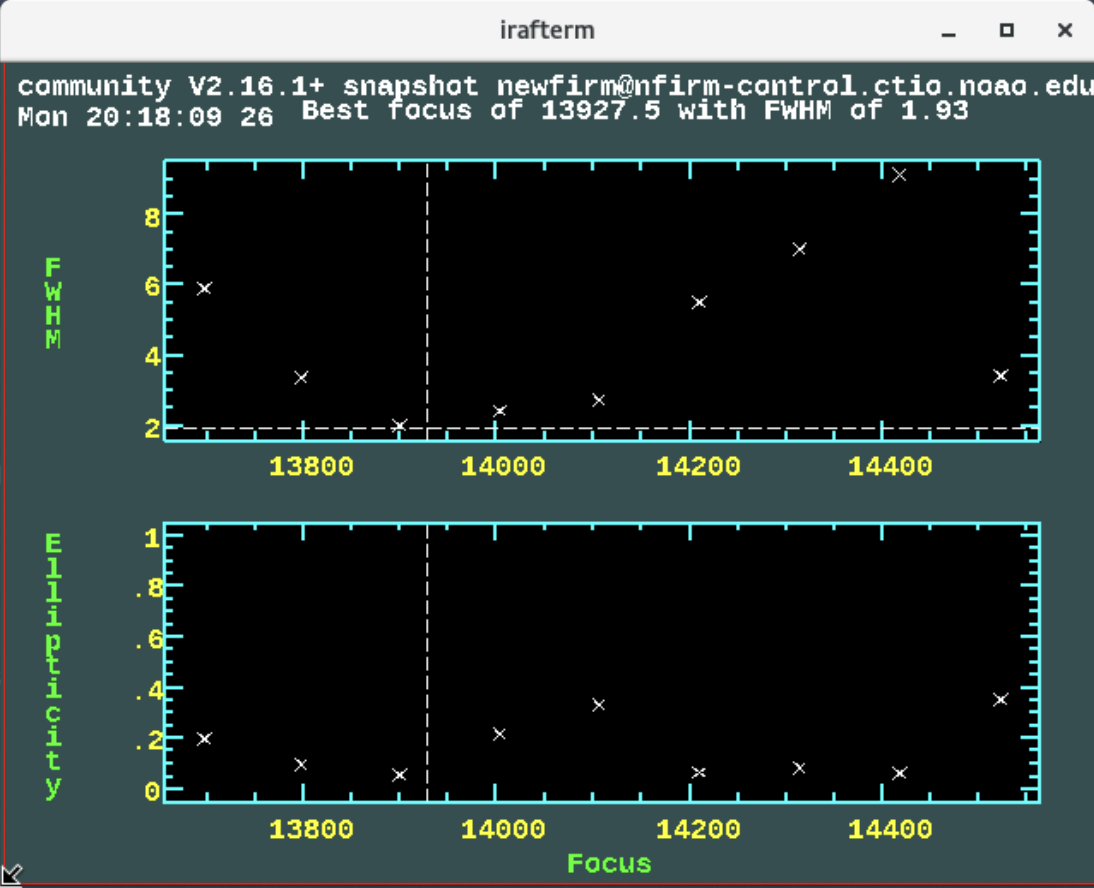
Using IRAF imexam, we can investigate each image in the focus sequence using the "a", "e", and "r" keys. The results using the "a" key are shown below. As seen in the summary, we can see that the peak flux, ellipticity, and FWHM of the selected star are changing during the focus sequence where the extrema of these values coincide with the third image in the sequence, comparable to the image shown above.
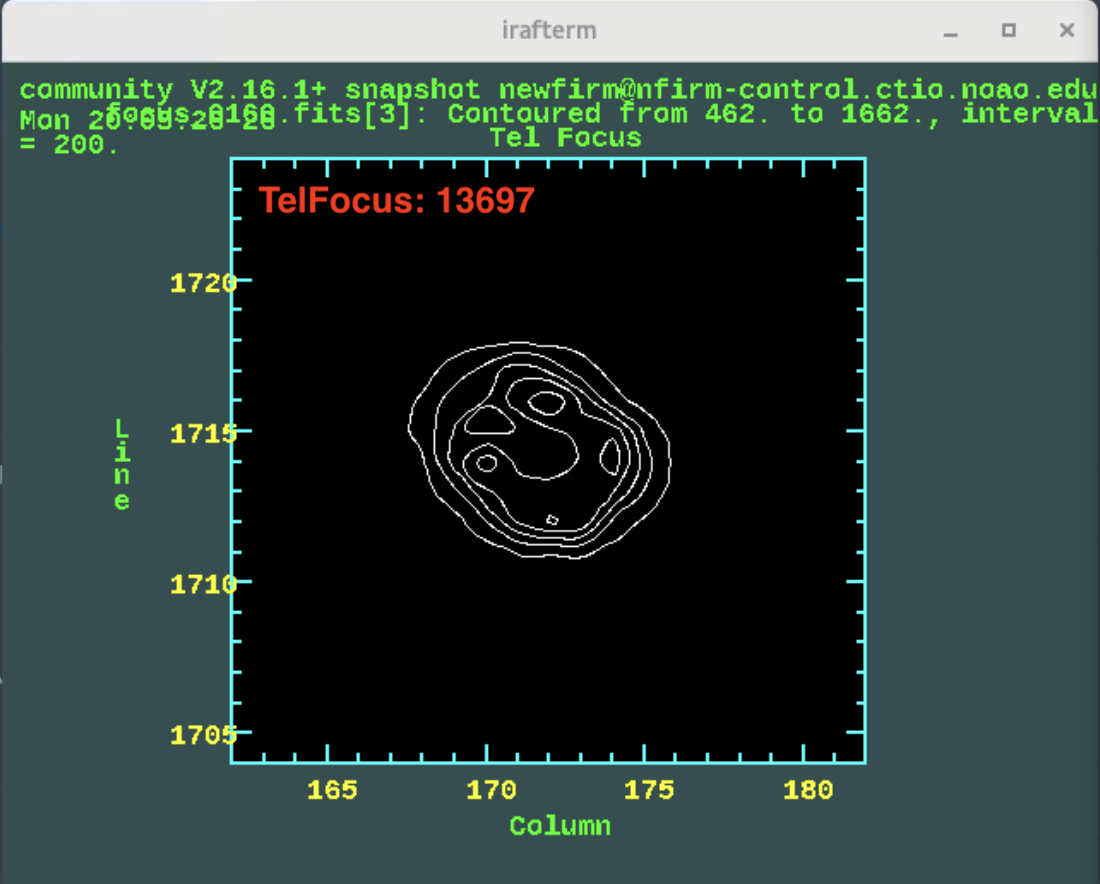
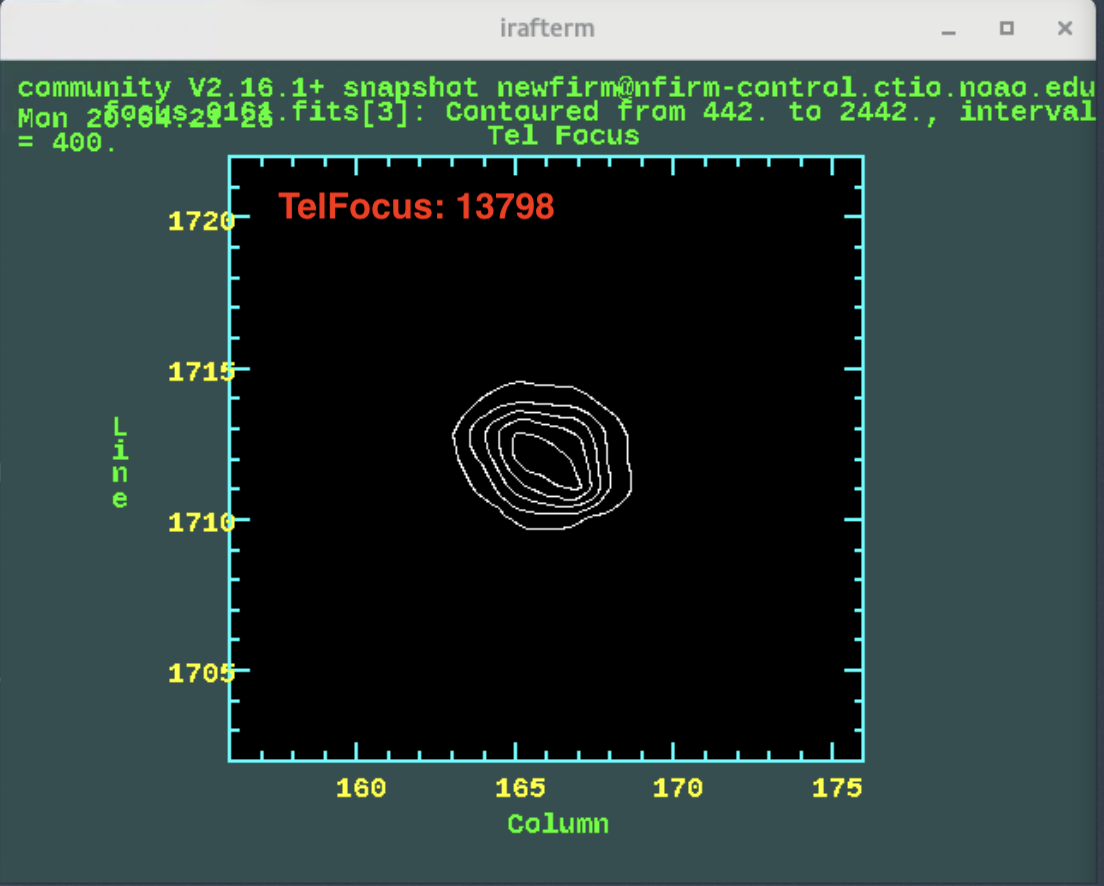
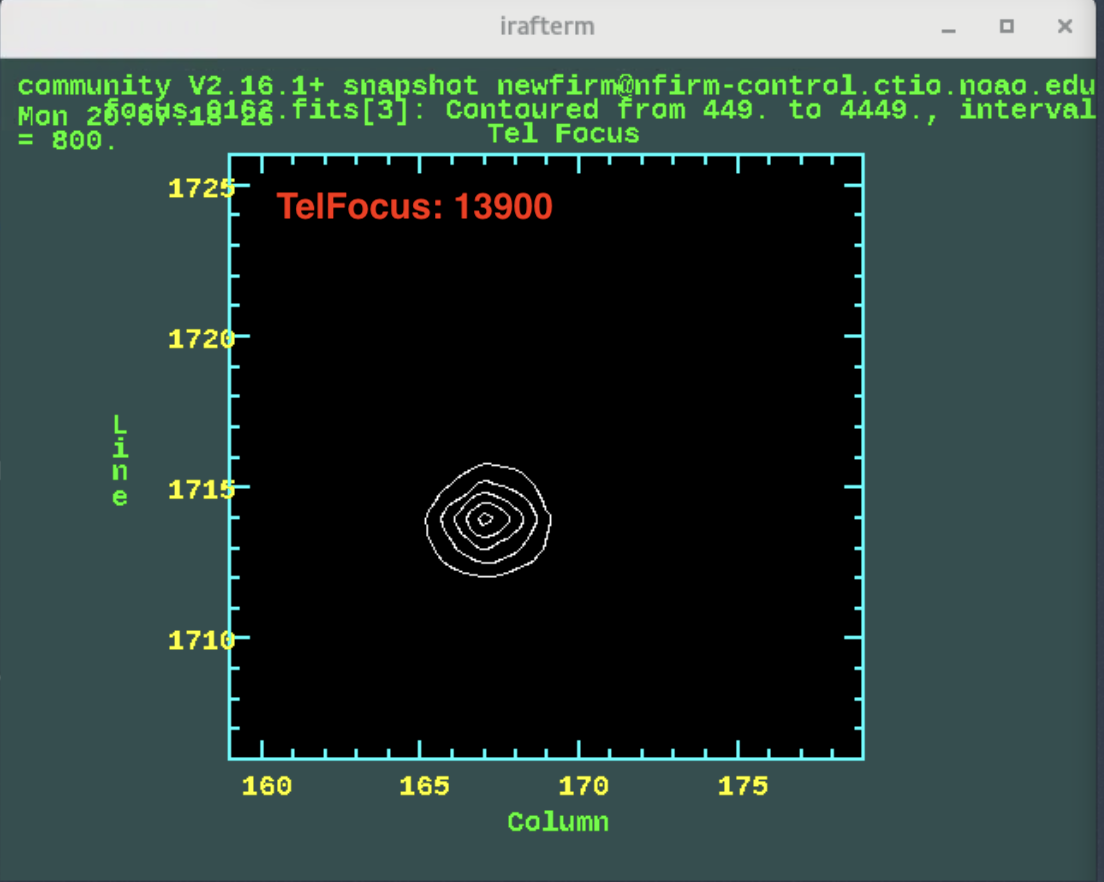
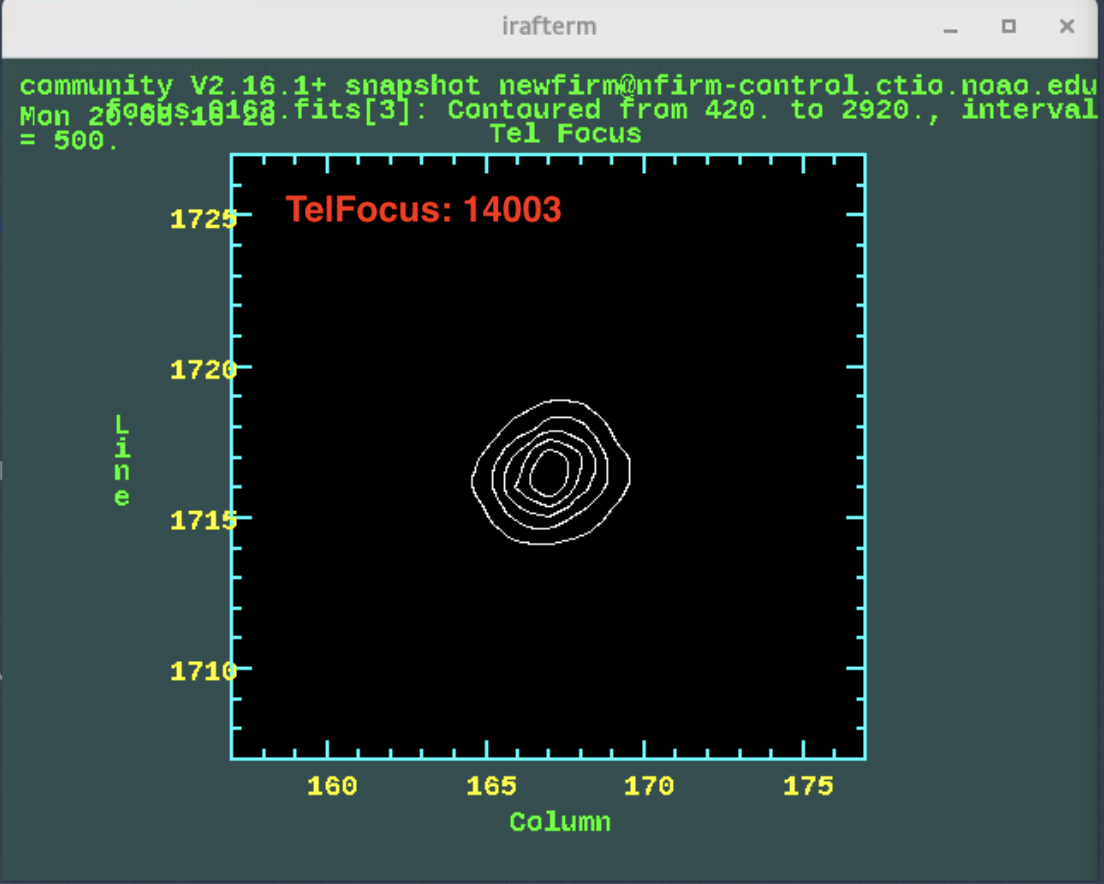
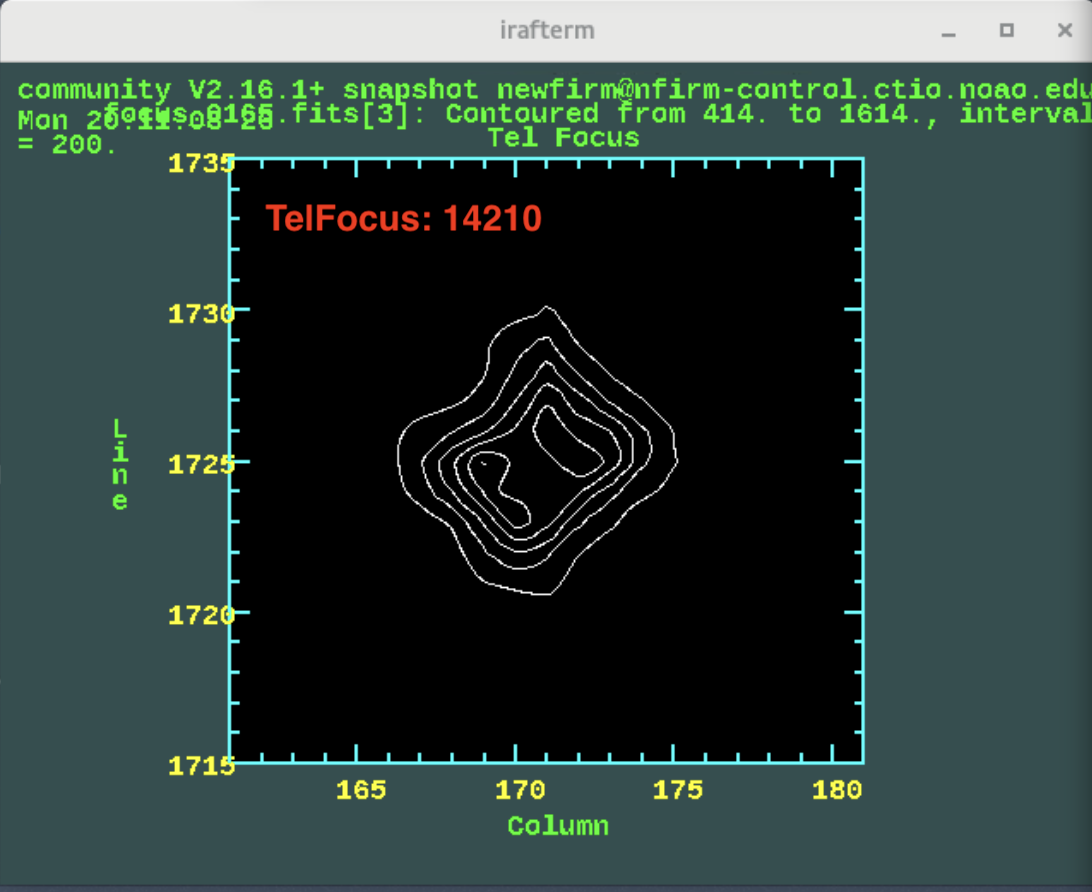
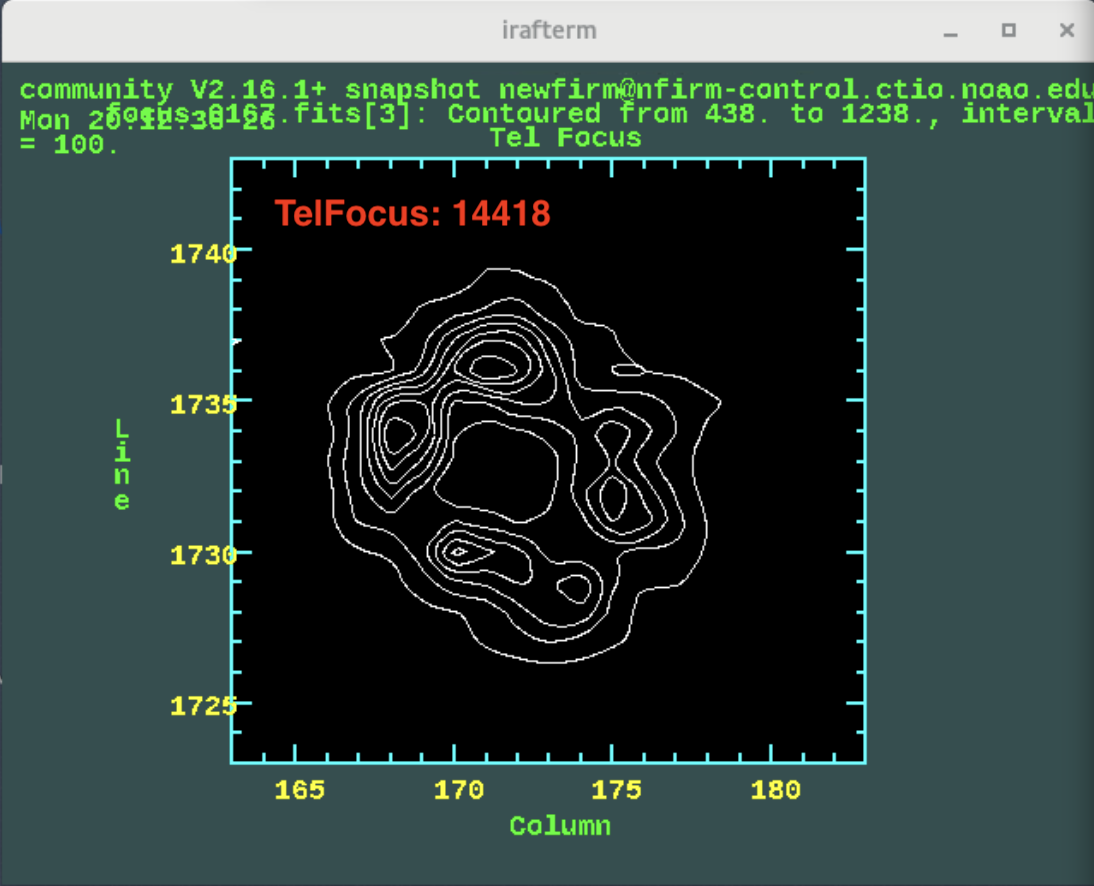
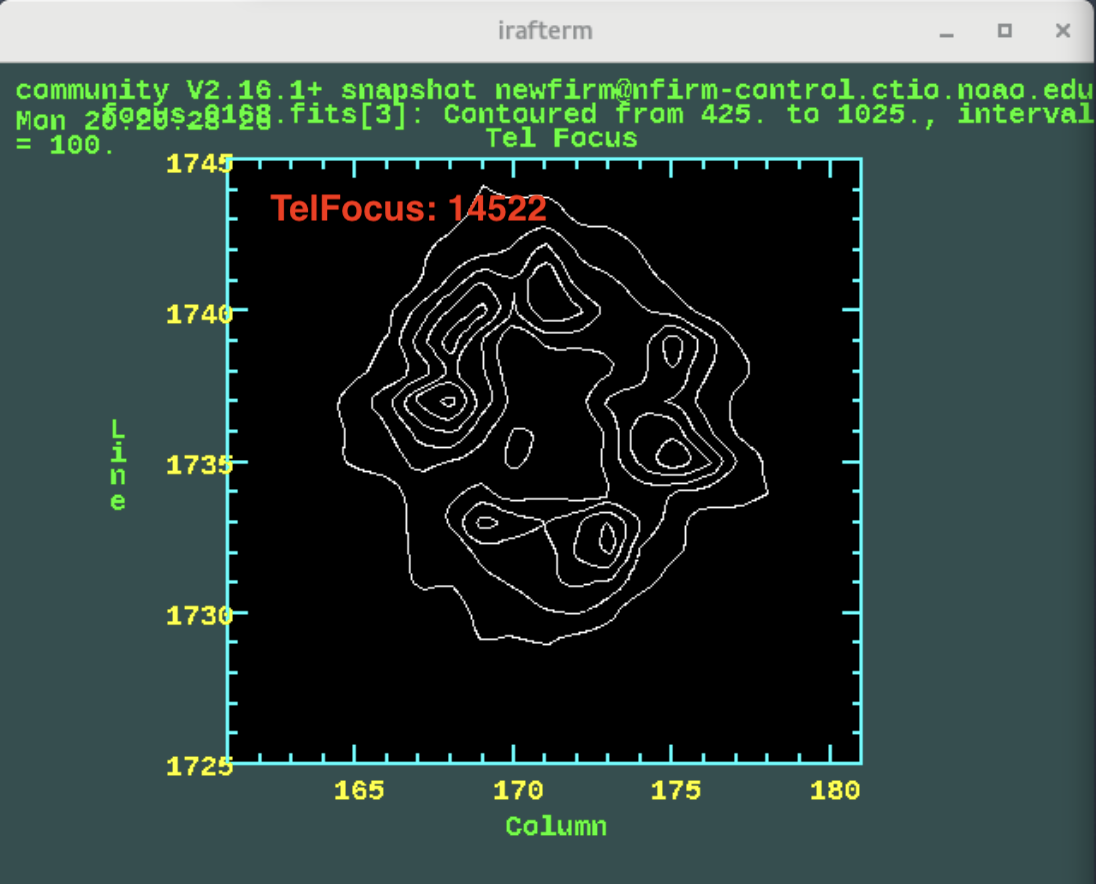
In addition to the text-based output, one can also use the imexam graphics keys to plot the contours ("e" key) of a selected object or make a radial plot ("r" key) of the object. The plots associated with the images of the focus sequence are shown below. As seen in the plots, the third image in the sequence has the best focus, in general agreement with the results of the "nffocus" task.
 |
 |
 |
 |
 |
 |
 |
 |
 |
 |
 |
 |
 |
 |
 |
 |
 |
 |
2) Focus near zenith and focus at higher airmass
The telescope focus is normally performed at the beginning of the night with the telescope pointed close to zenith (airmass=1). At lower elevations (airmass ~ 1.7) the image quality noticeably changes and the telescope should be re-focused. The focus at higher airmass is approximately 100-200 units below the focus value obtained at zenith.
3) Focus change with temperature
The telescope focus is dependent upon the ambient temperature. As temperature increases, focus decreases. As temperature decreases, focus increases. In practice, we have determined that the focus changes by 75 units per degree of temperature change as shown below.
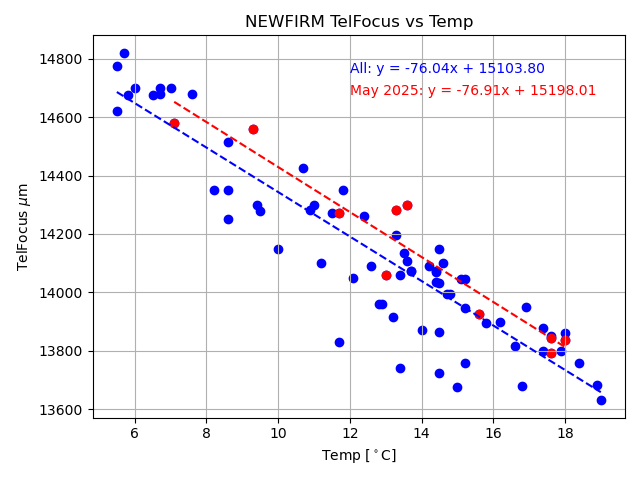
When using the "nffocus" task, the value of the temperature is recorded and the difference between the current temperature and the temperature at the time of the telescope focus is displayed. This panel will start to blink red when the absolute value of the temperature difference is greater than 1 degree.

4) Focus offsets for filters
The telescope focus offsets, relative to the JX focus, is given below. The table can also be found here. As mentioned previously, the GUI has an "AutoFocus" option that will change the focus when the filters are changed by clicking on the "AutoFocus" box.
|
FILTER |
Focus Offset (relative to JX) |
| JX | - |
| HX | +100 |
| KXs | +220 |
| J1 | +50 |
| 1066 | -50 |
| 1187 | +50 |
| 1644 | +100 |
| 2096 | +80 |
| 2124 | +165 |
| 2168 | +175 |
Observing
The NEWFIRM GUI and control system allows for a variety of means to obtain data:
1) Using the GUI directly
2) Using GUI scripts
3) Using GUI sequences
4) Using scripts via the command line interface
The method chosen to acquire data should be matched to the immediate goal. For example, it is best to use the GUI directly when performing the telescope pointing at the beginning of the night. When taking a series of dithered images, it is better to use the scripting capabilities of the software. The data acquisition methods are described below.
1) Using the GUI directly
In general, one should not use the GUI directly to observe. The exceptions are for determining the telescope pointing and taking test exposures to check the focus before a long sequence and/or after a large slew. To take an exposure using the GUI "Exposure Control" interface, you need to set the following:
- Filter
- Exp Time
- Repeats
- Coadds
- Fowler
- Obstype
- File basename
- Object Title

In this manner one can take an individual image or execute a basic dither pattern. To take one image, press "EXPOSE" button.
To take a simple dither pattern:
- Load the desired pattern template. The current patterns are for a 4pt, 3pt, or 5pt pattern.

- Input the dither offsets
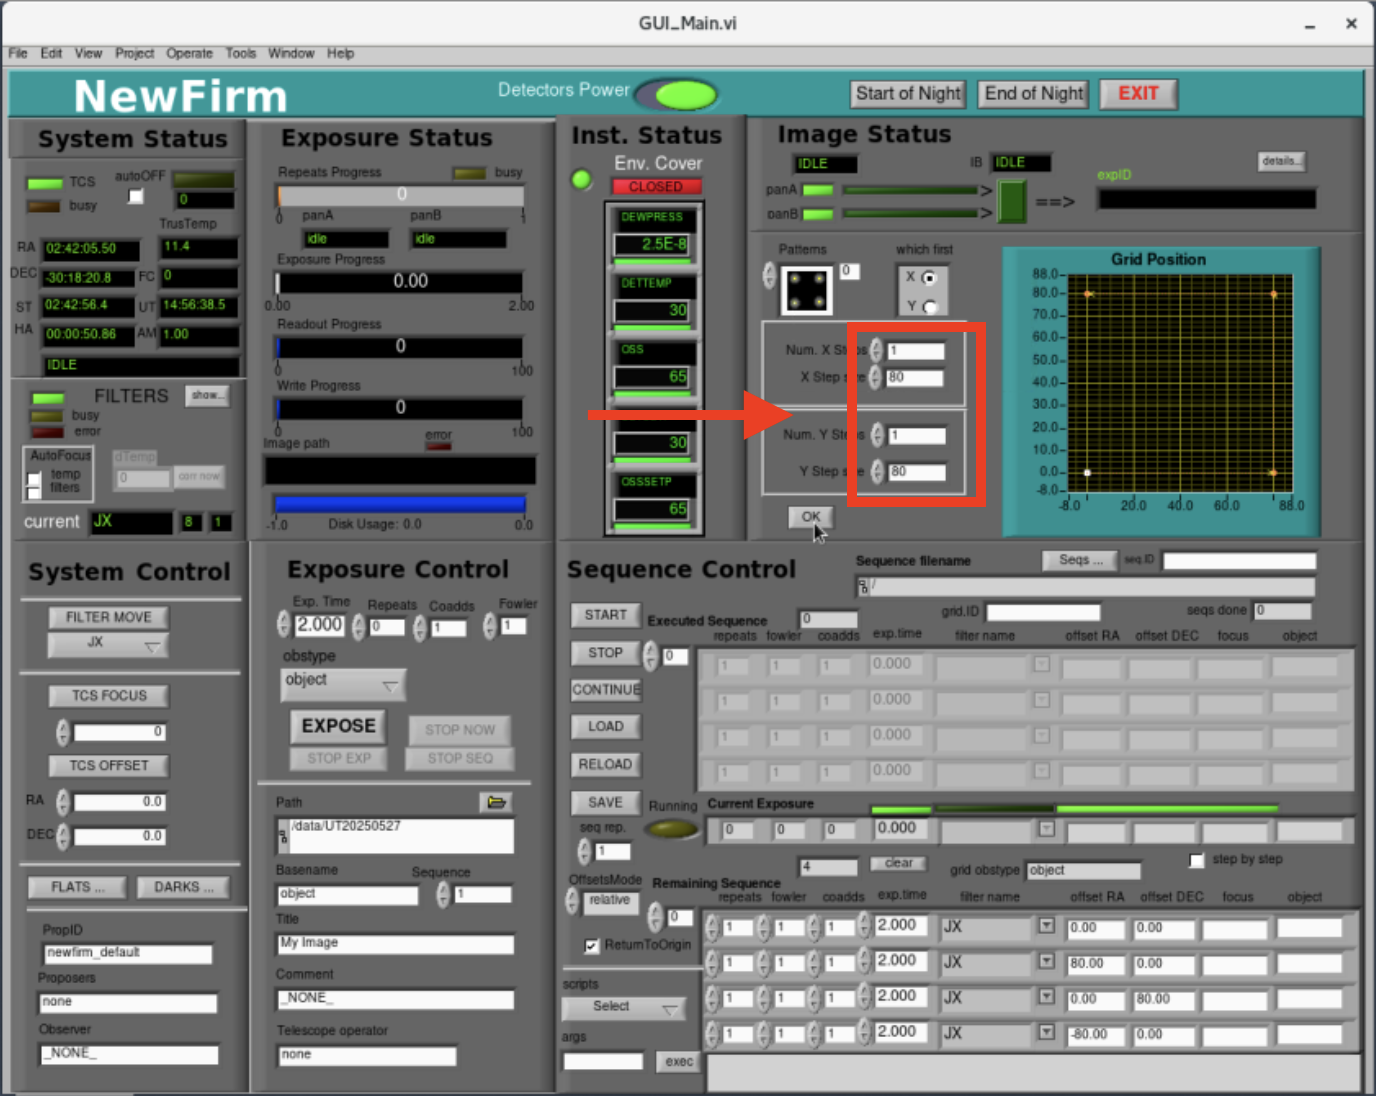
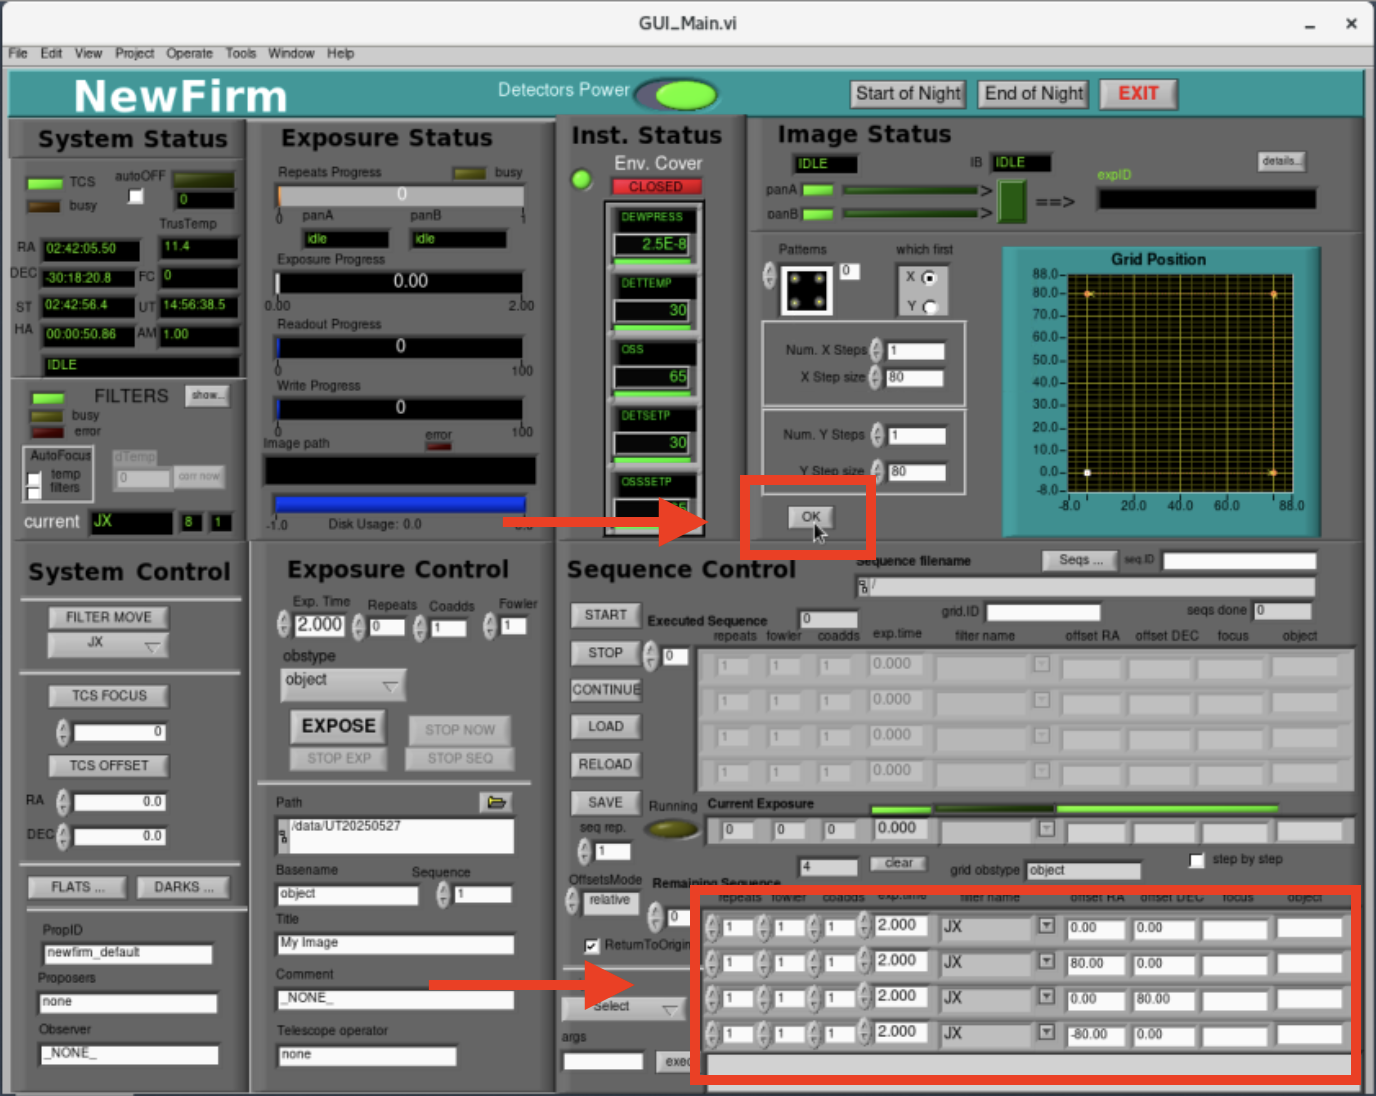
- Press "OK" to load the pattern into the observation queue. Note that the observations in the queue have the same parameters (e.g., ExpTime, Repeats, Coadds, and Fowler) that are set in the "Exposure Control" section of the GUI.
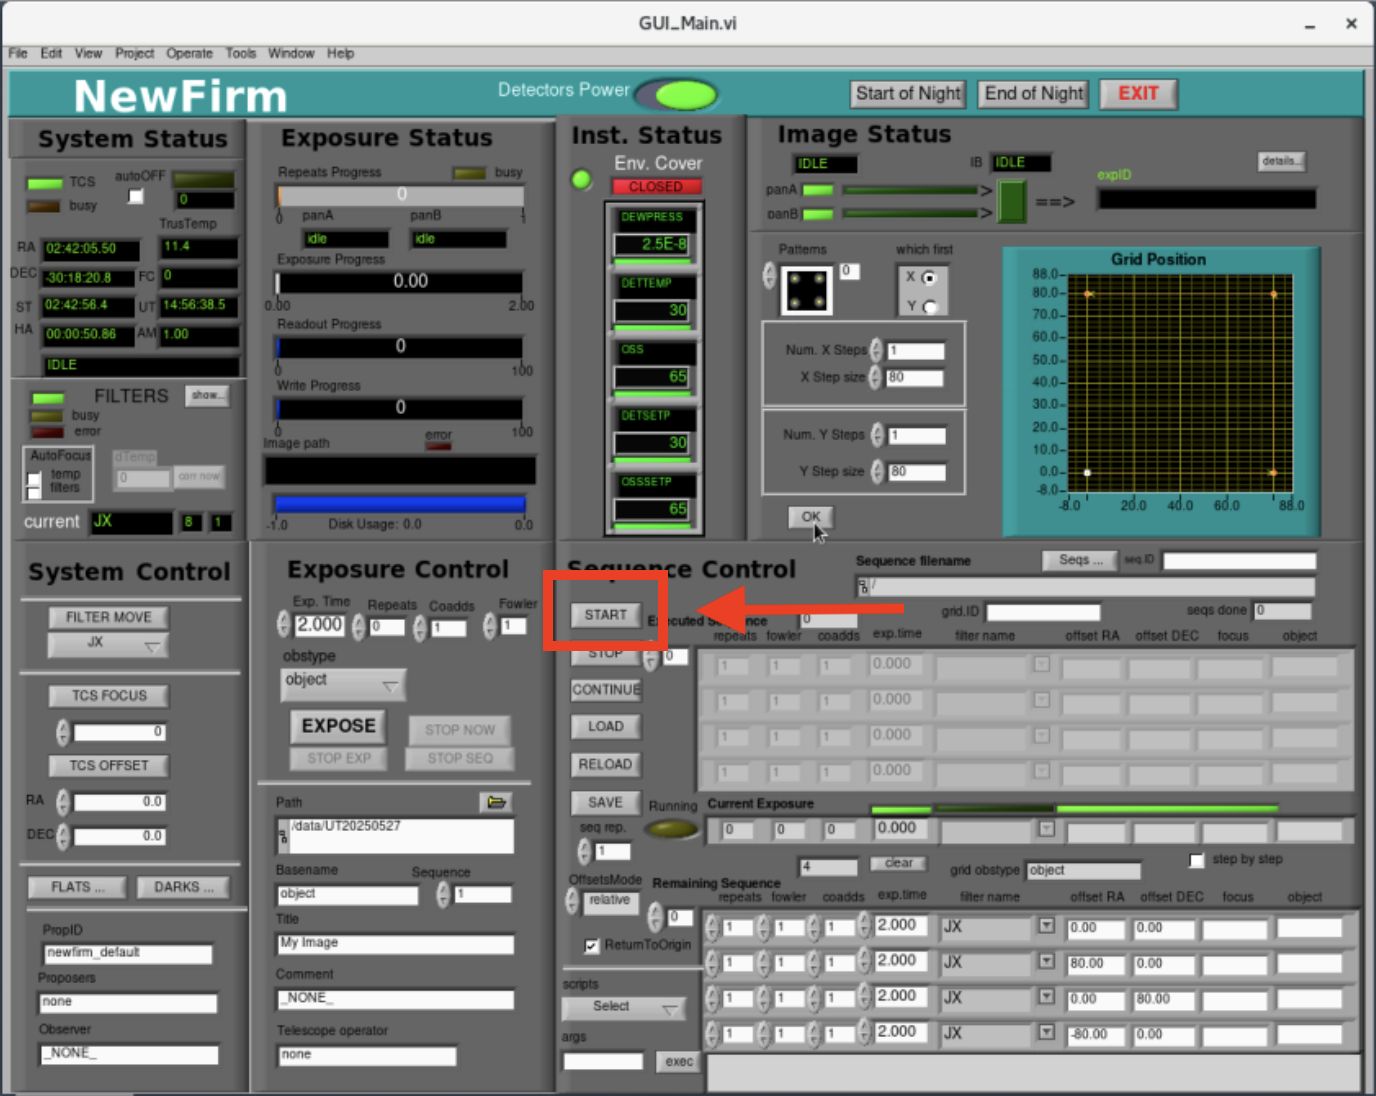
- Press "START" to begin the sequence
2) Using GUI scripts
This method of observing uses the same interface as observing directly from the GUI, but it allows one to create scripts before observing with customized dither patterns and offsets. These custom observing scripts are located in the directory "/home/newfirm/sequences/". The basic 4pt dither pattern that was created in the GUI above can also be represented as an ASCII text file like the following:

The observing dither sequence file contains the following:
- The first line sets the observation "OBSTYPE" where the allowed types are "object", "sky", or "standard".
- The remaining lines set the observing parameters, e.g., # of repeats, fowler sampling, # of coadds, exposure time, filter, RA offset (in arcsec), Dec offset (in arcsec), focus offset, and object name.
- The observing file can contain an arbitrary number of lines, allowing for more complex dither patterns.
- The offsets in RA and Dec can be customized.
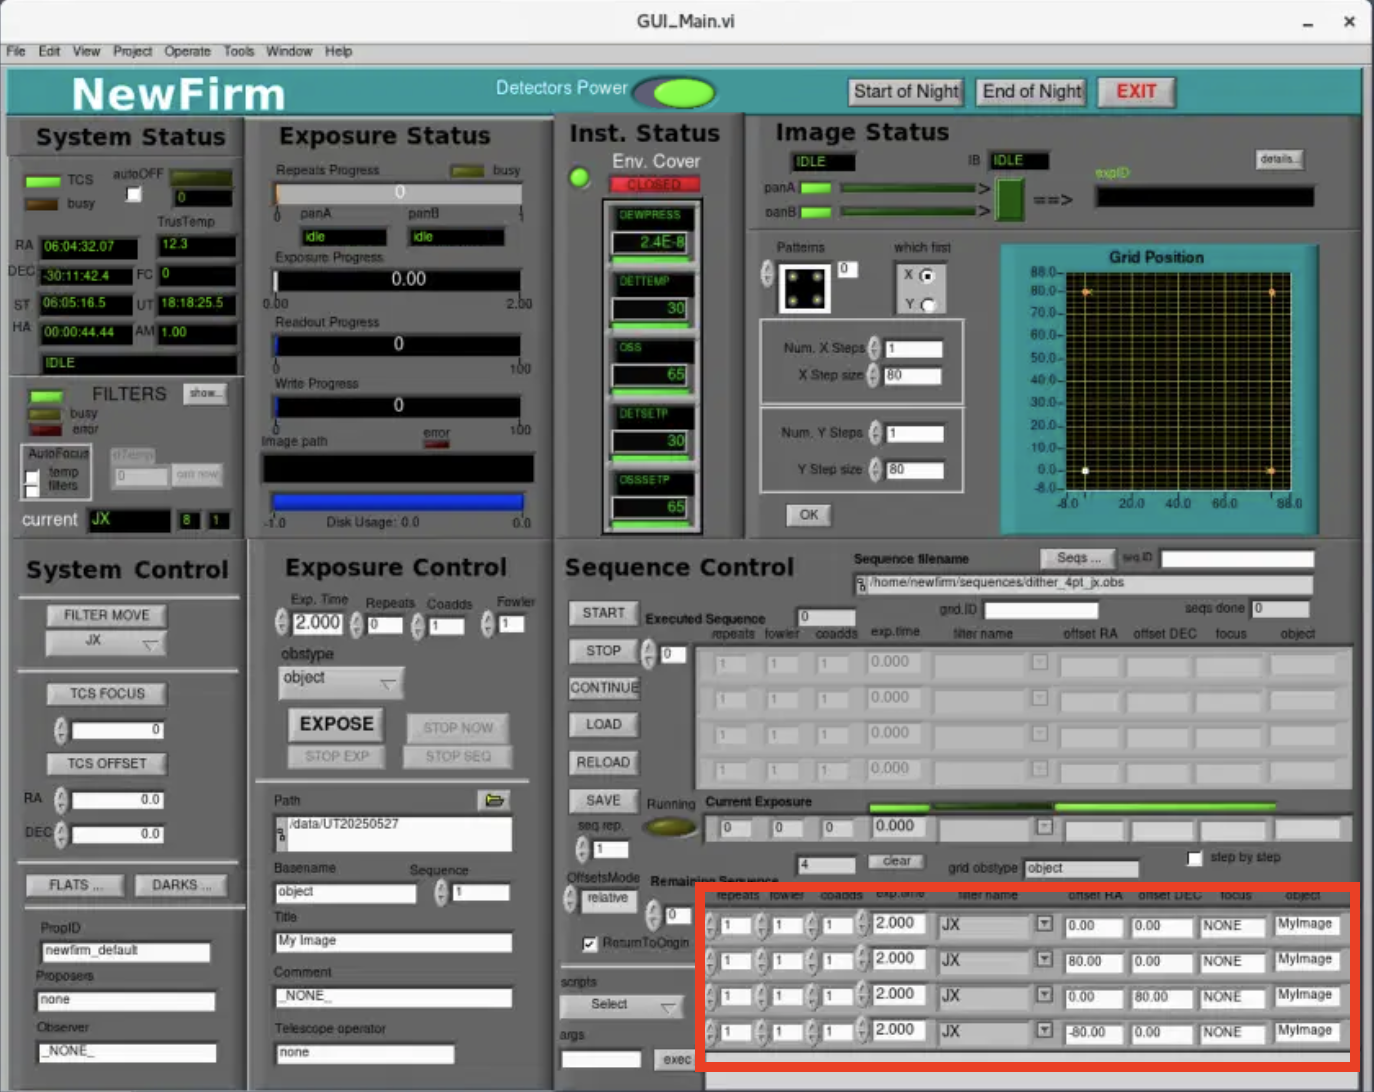
- The offsets are relative to the current telescope position. Thus, the first offset/exposure in the above example is at the original telescope pointing. The second offset/exposure is 80" East of the first exposure and the third offset/exposure is 80" North of the second exposure.
- Note that the object name (last column) can be left as "default". This will set the "OBJECT" FITS keyword to text in the "Title" box under "Exposure Control".
- The resulting filenames will default to the text in the "Basename" box under "Exposure Control".
- Observer written files should be named "<my_script_file>.obs".
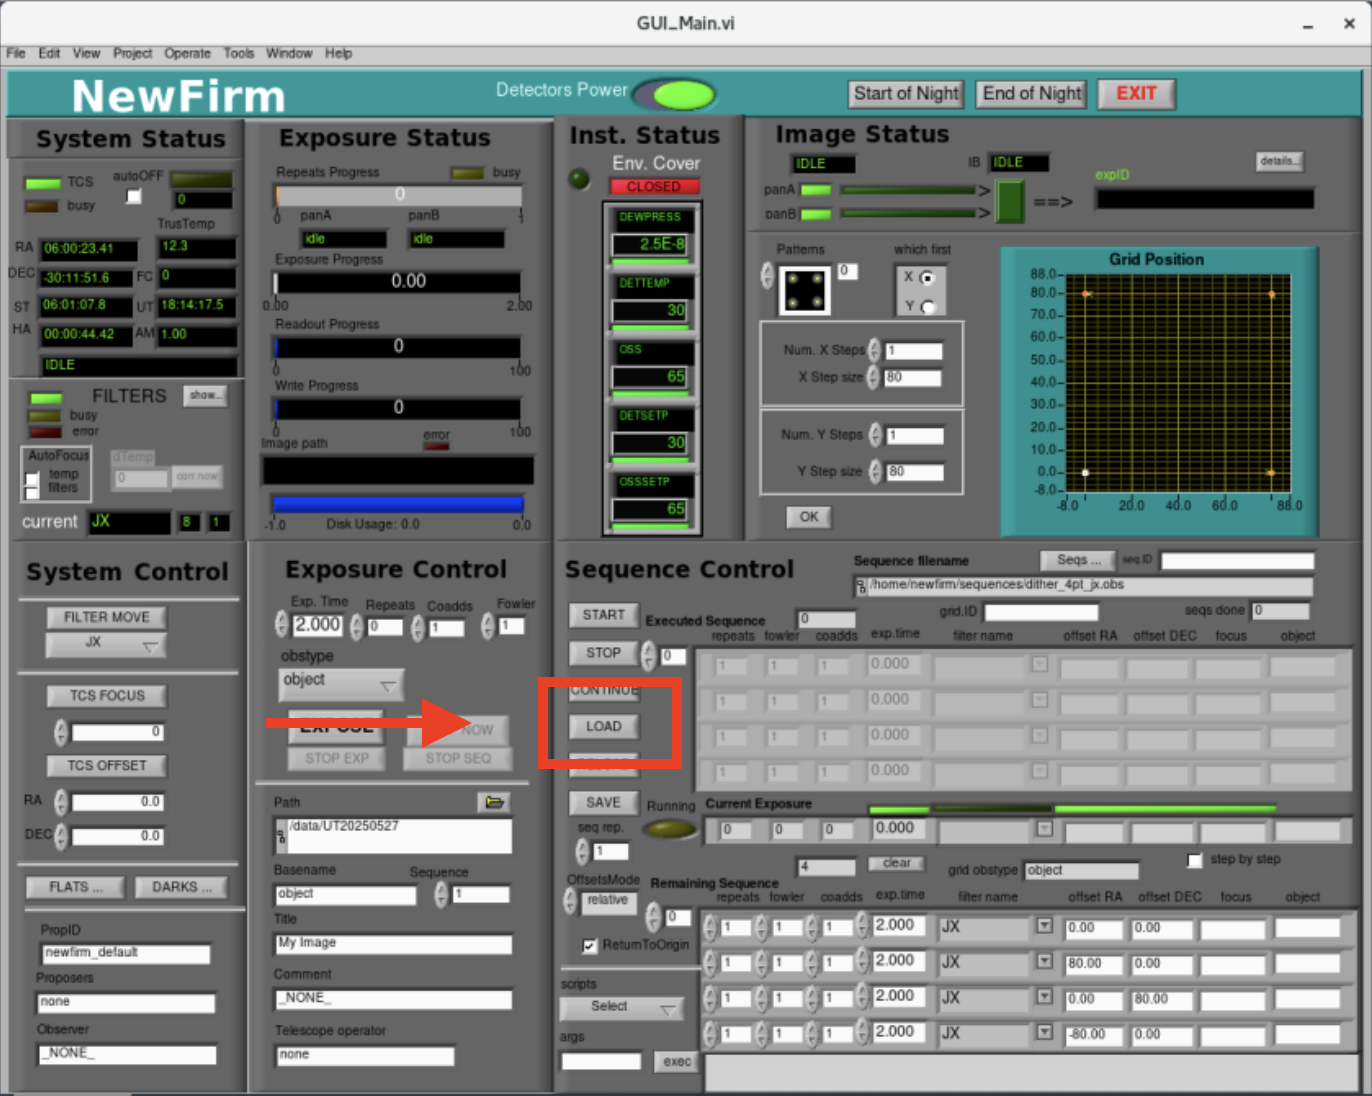
The scripts can be loaded into the observing queue by the following:
- Press the "LOAD" button in the "Sequence Control" section of the GUI.
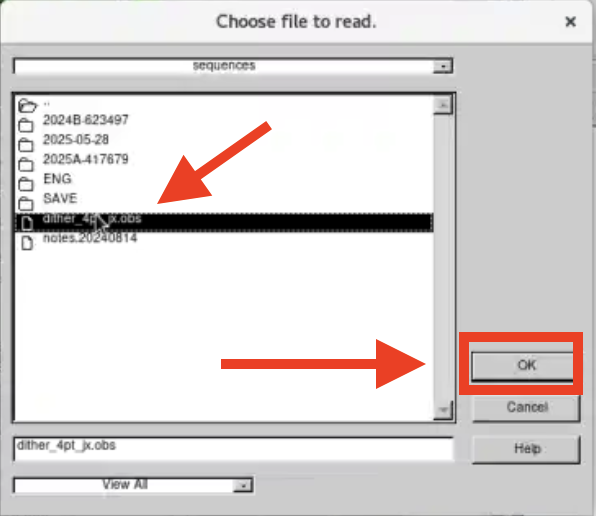
- Select the script to run and press "OK". The observation details will appear in the observing queue.
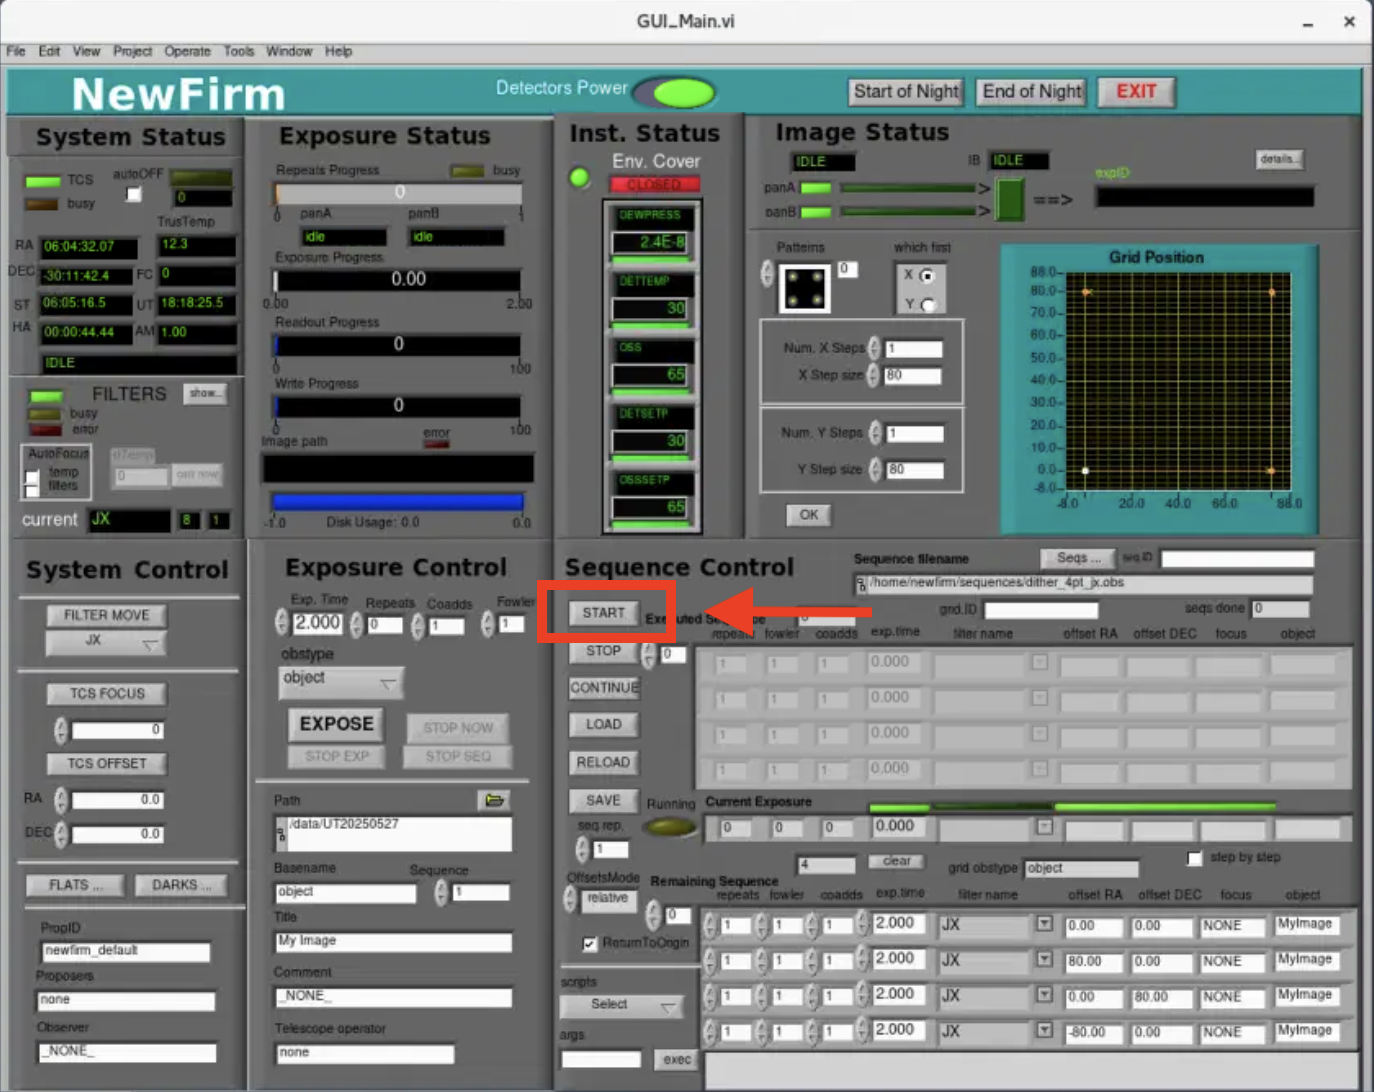
- Press the "START" button to execute the script.
3) Using GUI sequences
The NEWFIRM sequences capability allows the observer to execute multiple scripts in a sequence. This can be used if one wants to observe the same field with different filters. Instead of loading three observation script files, one can load a sequence file that contains the multiple scripts. We show three separate observation script files below that take images in JX, HX, and KXs. Examples of the individual observation files and the sequence file can be found here.
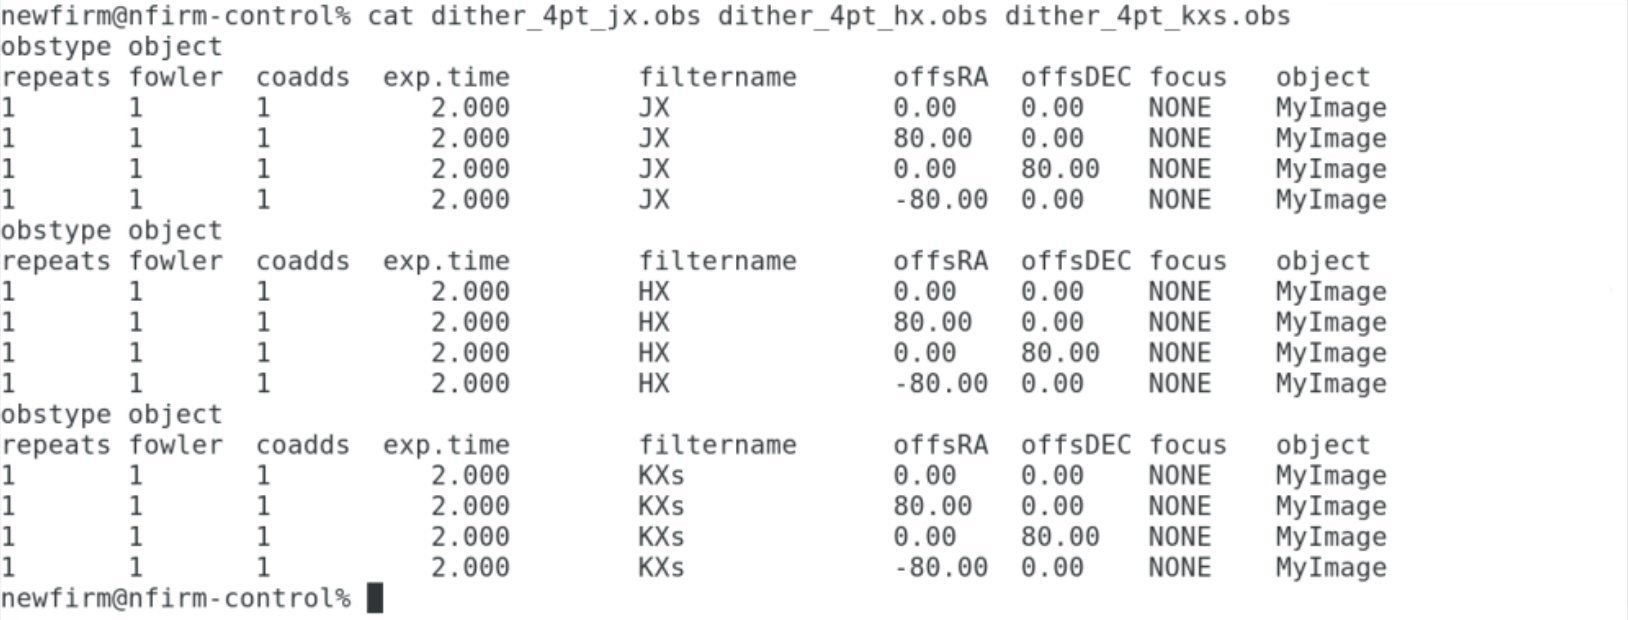
The individual *.obs files can be listed in a single sequence file like that shown below.
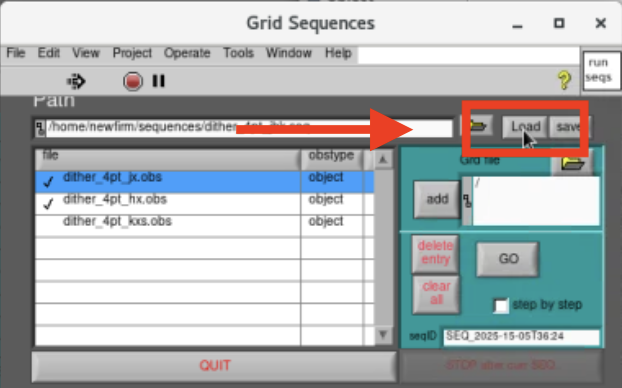
The observing sequence can be loaded and executed by the following:
- Press the "Seqs" button
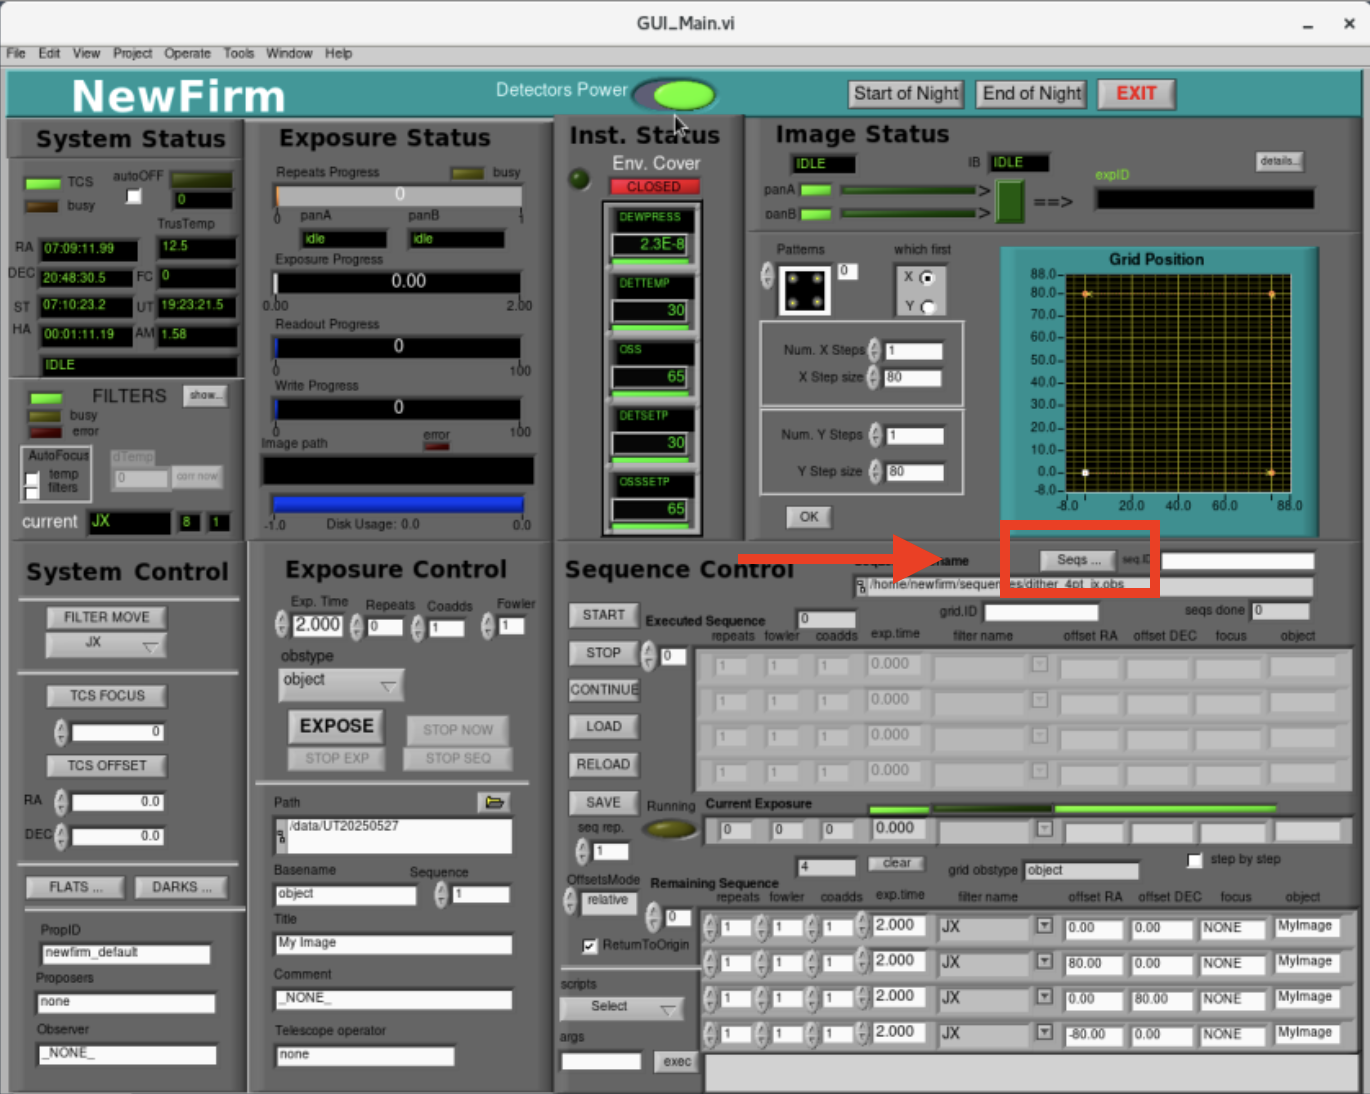
- Press the folder icon to locate available sequences
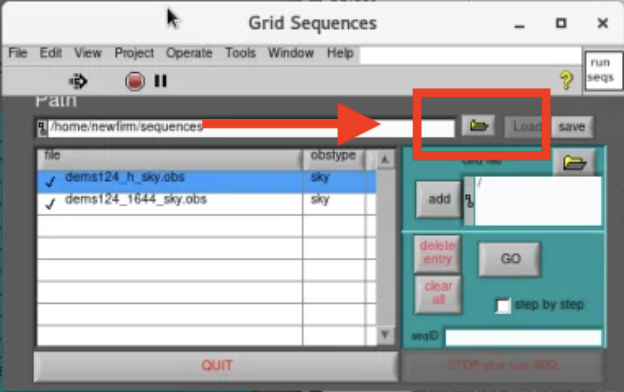
- Select the appropriate sequence and press "OK".
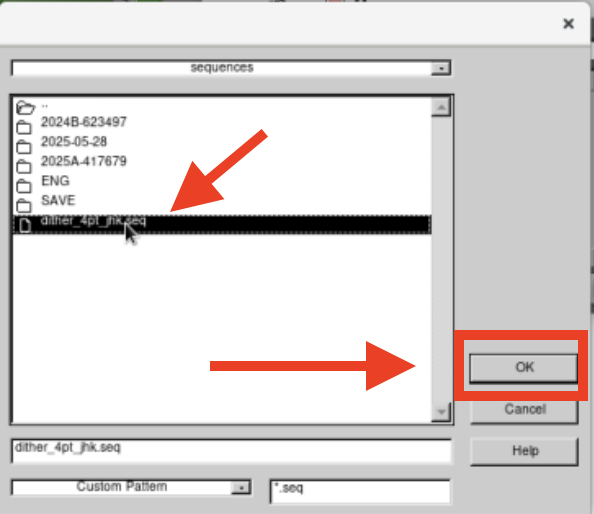
- Press the "Load" button to show the observation script files.
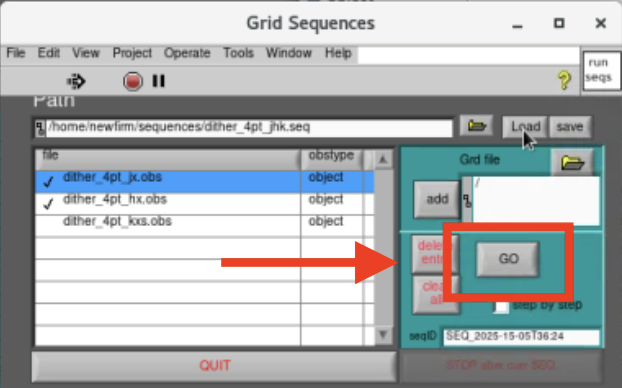
- Press "GO" to execute the sequence.
4) Using command line scripts
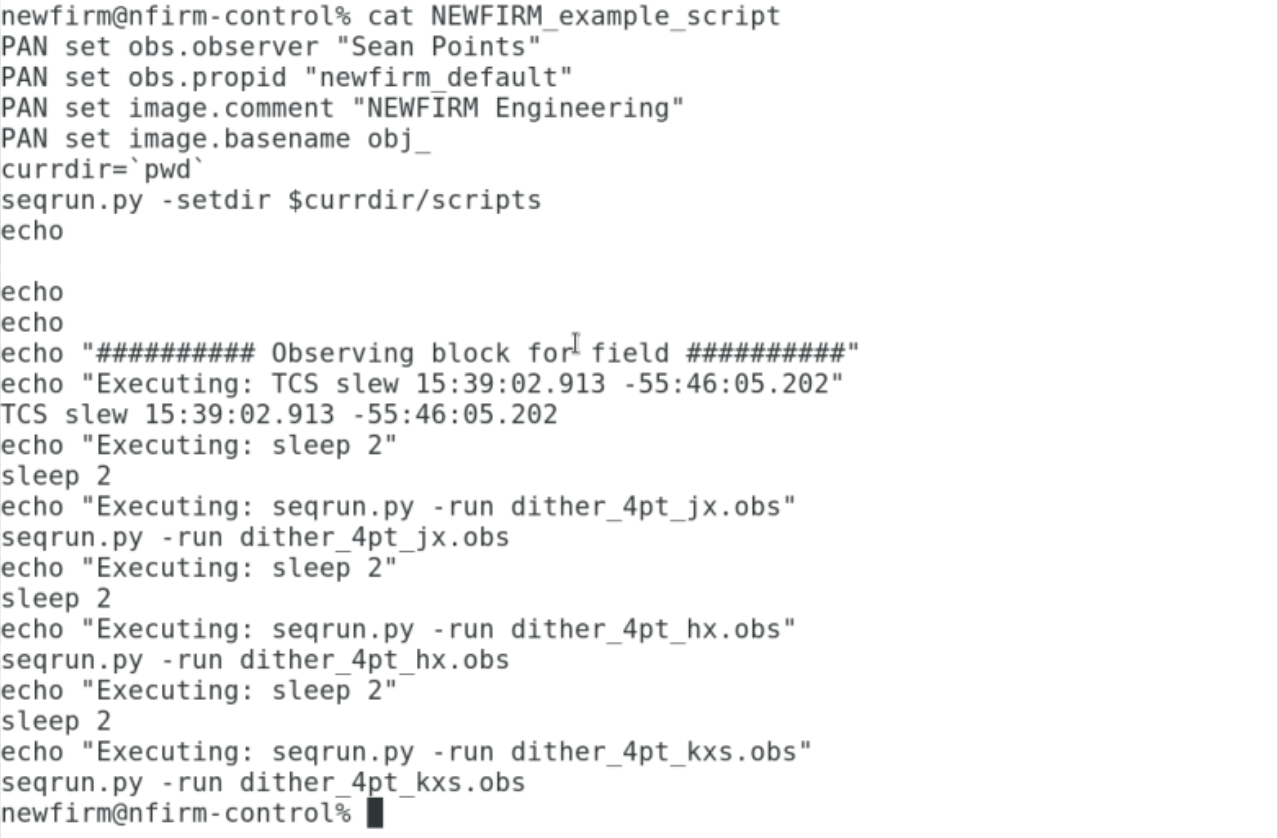
Observations and scripts can also be executed from the command line using the NEWFIRM Scripting Reference Guide. These commands set the parameters that are used in the GUI interface. An example script that performs the same observations that were made using the NEWFIRM sequences is shown below.
The script is run from the command line by:
>bash NEWFIRM_example_script
The script will set the observer's name and PropID, slew the telescope to the desired coordinates, and execute JX, HX, and KXs observation scripts. Additional observing blocks and targets can be added to the script by including other "TCS slew HH:MM:SS.S [+/-]DD:MM:SS.s" command and dither scripts. The NEWFIRM example script can be found here.
Additional Details for Observers
- Maximum Exposure Time:
In general the maximum exposure time in any given filter will be determined by the sky brightness and the detector saturation limits. The detectors have a full well of ~12000 cnts and linearity up to ~10000 cnts. In practice, we limit the exposure time such that the sky counts are approximately 1/2 the linearity range, or 5000 cnts. For JX, HX, and KXs, the maximum exposure times would be 50s, 10s, and 10s per coadd, respectively. For the narrowband 1644, 2124, and 2168 filters, the maximum recommended exposure time is 250s per coadd.
|
FILTER |
Sky (counts/s) |
| JX | 95 |
| HX | 485 |
| KXs | 425 |
| J1 | N/A |
| 1066 | N/A |
| 1187 | N/A |
| 1644 | 15 |
| 2096 | N/A |
| 2124 | 20 |
| 2168 | 25 |
- Guiding:
NEWFIRM can be used with its guider cameras. In practice, the guider does not need to be used for individual exposures with total exposure times < 300s. If you will be using guiding, it is best to go to the field before starting the acquisition so the telescope operator can find a guide star. Once a guide star is centered, start the observing sequence. - Filter change overheads:
The NEWFIRM filter wheels only rotate in one direction and are time consuming as shown in the table below. You should plan your observations to minimize the amount of time spent on filter changes.
|
Filter Change |
Time (s) |
| JX -> HX | 20 |
| HX -> KXs | 20 |
| JX -> KXs | 25 |
| KXs -> HX | 45 |
| KXs -> JX | 40 |
| HX -> JX | 40 |
- Offsets
The NEWFIRM detector gaps are 35" wide. Furthermore the top 100 rows (40") of detector 3 are affected by a hot pixel. To fill in the gaps, it is recommended that the minimum offset is ~80". Offsets in Declination are more complicated if guiding. The guider patrol field is 28 arcmin by 4 arcmin. Depending on the location of the guide star in the patrol field, it is possible to lose it by large offsets in Dec.
Please note that the offsets in the scripts are relative to the current position and not absolute to the original pointing. - Using scripts
When using scripts, it is suggested that the total amount of time observed is on the order of 30 min. This allows he observer to make changes to he telescope focus, if necessary, on a reasonable time scale without the need to abort images or sequences. A 30 min block for scripts also gives the observer time to assess the data quality of the observations without the pressure of having to constantly load and execute scripts. - Assessing data quality
Display the images in the ds9 window and use imexam to check the roundness and FWHM of stellar profiles in the data. Details on how to display images and useful imexam commands are given in the Telescope Focus section of this manual.
Shutdown
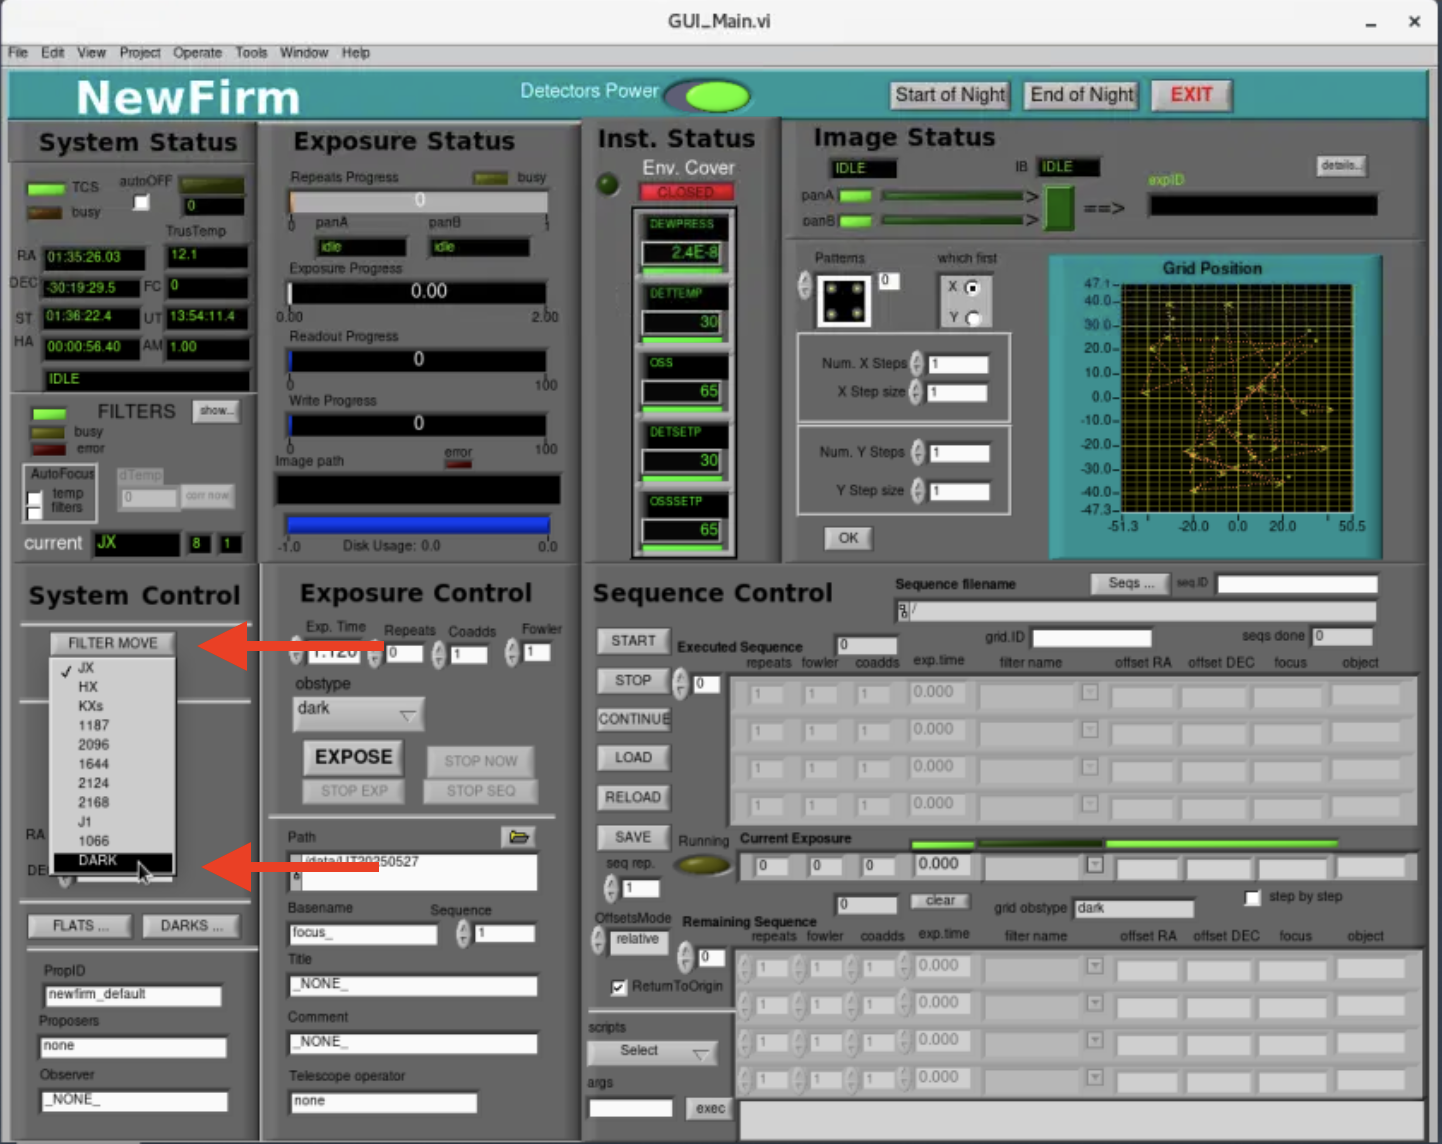
- Put the "DARK" filter in place.
- Select DARK filter from menu
- Press "FILTER MOVE" button
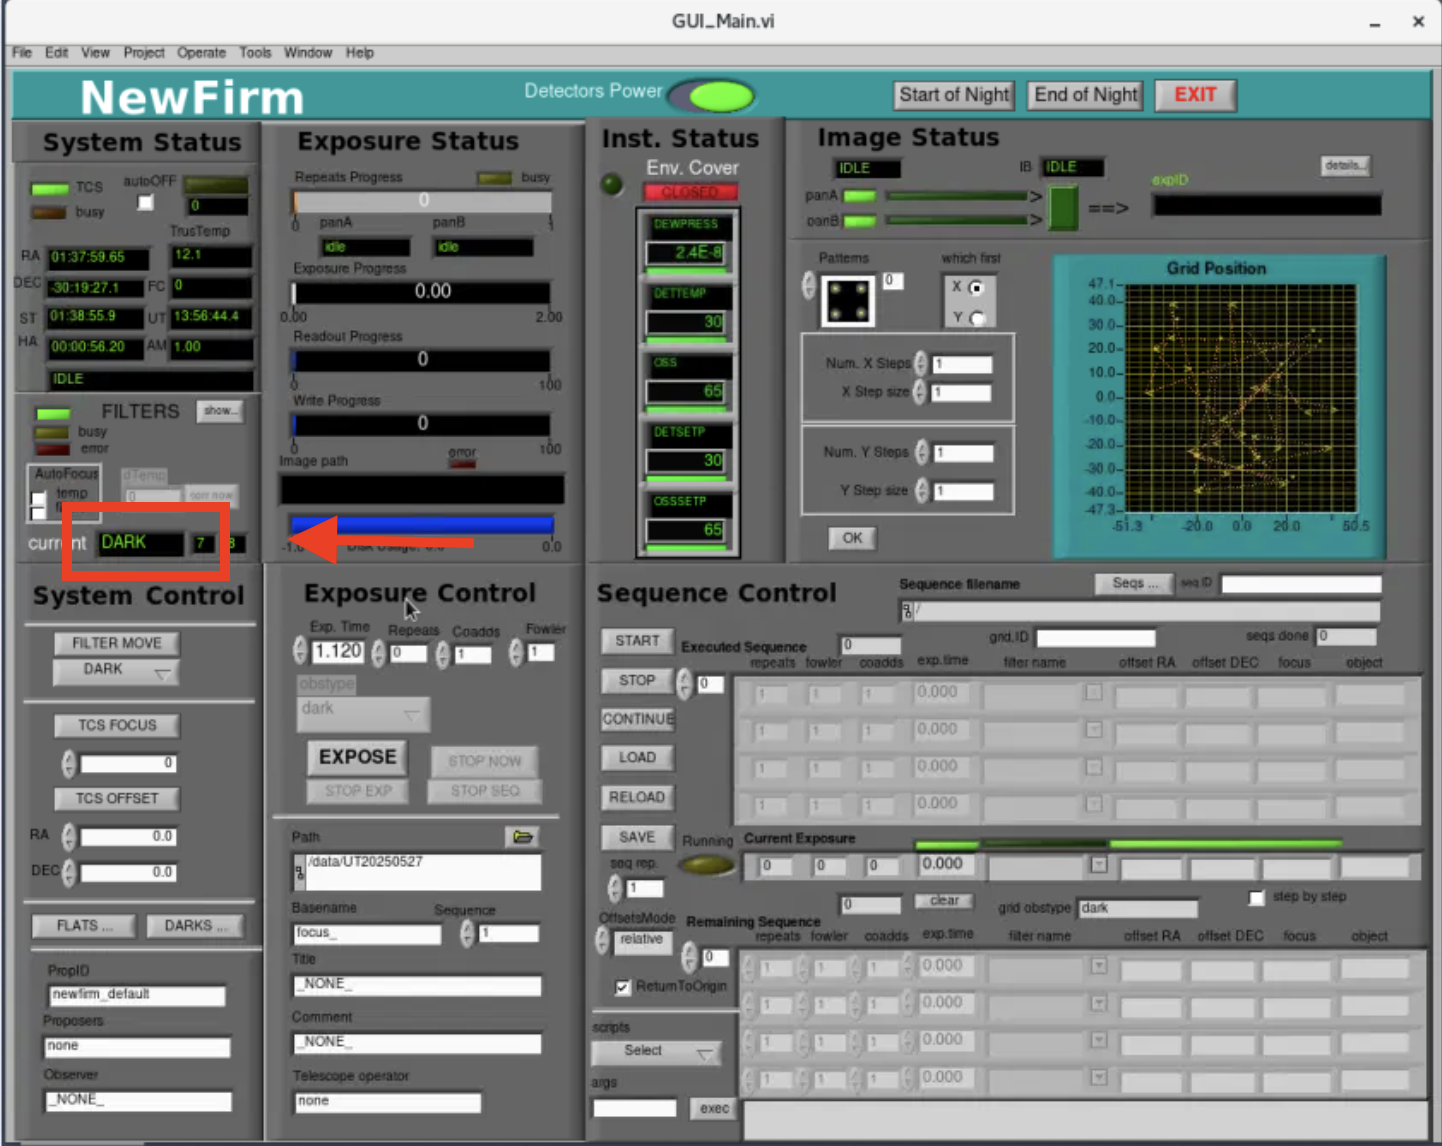
- Confirm that the DARK filter is in place
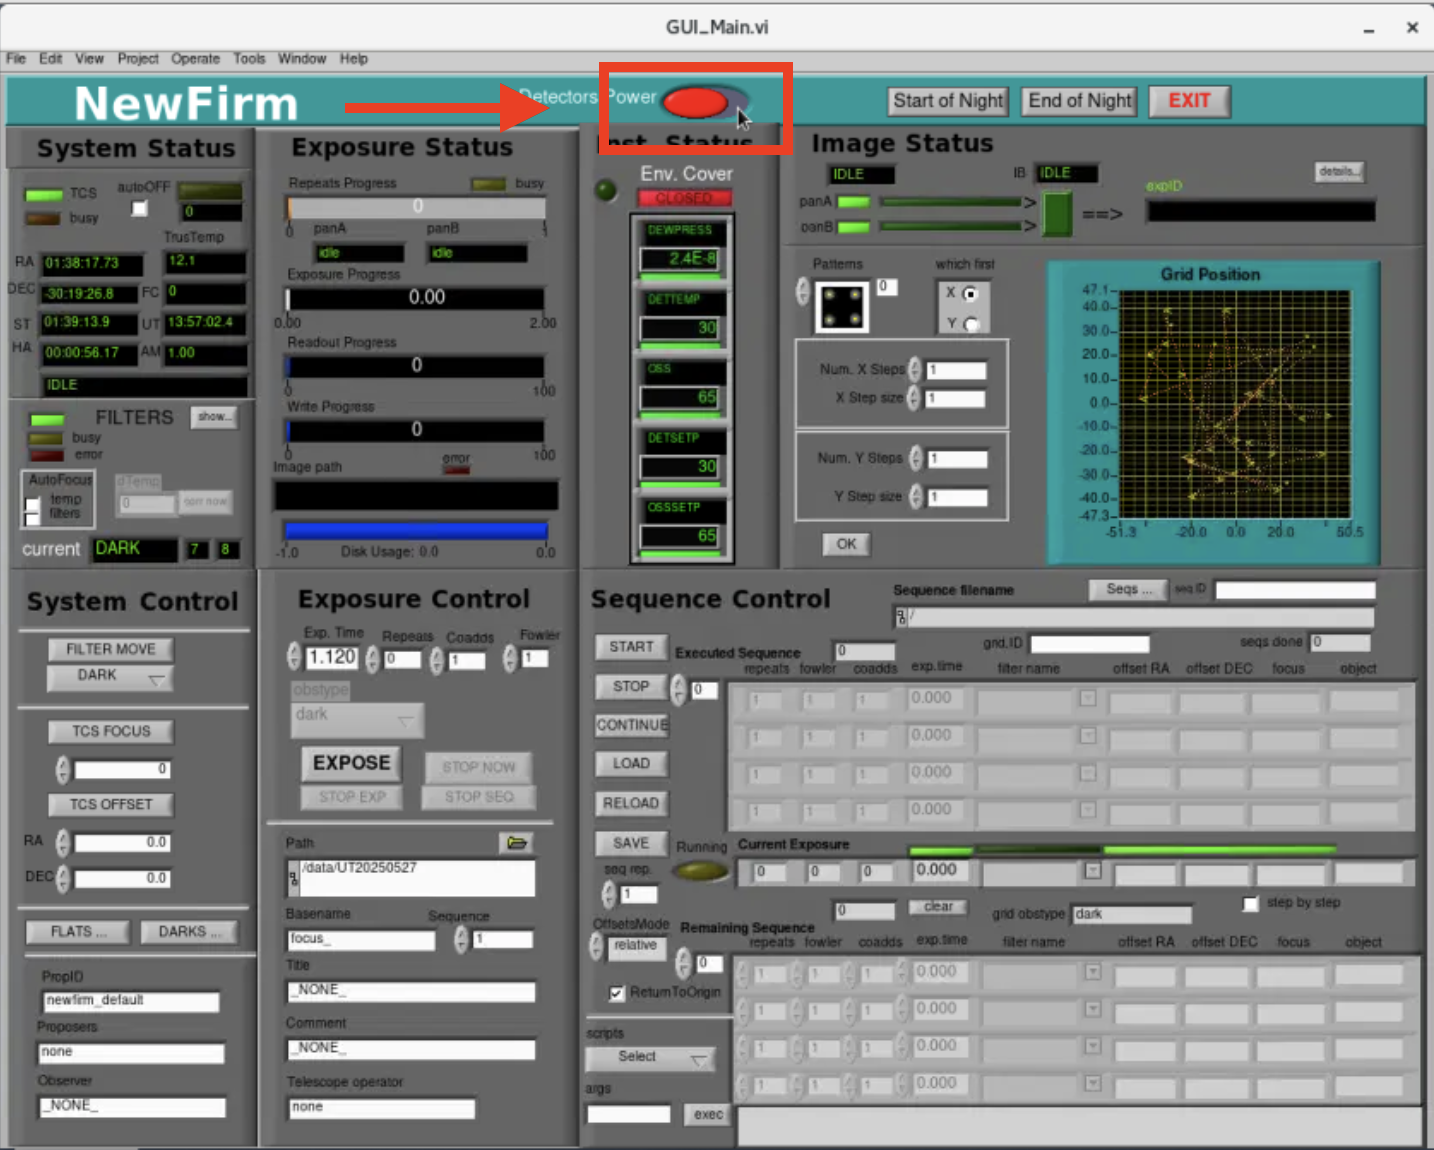
- Turn off the detector power.
- Press green "Detectors Power" button
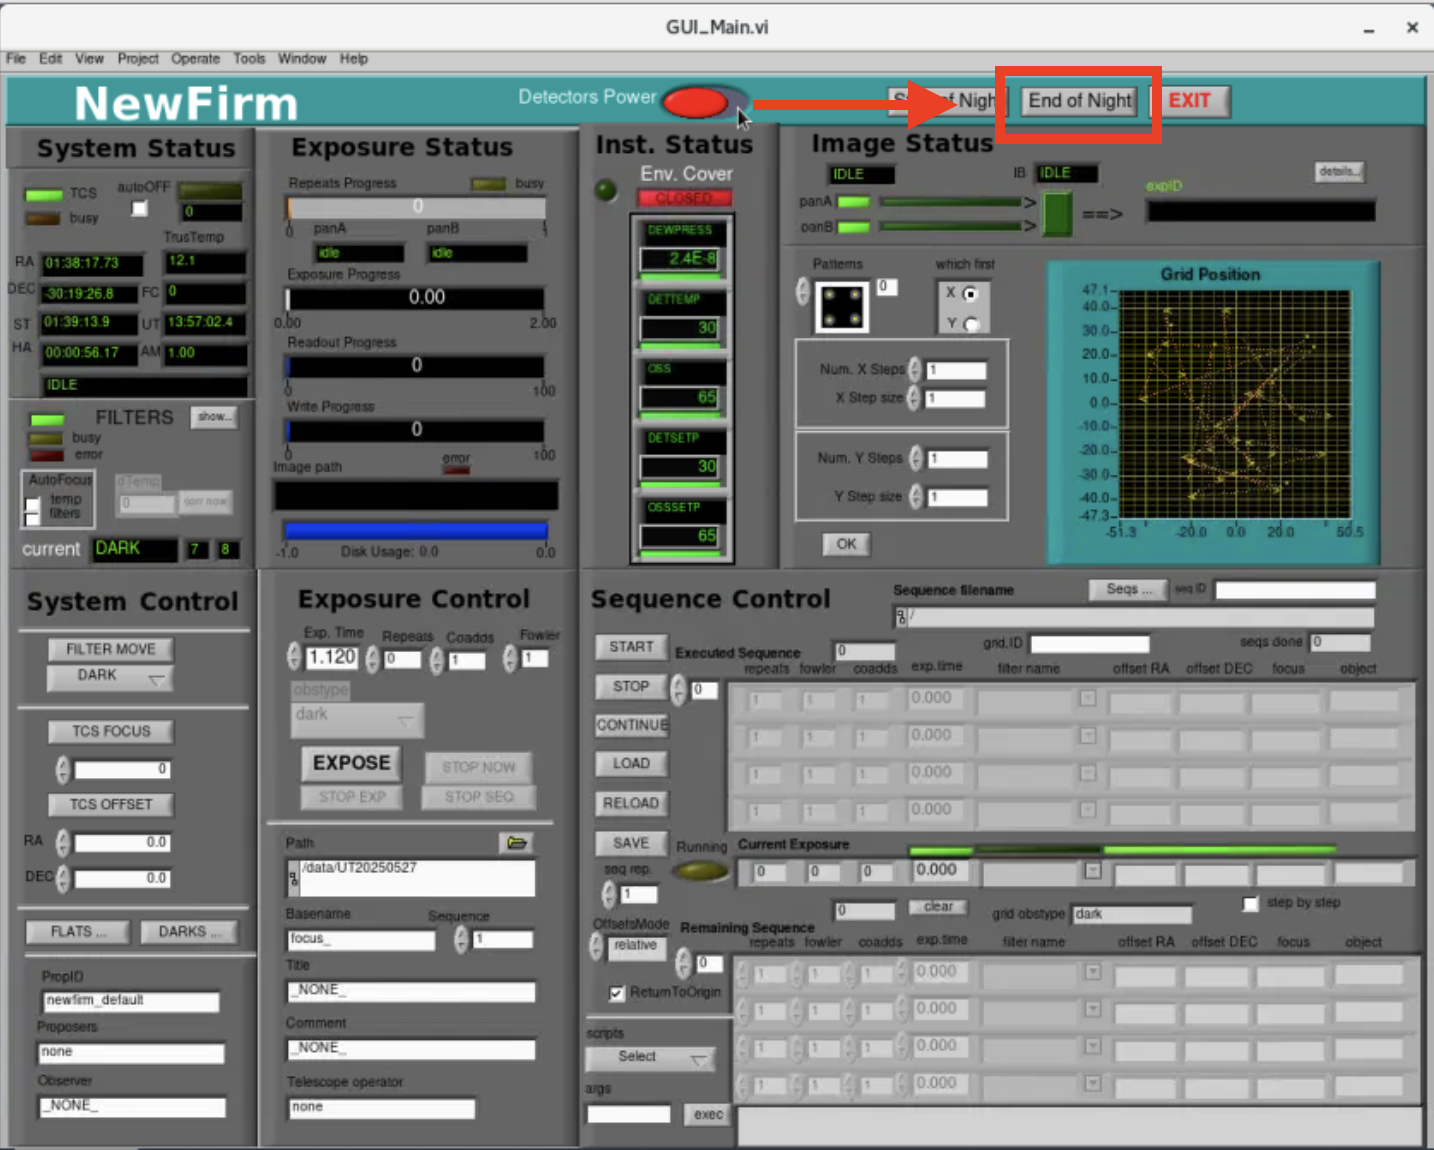
- Close the environmental cover. Pressing the "End of Night" button should do this. You can check on the NEWFIRM NICC vncviewer.


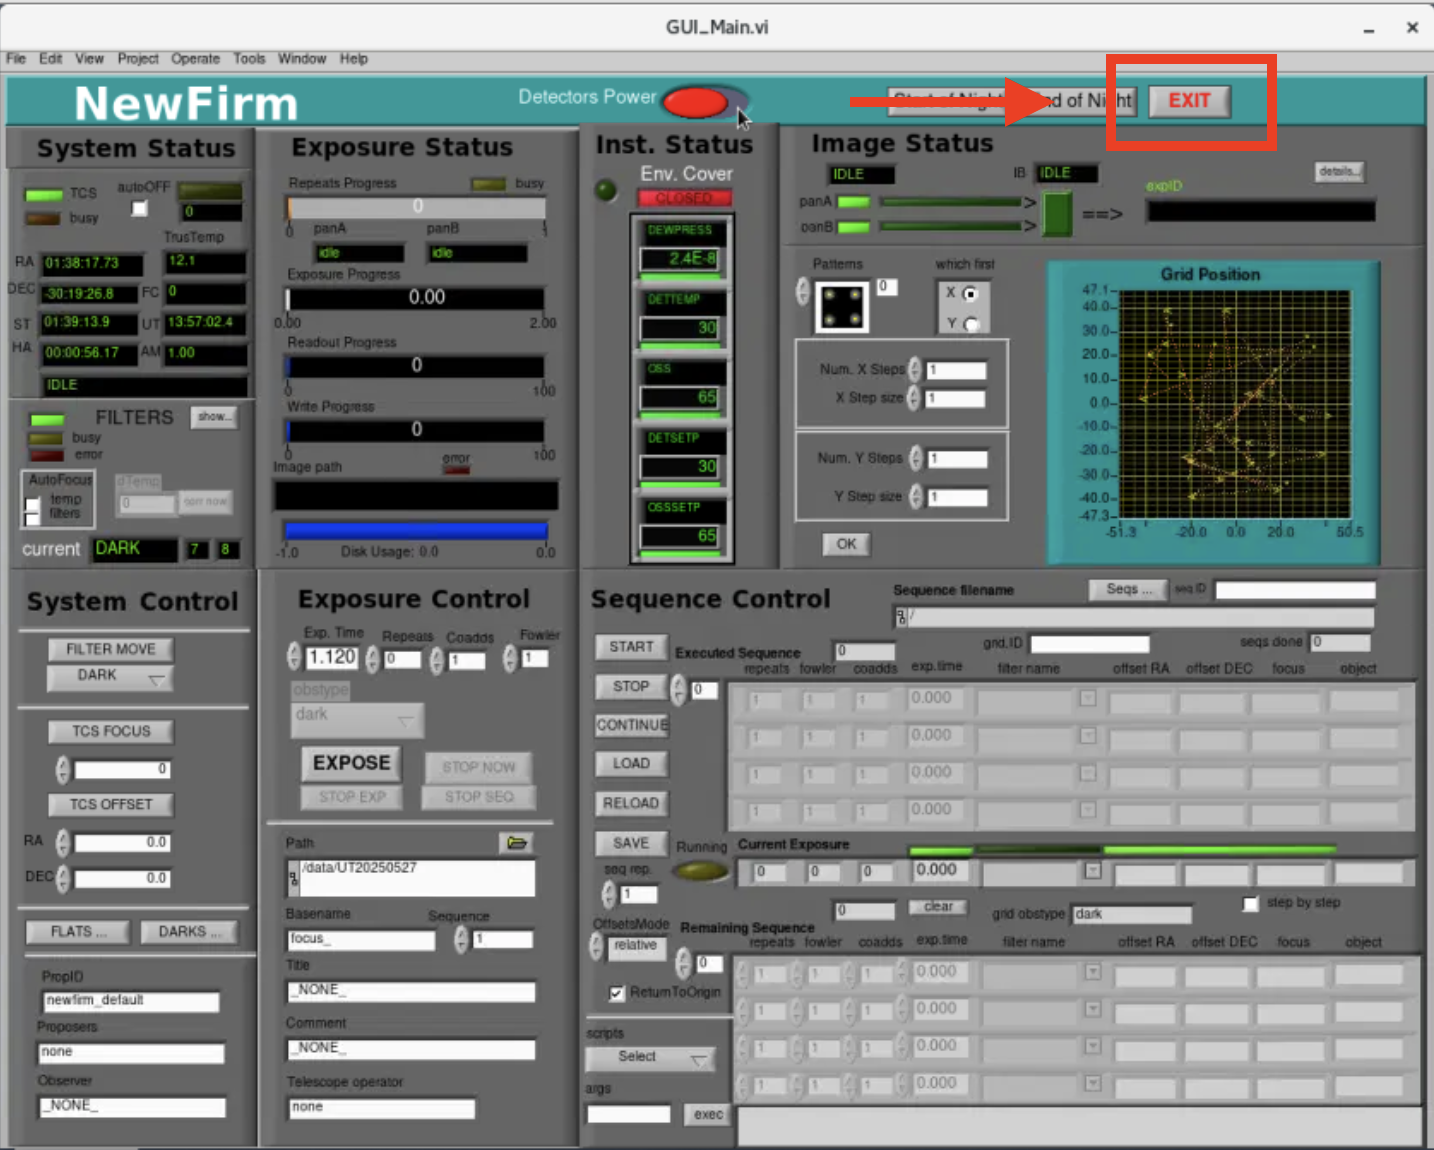
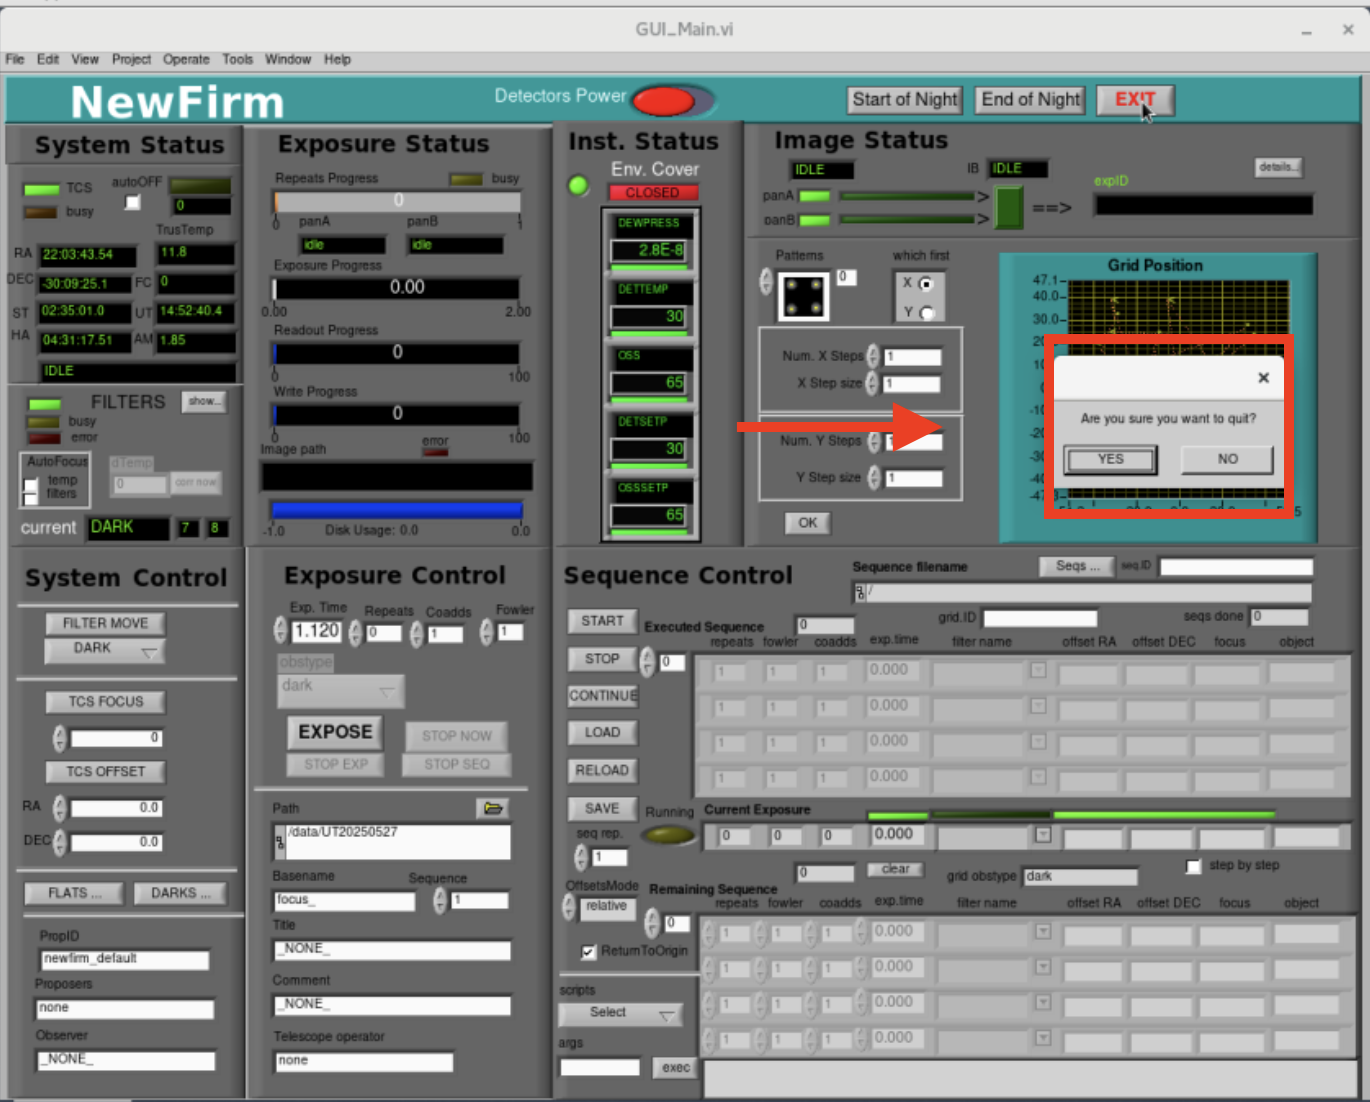
- Exit the NEWFIRM GUI.
Updated on June 5, 2025, 12:16 am
