SPARTAN Cookbook
This is a short description on how to make observations with Spartan. For an in-depth description of the instrument and further advice you should visit Ed Loh's Spartan web page. In particular, there's a detailed Observing Manual.
Setting up the data writing
Once you are logged in (log in instructions are given elsewhere), you will access the Spartan GUI (Fig. 1). Before you do anything further, check that the instrument is communicating with the telescope by verifying that the data on the right-hand panel look reasonable and that times are updating. If not, the operator will work with you to establish communication.

Fig. 1: The contents of the Observing tab.
When observing remotely, the first task is to tell the GUI where the data should go. Click on the "ObservingSetup" tab. (Fig. 2).

Fig. 2: The contents of the ObservingSetup tab.
If you are a NOIRLab user, choose 'NOAO' for 'remote directory'. This determines where the files will be written.
Type in the observer name and hit enter.
A directory will be automatically made in soaric7 at: /home3/observer/SPARTAN_DATA/NOAO/*your date* (where *your date* will be of the form, e.g., 2014-10-25). This is where your data will be saved. The date is the UT date of the most of the night.
Making an exposure
Now click on the "Observing" tab. You will stay here most of the night.
In order to make an exposure:
-Set how many exposures you want, right next to "Get N picture Pairs; N is"
-Set an exposure time. Shortest possible exposure is 10 secs. Shorter than that defaults to 10s.
-Give an object name. Spartan writes 4 fits files per exposure corresponding to the four detectors. Each fits has a suffix dn before the .fits, where n is the detector number. The distribution of the detectors can be seen in Fig. 3.
-Define the type of observation. Object (for science), flat field, zero, dark.
The grey boxes on the right indicate the current selection for the following:
-Select a filter and set it by clicking on "Change filter to".
-Set the field mask to 'LROpen'. This is the only one useful. HR mode is seldomly used and not recommended.
-Change pupil stop to 'LRLoose', although the LRTight pupil may be useful for K-band observations.
-Confirm ang resolution is "LowRes". You can't change it from the GUI so it's likely to be correct.
Every time you change one of these, make sure to click on the highlighted box on the right to actually make the change.
Finally, the exposure(s) is/are taken when you press the "Get N picture Pairs; N is" button.
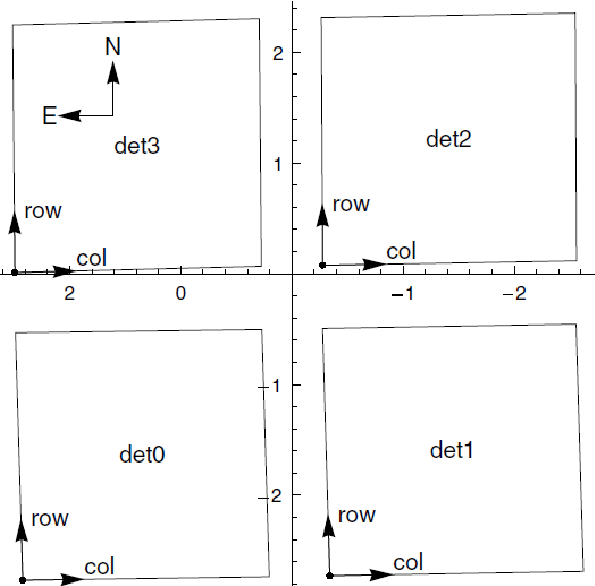
Fig. 3: The distribution of Spartan detectors. As of April 2015, the right side of detector 0 is not operational due to problems with internal connections. Detector 2 is an engineering grade array with some defects. If you are doing imaging of individual objects, it is recommended that you center them on detector 3.
Taking calibrations
You most likely will want to do calibrations during the afternoon.
Twilight flats are rather impractical, especially if using a large number of filters. To acquire dome flats, ask the TO to turn on the lamp. The following table gives the lamp intensities and approximate exposure times to obtain well-illuminated flats for the broad-band filters (for the LRLoose pupil except Ks):
For each set of dome flats you will need another set of dome flats (same exposure time and number of exposures) with the lamps turned off (ask the TO to turn them off). These are used to remove the thermal emission from the telescope/instrument/dome.
Note that saturated flats will appear with negative counts on the log. Take 9-11 per filter.
Take a set of darks for each exposure time you will use for your individual science exposures. Something like 9-11 darks is customary. For darks you will need to change the Pupil Stop to "DarkSlide". Take a series of bias frames. NOTE - when you change to the dark slide, a red "light" will appear next to the angular resolution entry which displays a message about inconsistent angular resolution when you mouse over it. This is normal. If the red "light" appears for any other configuration, you have very likely chosen an incorrect configuration.
At night: Moving to your target
When you ask the TO to go to a target this will be centered in the middle of the 4 detectors. You will need then to move your object into one of the detectors. Since, as of early 2022 only d1 and d2 are functional and d1 is more efficient, you will want to center your object in d1. (Detector d3 has many hot pixels, so it can be used if you are prepared to address them during data reduction.) To do this you go to 'put star on:' and select 'define as center', then click 'put star on'. Then select 'detector d1' and click again 'put star on'. That should put it on d1. You can now start making observations, although most likely you will want to script them. If the precise position of the target on the detector is important, you can take a test exposure and enter offsets (either pixels or arcsec) in the GUI (below 'put star on'), or ask the TO to make them.
Running a script
Observations at night are usually conducted using scripts which ease the large number of dithers NIR imaging requires. Scripts are controlled using the text-based user interface (TUI) (Fig. 4). If the TUI is not open, double click on the "SpartanTUI" icon on the desktop. Once the TUI is loaded, click on the arrow at the top left corner.
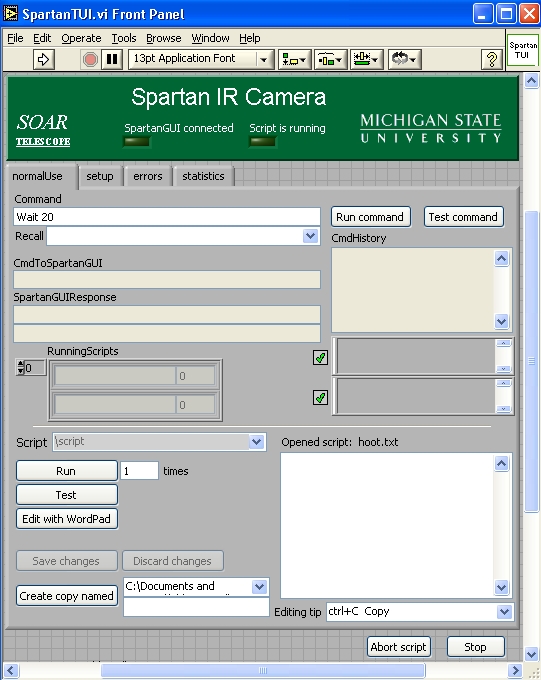
Fig. 4: The Spartan TUI. Remember to click on the arrow to activate it.
You can load scripts by choosing one under the "Script" pull down menu. The script will be loaded into the white box.
For example, the script sn_3x3_15step.txt, defines 9 positions separated by 20'' and then goes to each one of them taking an exposure. Scripts can be edited by clicking on "Edit with WordPad". If you are editing a script from a previous observer, make sure to save it with a new name. Once you have your script ready, click on "Test" in order to check the syntax. Once the test is passed you can now "Run" the script. More details on script commands (changing filters, exposure times, etc.) can be seen in the Observing manual (see links at top and bottom of this page).
The first script you will have to run at night is the one for the focus.
Making a focus sequence
Before doing any scientific observation you will need to focus the instrument. For this you will need to go to a relative sparse field, with bright stars, e.g. a standard star field. There are a couple of scripts called Dofocusxx.txt where xx is the step in which the focus is changed between exposures. If the seeing is good you will want a shorter step; use Dofocus20. For bad seeing, use Dofocus50. Each of them will take 7 exposures. Note there are other scripts called "dofocusstepxx". These will move the telescope between each exposure. Don't use them unless you want to determine the focus manually (not recommended). Use the J filter for focusing since it gives better image quality, although in case of bad seeing it doesn't really matter.
Determining the best focus
Unfortunately there have been enough updates that the Mathematica script no longer works. You can use IRAF 'imexam' to examine the focus frames individually, or IRAF 'starfoc' to examine the sequence. The latter requires you to make a list of the images or give the files a unique prefix when you carry out the focus observations.
IGNORE THE FOLLOWING - No longer works correctly. Once you have ran the focus script, go to the "ObservingSetup" tab in the GUI and click on "Start Focus Assistant". This will open Mathematica. A window with explanations will greet you (Fig. 5). To start the assistant click to the right of assistant[]; and press <Shift><Enter>. Answer Yes to the pop-up window. A new small window will appear (Fig 6).

Fig. 5: The initialization window of the focus assistant.
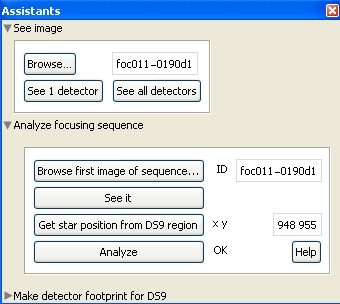
Fig. 6: In this small window you enter the first image of the sequence, as well as the position of the star to be measured.
Click on to the left of "Analyze focus sequence" and then identify the first image of the focus sequence under "Browse first image of the sequence". Clicking now on "See it" will open this first image in ds9. You will have to identify now which star on your field you will use for the analysis, and then click on the box that contains "1 1" coordinates. This will open a new box where x and y of your star should be given. Beware that boxes may be hiding behind each other! Then you will be ready to hit "Analyze". Analysis takes some time. Once is done you will see something like Fig. 7.
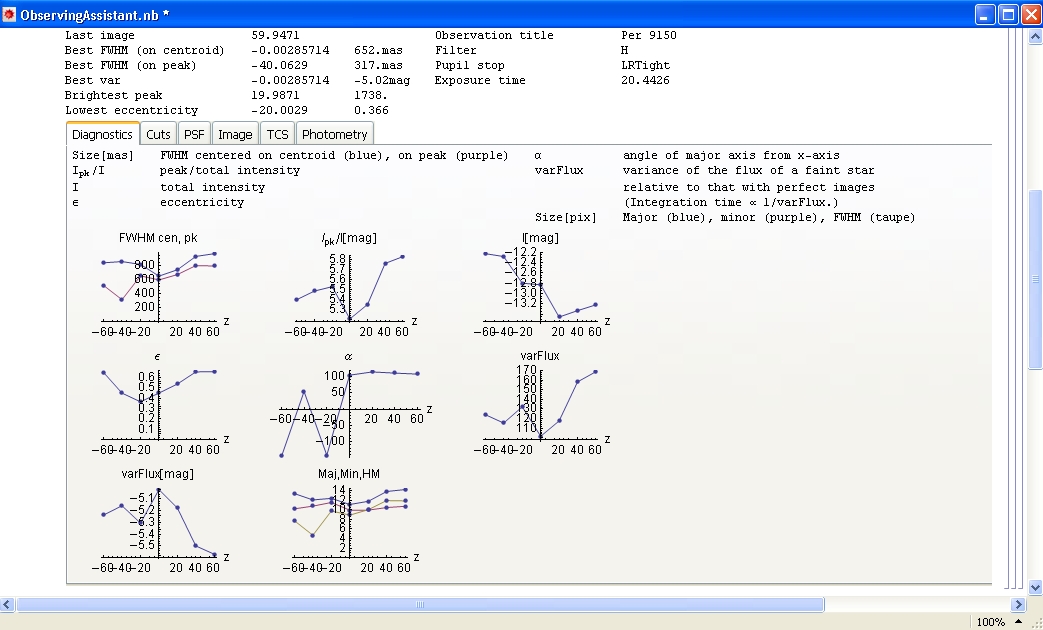
Fig. 7: The diagnostics tab of the Focus assistant results.
The observing assistant measures several quantities that are useful to determine the best focus. Things you may consider are the FWHM, the peak intensity, ellipticity, etc (See Figs. 8 and 9)
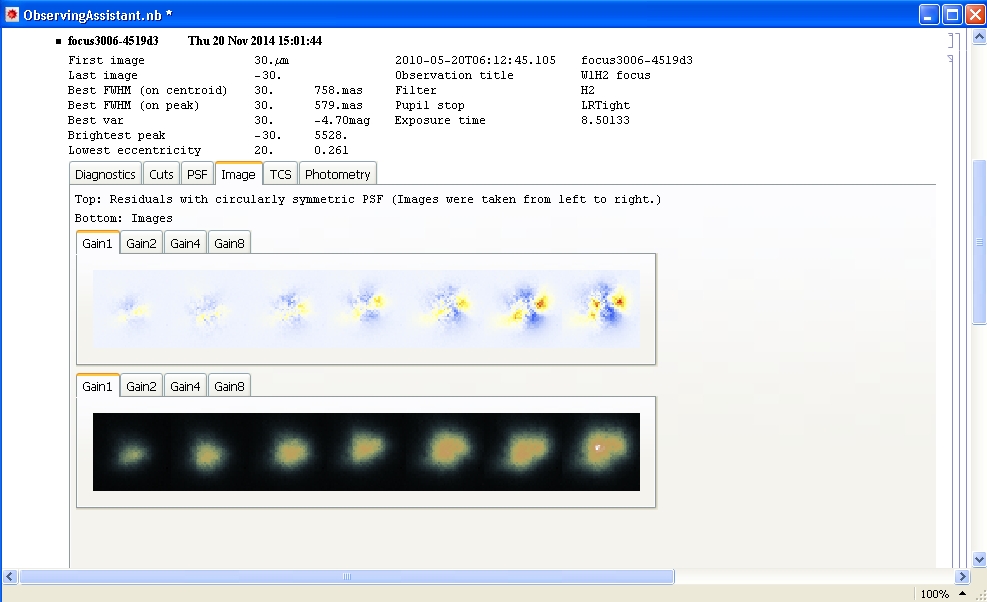
Fig. 8: The image tab shows the shape of the selected star as well as a the residuals after removing a cylindrically symmetric average. The smaller and rounder, the better.
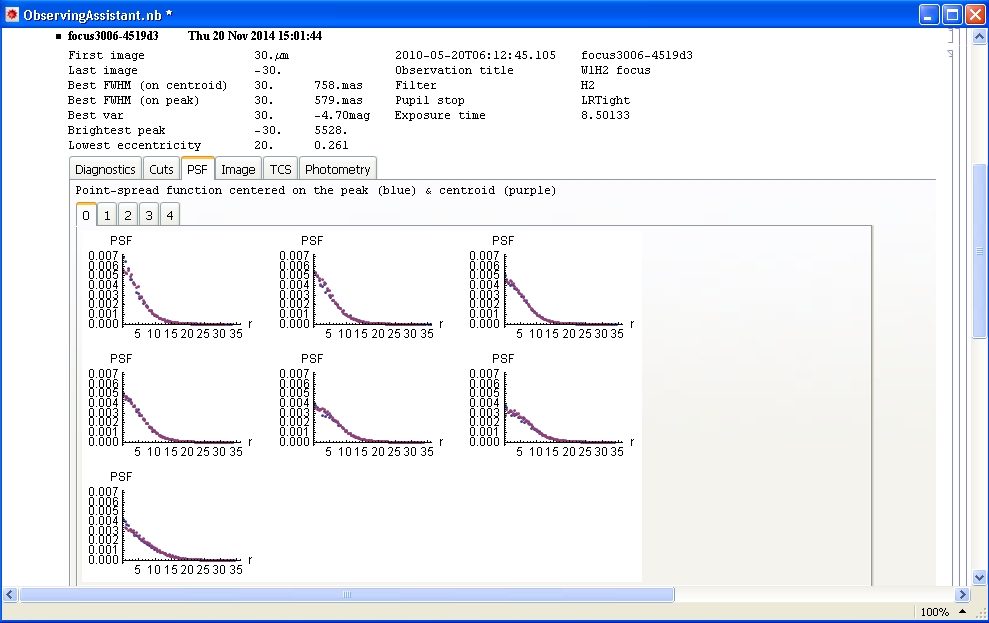
Fig. 9: The PSF tab shows the point spread function. Probably you want something peaky.
Once you have decided the best focus go back to the observing tab on the GUI and enter this value in the "Move focus by" box. You can now close all the Mathematica windows and finally start observing!
Troubleshooting
- If one of the detectors that is supposed to be working is not, ask the TO to switch power off and on. That usually fixes it.
- If a big shadow is seen on the images, and re-initializing mechanisms doesn't fix it, it might be condensation on the window.
- More troubleshooting suggestions can be found on the troubleshooting web page.
Much more information about Spartan can be found at Ed Loh's Spartan web page.
Updated on April 18, 2024, 9:42 am