Spartan Trouble-Shooting
This page describes some relatively common issues and their (potential) solutions.
Start-Up Issues
1) If the instrument hasn't been used for a while, it may have lost communication with the telescope. Symptoms can be that the panel on the observing tab is frozen, with sidereal time not updating, or else displaying meaningless information. Advise the telescope operator, who can restart the connection. It may be necessary to restart the Spartan GUI as well. See the second bullet under "recovery and bad images", below, for how to do this. If for some reason you have started calibrations before checking this, the calibration data are still usable.
2) It is common for the remote disk not to mount correctly if the Spartan computer is re-started (re-booted). This is different from re-starting the Spartan GUI, which retains the remote disk connection. If the remote disk does not mount when selected from the "Observing Set-Up" tab, what you need to do is the following:
- Open the "My Computer" icon on the desktop (double-click)
- Drive "M" will likely show a red "X"; click on the icon and it will ask for credentials to connect
- Double-click on the desktop icon labelled "ic7_connection", which is a text file listing the credentials. Enter these.
- The remote drive should mount OK.
- If it fails to do so (and you typed the credentials correctly), then it is probably necessary to ask someone to start the server process on ic7. That should not be required unless ic7 itself was restarted recently; check that you typed the disk mount credentials correctly first.
Mechanism Issues
Generally, the instrument remembers where the mechanisms are positioned, so that all you need to do is specify where you want them to be. But in some cases (for example, system crash while moving a mechanism), you will need to re-home them. From the "Instrument" tab you can both test the home positions and find the home positions of each mechanism. If you need to initialize, use the "find" command for each of the 3 active mechanisms - Filter Wheel, Stop Wheel and Mask Wheel. (The camera mechanisms are not used, don't try to move them. But see the entry on camera mechanisms below.) After the home position is located you will need to position each wheel to a useful position. For the mask wheel, this is "LR Open". This is the only time you will need to move the mask wheel. The figure below shows the relevant part of the interface. These steps are not normally required if you are just restarting the GUI.
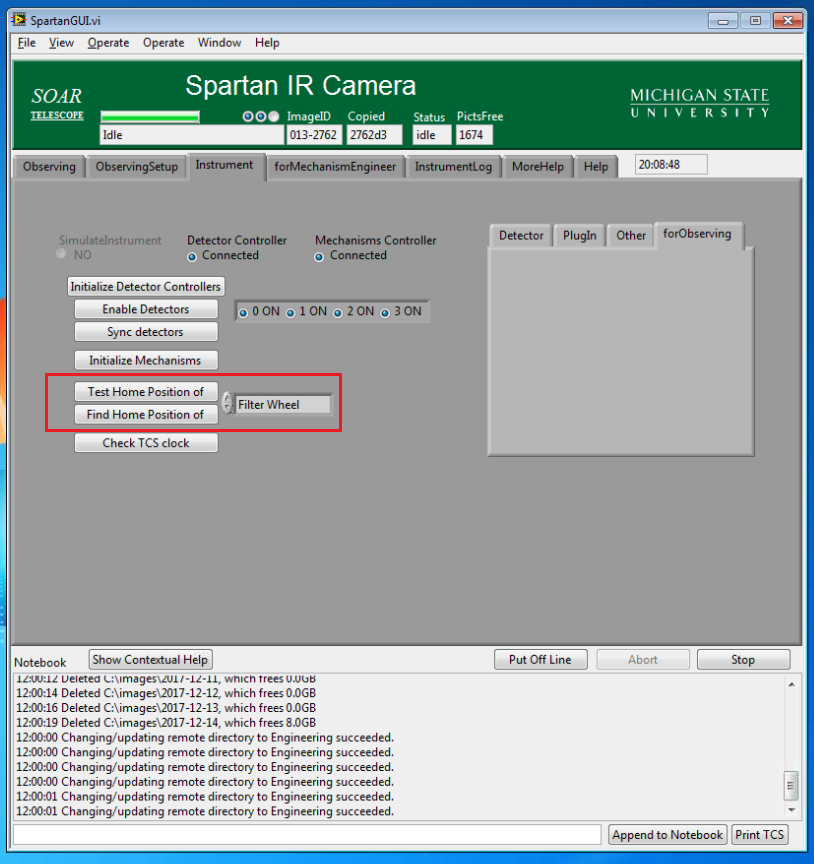
If you want to, you can open the "Mechanism Homing" window from the "Window" menu on the menu bar at the top; this lets you see things happening but is otherwise not needed.
If the instrument allows you to change filters at all, it is likely that the mechanisms are positioning correctly. The "test home" allows you to check without resetting anything. The "home" positions should be a few hundred steps different from zero at most. The same "homing" window will let you watch this as well.
Camera/Collimator Mechanisms
The re-imaging optics are controlled by two mechanisms - one for the camera mirror and the other for the collimator mirror. These should always be in low resolution mode, but there may be rare occasions where the mechanisms have moved and need to be re-positioned. It is strongly recommended that you contact one of the instrument support scientists before taking any action, but what should be done comprises the following:
- Find home for both the collimator and camera mechanisms (as in the screen above); this will likely cause the red angular resolution warning on the observing tab to appear.
- Open the forMechanismEngineer tab, where you will see entries on the right to set the collimator and camera - set both to low-resolution (f/12). Note that setting the resolution from the observing tab is disabled, so you have to do it this way.
Recovery and Bad Images
If the system hangs, there are several levels of recovery available - try these in order.
- From the "Instrument Tab", press the "Stop" button, then "Put Off Line". That button will change to "Put On Line" - press it again. The system will then initialize and take a test image. If that occurs, from the "Observing" tab click on the "See" button to the right of the object name (it should be set to "last" and "All det" below). This should bring up a ds9 window with the detectors; you may need to adjust the display parameters (in particular, scale to "zscale"). See the figure below.

NOTE - it is possible to stop the GUI, for example by clicking inadvertently on the red "X" on the upper right. The instrument status will show "stopped" instead of "idle". The "run" arrow (see above) should be visible; click on it and the GUI should recover. You will likely also need to click the "run" arrow for the scripting interface (TUI).
- If this doesn't work, you can restart the GUI. This is not the same as restarting the instrument computer! The steps are as follows:
- From the leftmost "Operate" menu at the top of the GUI, select "Stop". The "run" arrow should appear on a menu bar just below; click on that to restart. This procedure will also work on the scripting GUI (TUI) if that is where the problem is happening.
- If that fails to work, instead of clicking on the "run" arrow, open the "File" menu and click on "Exit"; click "Yes" on the prompt and the GUIs will all disappear. Now double-click on the "Spartan GUI" icon on the desktop. It will open and you can then click on the "run" arrow as above. This procedure will also close the scripting GUI (TUI); doing these steps on the TUI will also close both interfaces.
- These last two steps are not much slower than the first one, but you will need to reset more parameters (observer name, remote directory, mechanism positions) as you progress.

- The steps above will solve most problems, but if operation is still not nornal (especially, peculiar images), you may need to restart the computer and the Spartan electronics. If this is during the day, the day crew can help. The required steps are:
- Shut down (do not "restart") the instrument computer (from Windows icon on left end of taskbar on desktop)
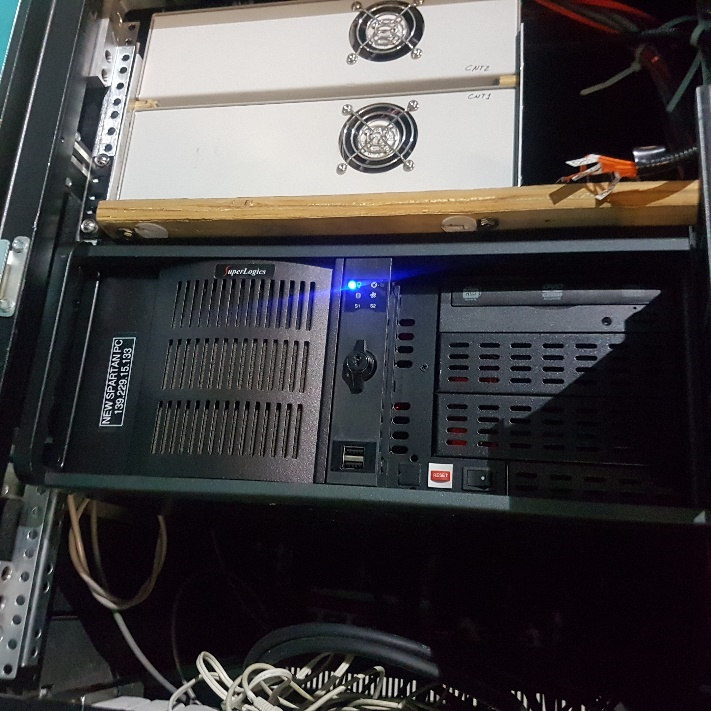
- Have the operator unplug the instrument electronics from power for ~5 minutes. The power connection is inside the rack on the Nasmyth platform; it is the white cable on outlet 6 (see the figure below). The delay is necessary to allow time for capacitors, etc., to discharge.
- Plug the electronics back in on outlet 6 and wait for things to re-start (a couple of minutes)
- Turn on the instrument computer inside the rack (see figure below); when it is ready for the observer to login the VNC connection will work again
- Log in (usual observer log in)
- Start the Spartan GUI as above
- Note - this procedure applies if the problem behavior is uniform - e.g., problems with exposure times, all detectors have the same issue. If the problem is restricted to a single detector, then the day crew is required to review the connections internal to the detector electronics. Also note that problem quadrants on the detectors are due to wiring internal to the cryostate and cannot be solved by the day crew.
|
|
The left-hand figure shows the power connection. The right-hand figure shows the PC controls. |
|

Updated on May 10, 2023, 5:55 am